Operator’s guide
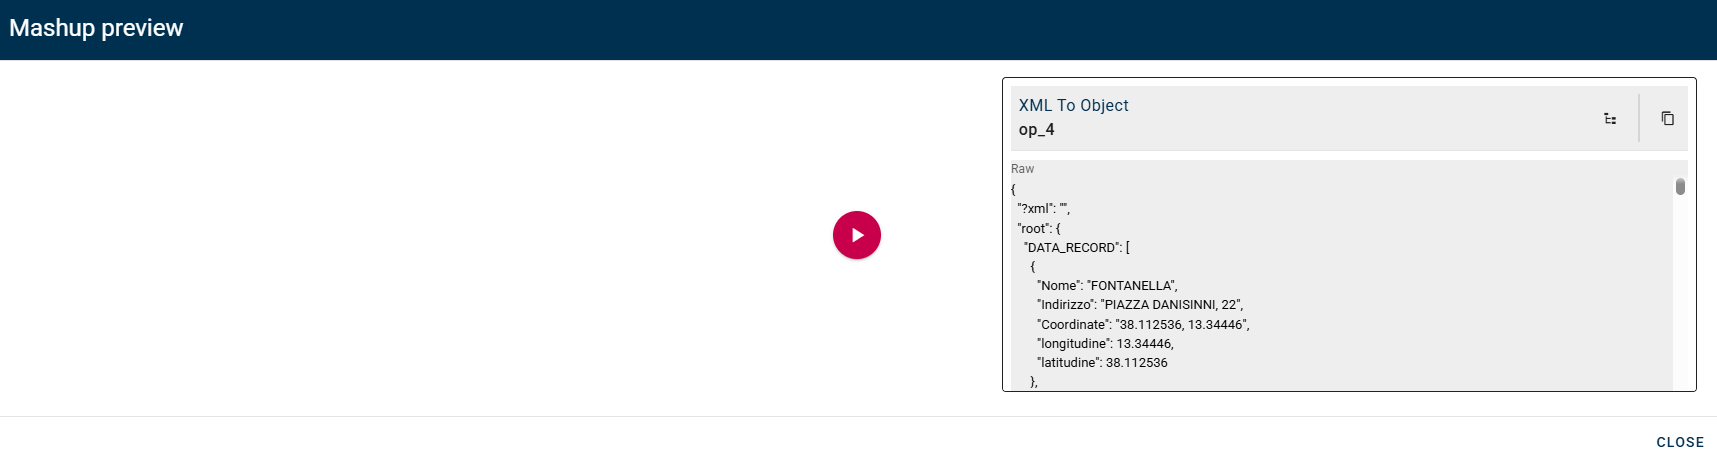
How to preview
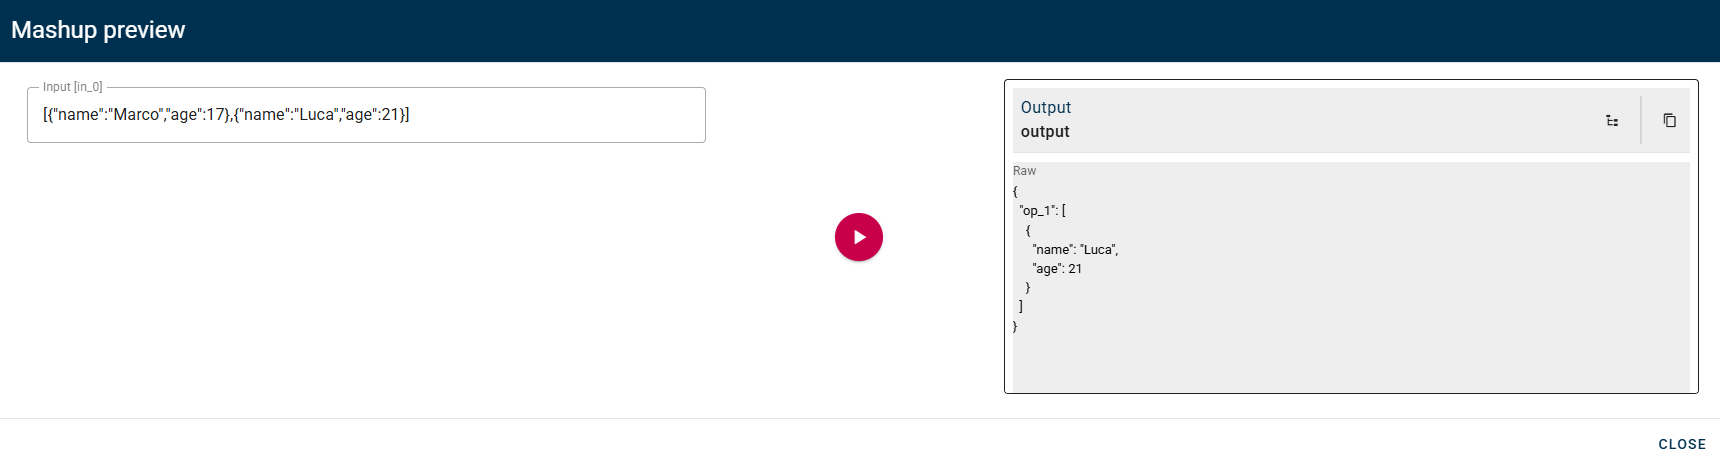
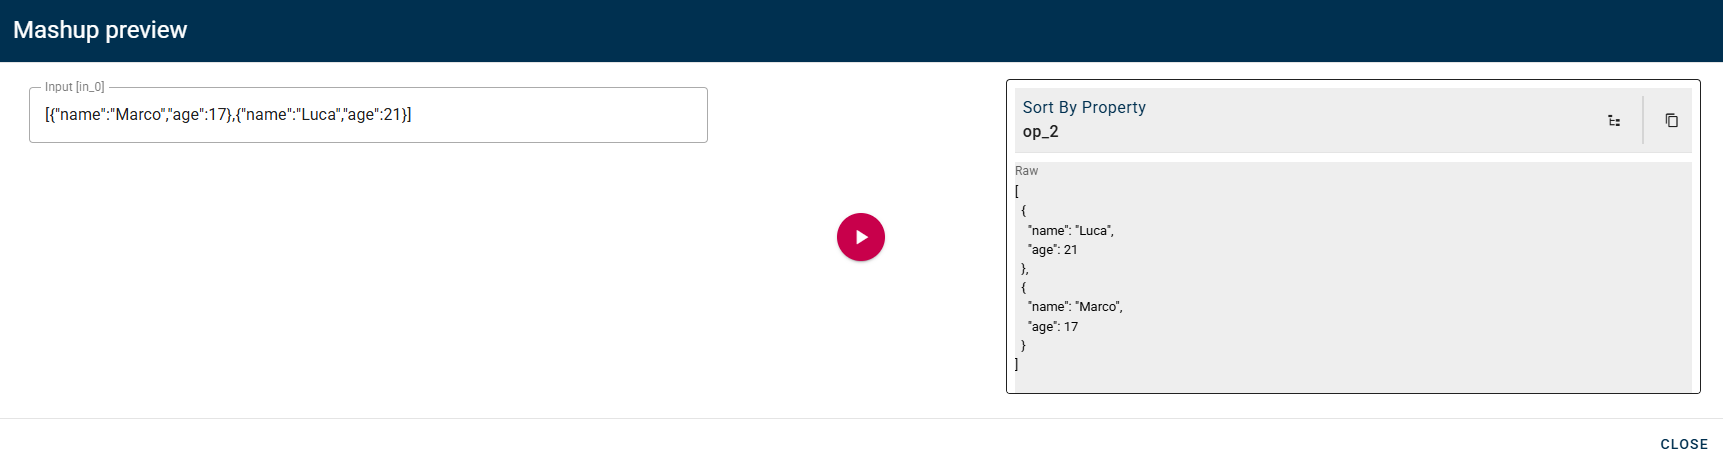
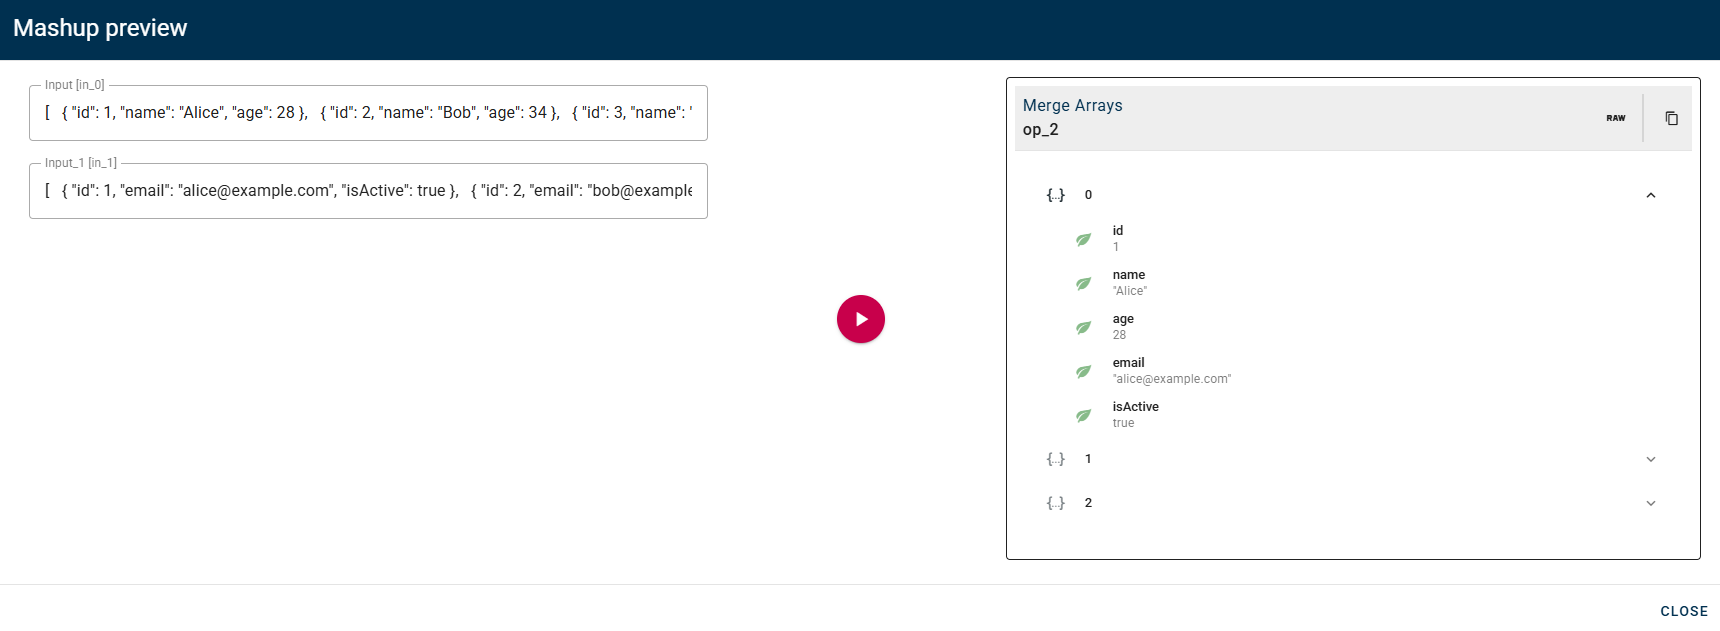
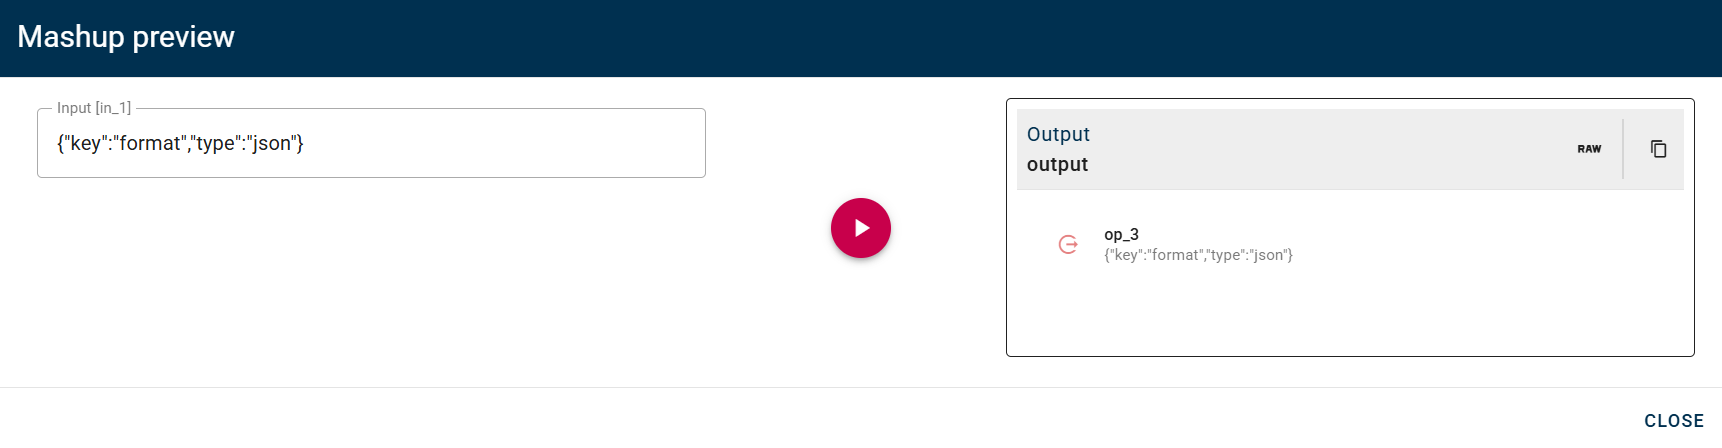
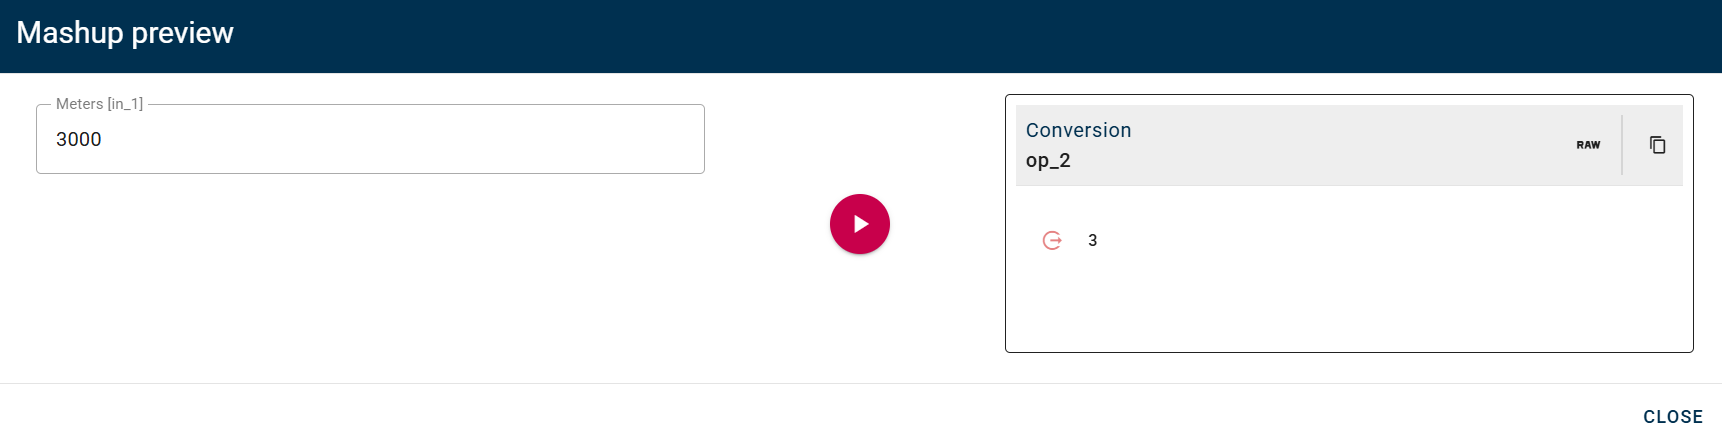
Before examining individual operators in detail, it's essential to understand how the preview functionality works.
Once you've created a mashup by connecting various nodes and have ensured that the connections between input nodes and output nodes are properly configured, you can execute the mashup to test its behavior.
The system provides two distinct preview modes:
- Single operator preview: By clicking the preview button in a specific operator's toolbar, you can view the output produced exclusively by that operator. This feature is particularly useful for debugging and verifying the functionality of individual components.
- General mashup preview: By pressing the RUN button in the main toolbar (located at the bottom), you obtain the final output of the entire processing flow, which corresponds to the result that will actually be sent to the destination target.
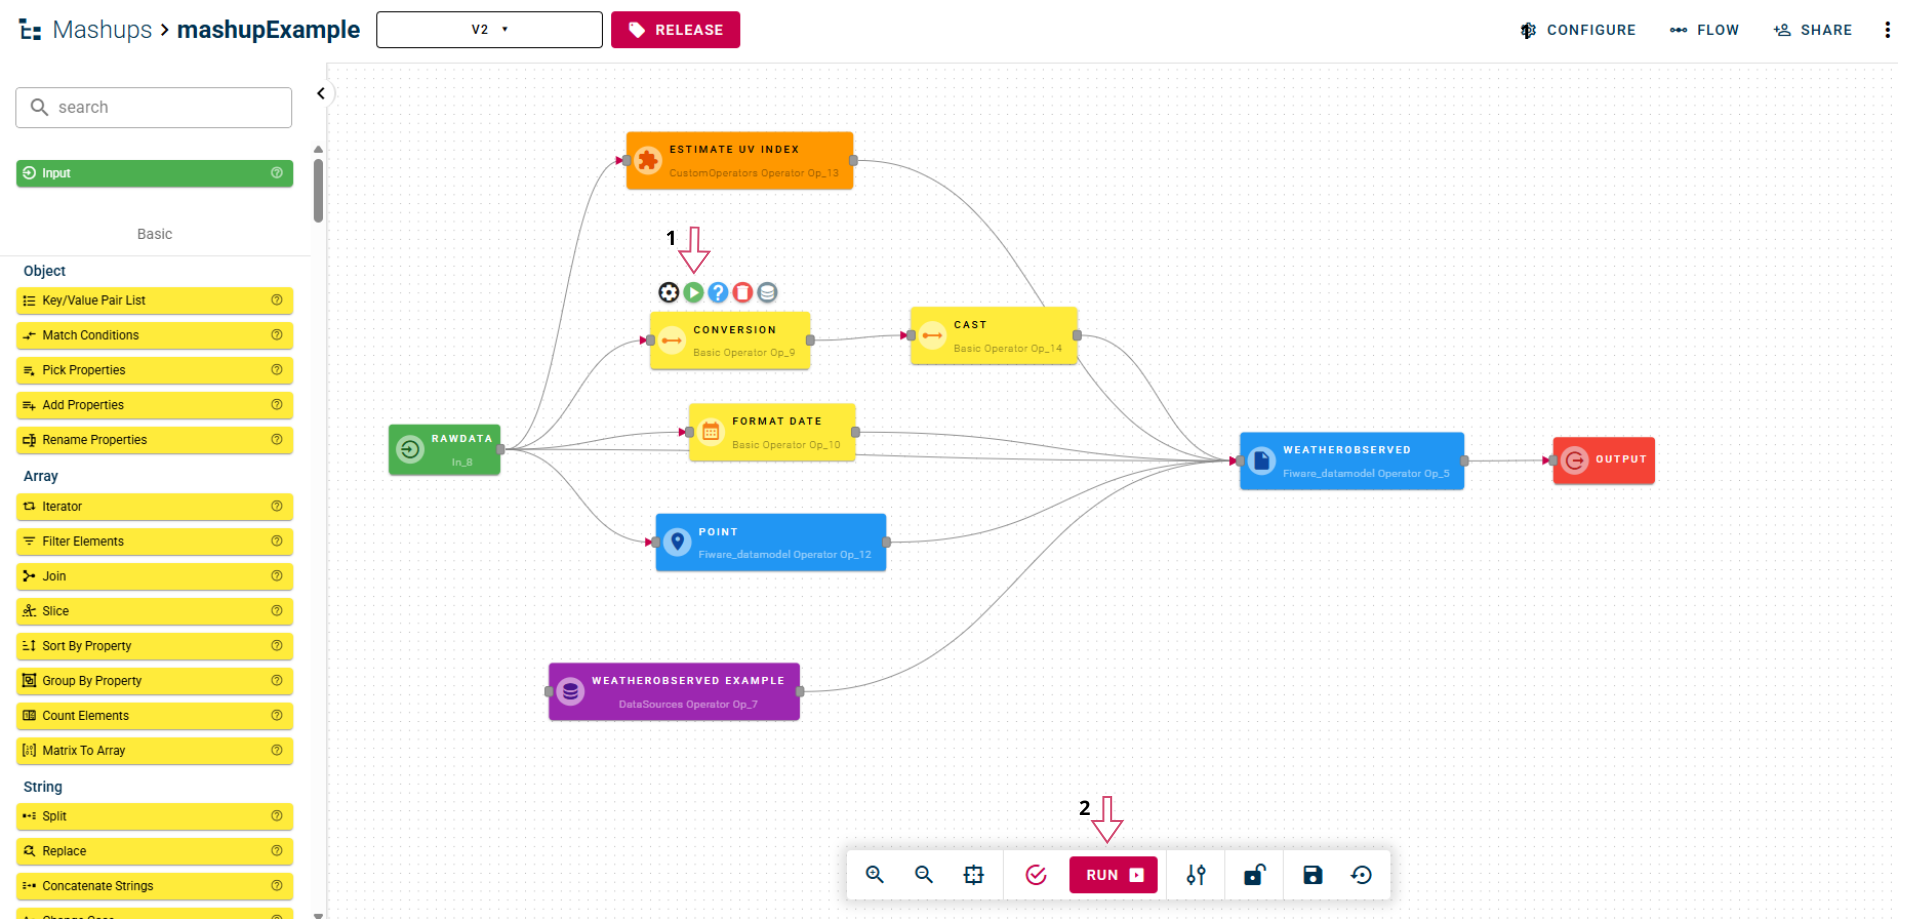
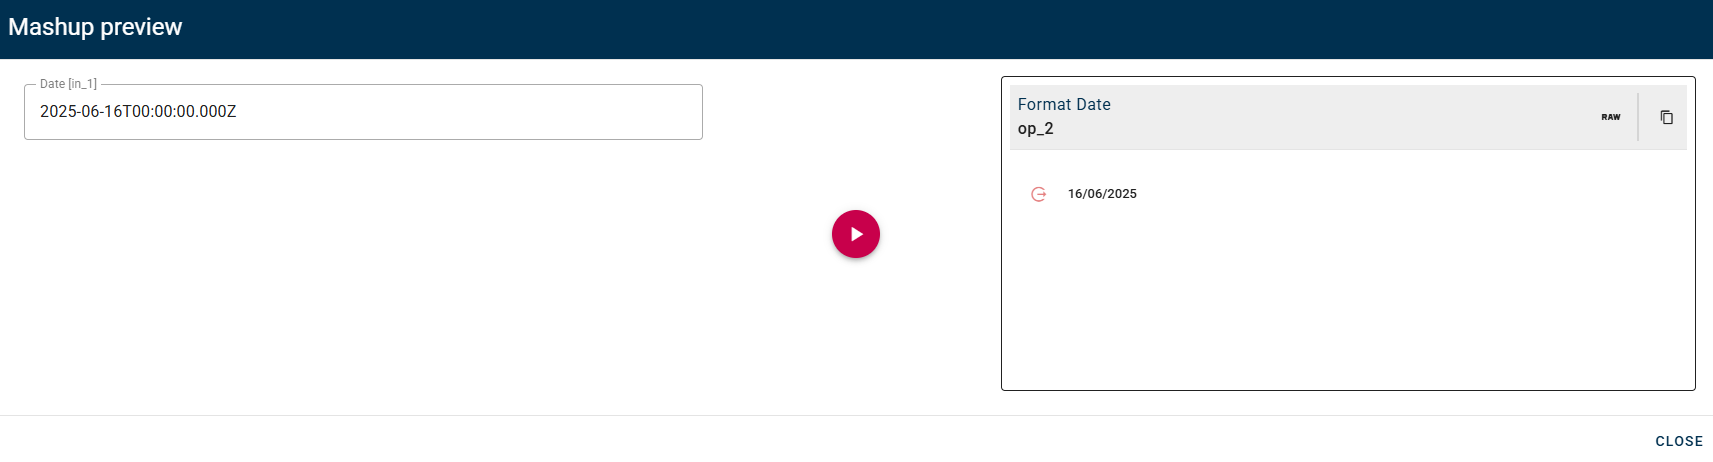
An important aspect to note is that when the preview modal window opens, you can dynamically modify the mashup input using the control panel located on the left side of the interface. This functionality allows you to test the mashup's behavior with different data sets without having to modify the main configuration.

Custom Operator
The custom operator options allow you to create your own operator,based on your needs, click "create custom operator" to start building your own operator.

Once the custom operator gui is open you will see the following screen:
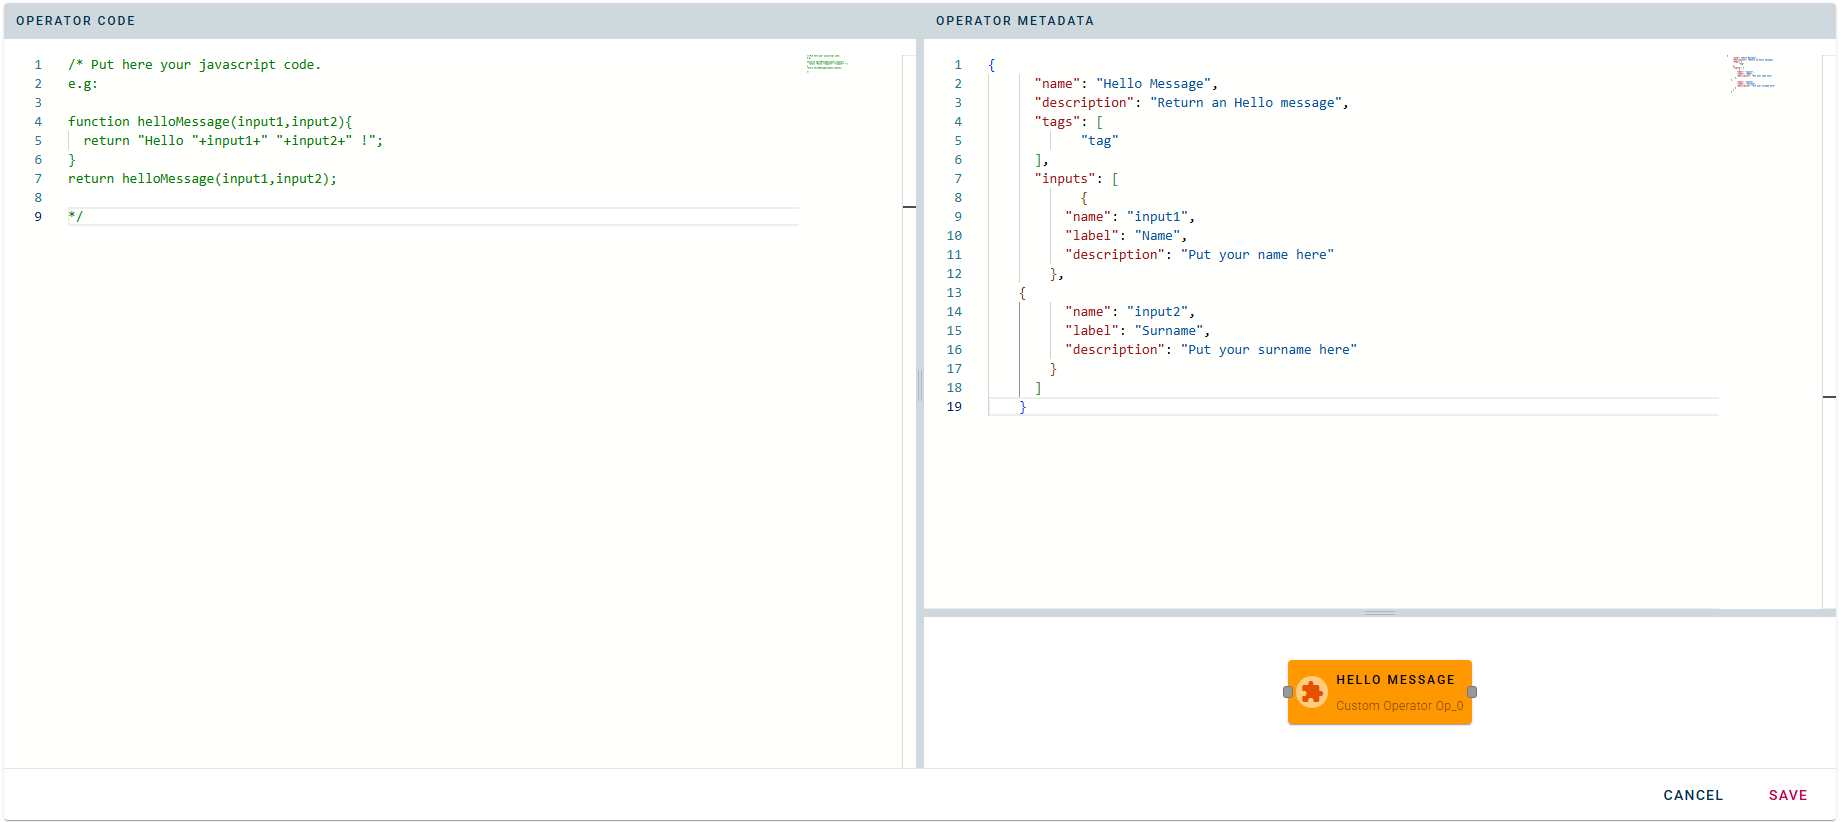
In this window, the left section features a vanilla JavaScript code editor where you can write the code that the operator will execute. The inserted code functions as a main function and is executed directly by the system. The code can be structured in different ways:
- Linear code: All code can be written sequentially in the editor
- Modular functions: The code can be divided into multiple separate functions that will then be called by the main logic
The input parameters required for code execution are defined and configured in the right section of the interface, allowing for a clear separation between processing logic and input data configuration.
The operator metadata is composed by the following fields:
- Name: the name of the operator
- Description: a description of the operator
- Tags: a list of tags to help you find the operator in the operator list
- Inputs: the list of the inputs of the operator
- Name: the name of the input (name should not contains space or special characters). The parameter can be recalled in the code editor using this name.
- Label: the label used to indicates the parameter in the modal of the operator
- Description: a description of the input
Object
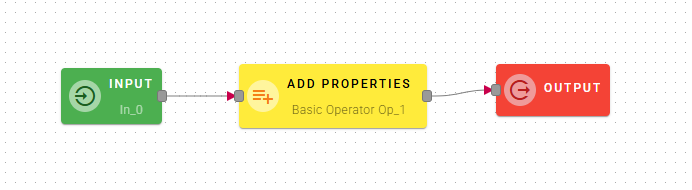
Add properties
Add new properties to an existing object given as input to the operator. This operator allows you to enrich data objects with additional fields as needed.
 .
.
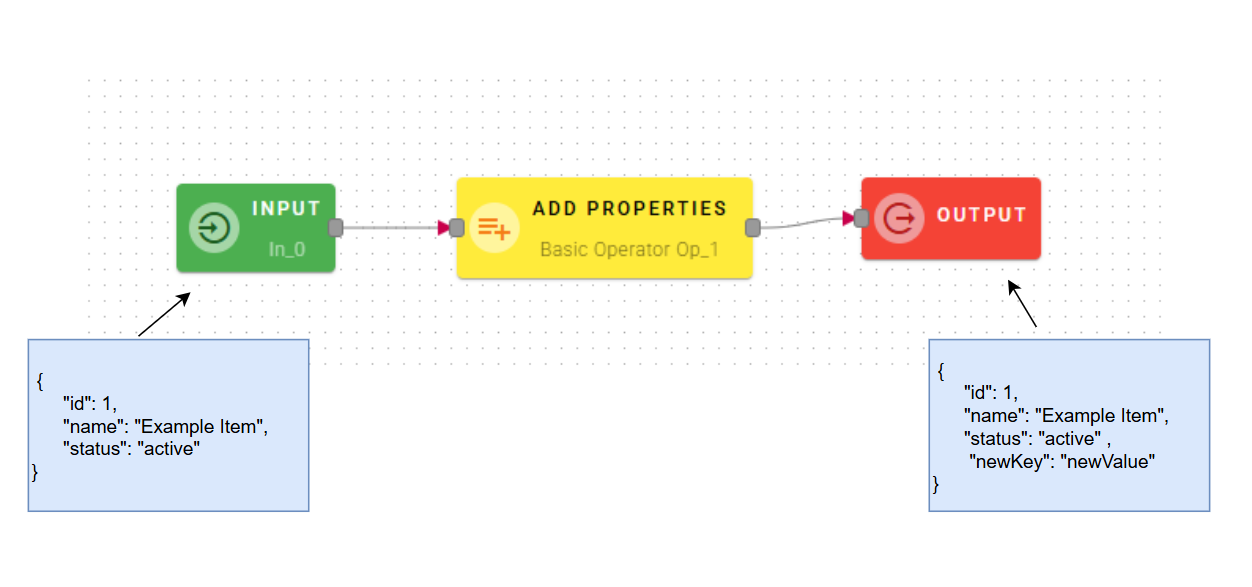
Input/output example
The operator accepts a json object as input and returns a json as output to which it adds the key-value pair(s) relating to the properties added by the user.
How to use
NOTE: This operator is designed to handle flexible inputs and can accept both single objects and arrays of objects. When it receives an array of objects as input, the operator automatically applies the operation to each element in the array iteratively. In this case the configured fields will be added to all objects within the array.
Connect your input to the operator, within the source tree, locate and select from the input one of the object. You can do this by clicking on the appropriate node within the source tree and drag-and-drop it into the source object field
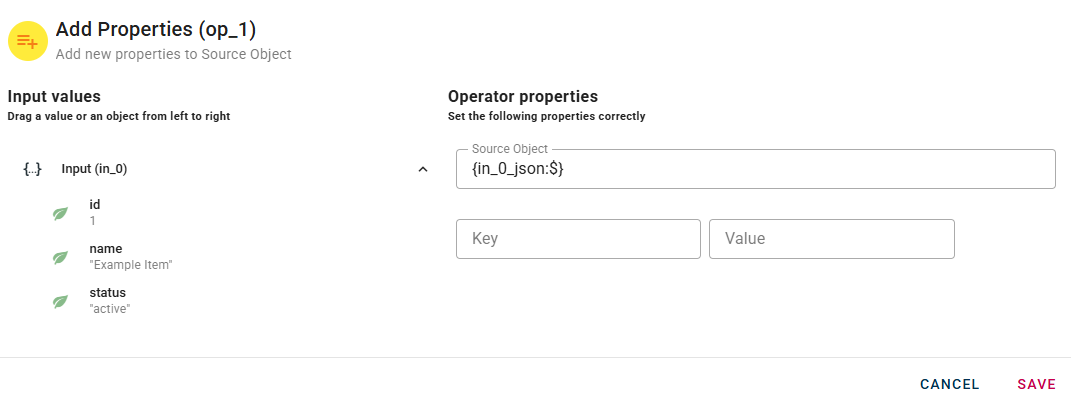
Once your object is in the Source Object you can start add more property to it.
As you can see, under the "Source Object" field there are two fields to enter the key of the new property and its value.
When you enter a property (key and value), a new empty line will automatically appear to add another. This process is repeated for each property you add, allowing you to enter as many properties as you need.
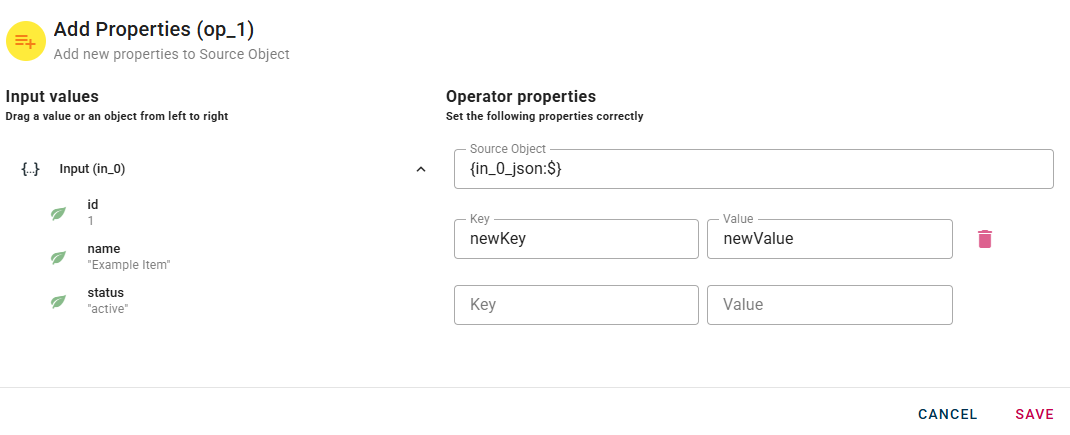
If you have entered a property incorrectly you can easily remove it by selecting the trash bin button, and if you have entered a value incorrectly you can easily change it by clicking on the relevant field and changing it as you wish.
Click SAVE button to save the configuration and then generate your output.
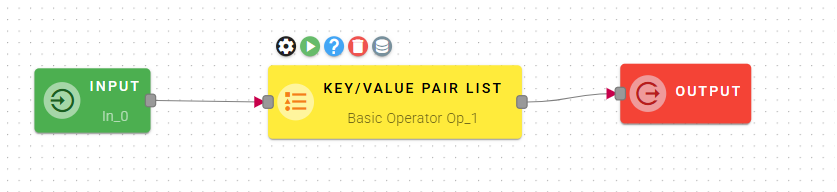
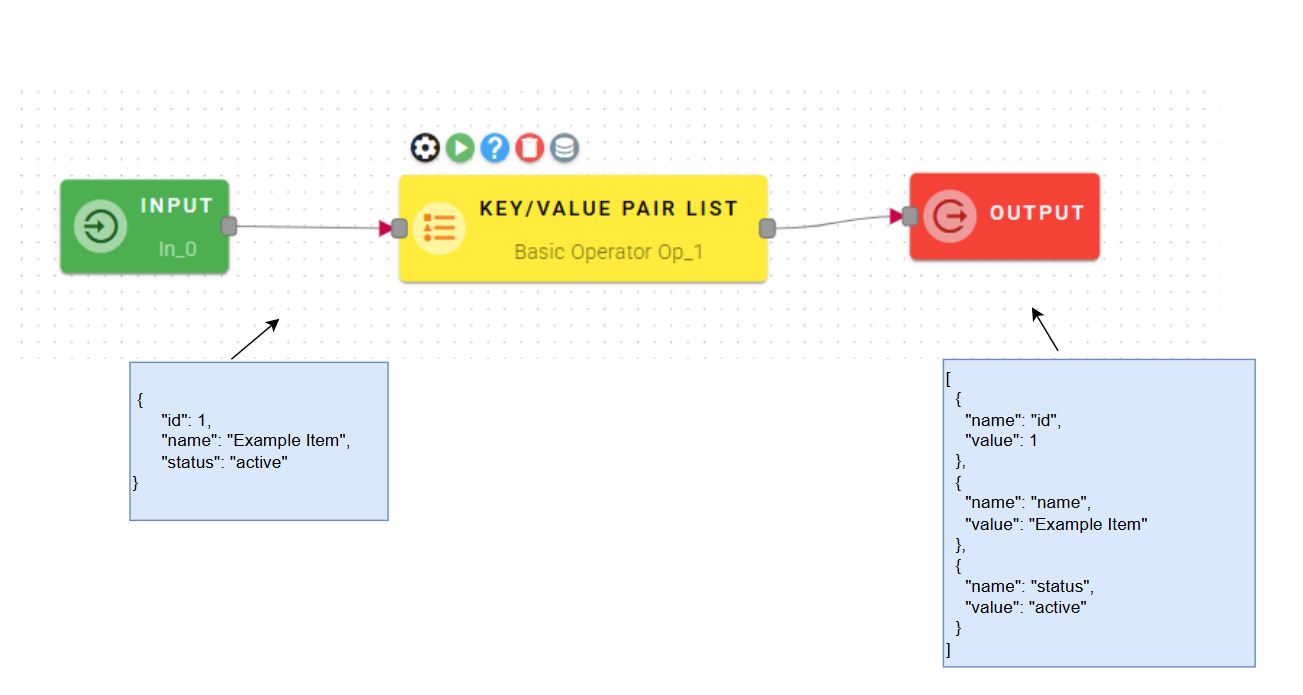
Key/Value Pair List
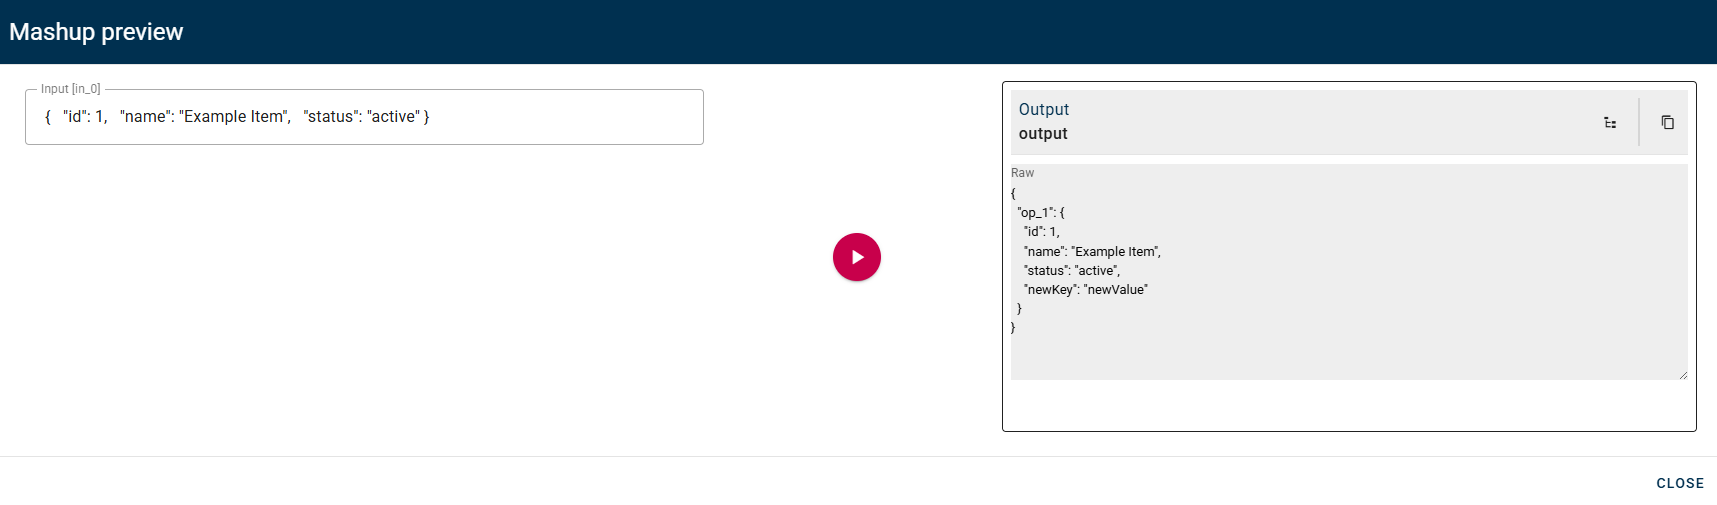
This operator allows you to convert an input object into an array of key-value pairs of the object itself.
Input/Output examples
How to use
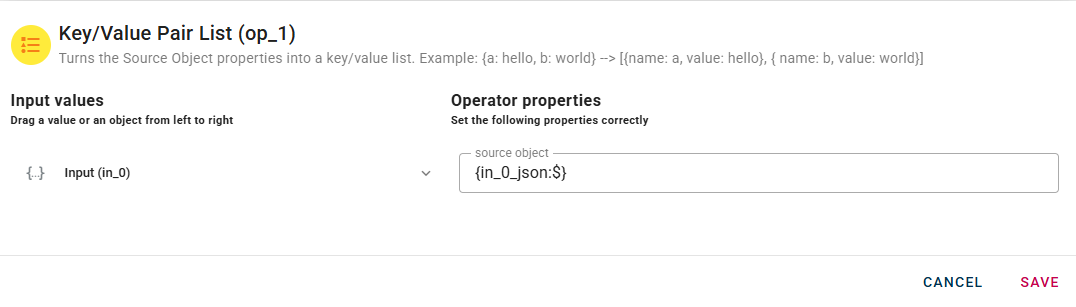
Within the source tree, locate and select the input object that you want to convert into an array of key-value pairs. You can do this by clicking on the appropriate node within the source tree.

With the desired input object selected, drag and drop it from the source tree modal into the designated source object field within the operator's interface. This action associates the selected object with the conversion process.
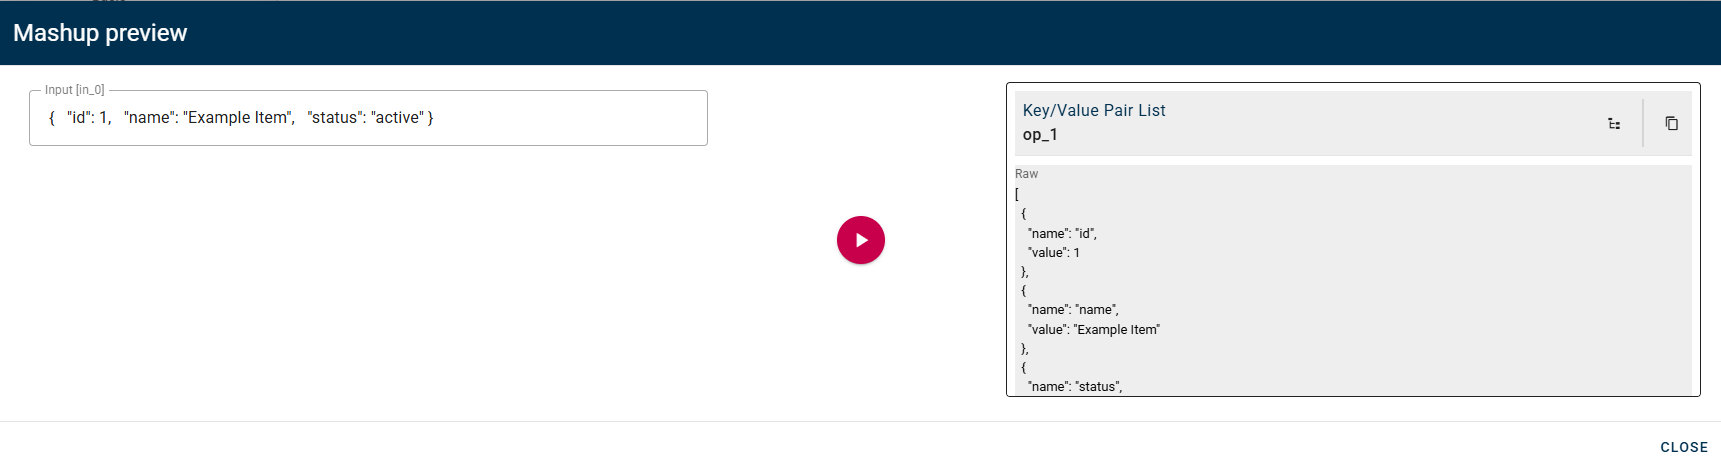
Click SAVE button to save the configuration and then generate your output, which will be an array of key-value pairs.
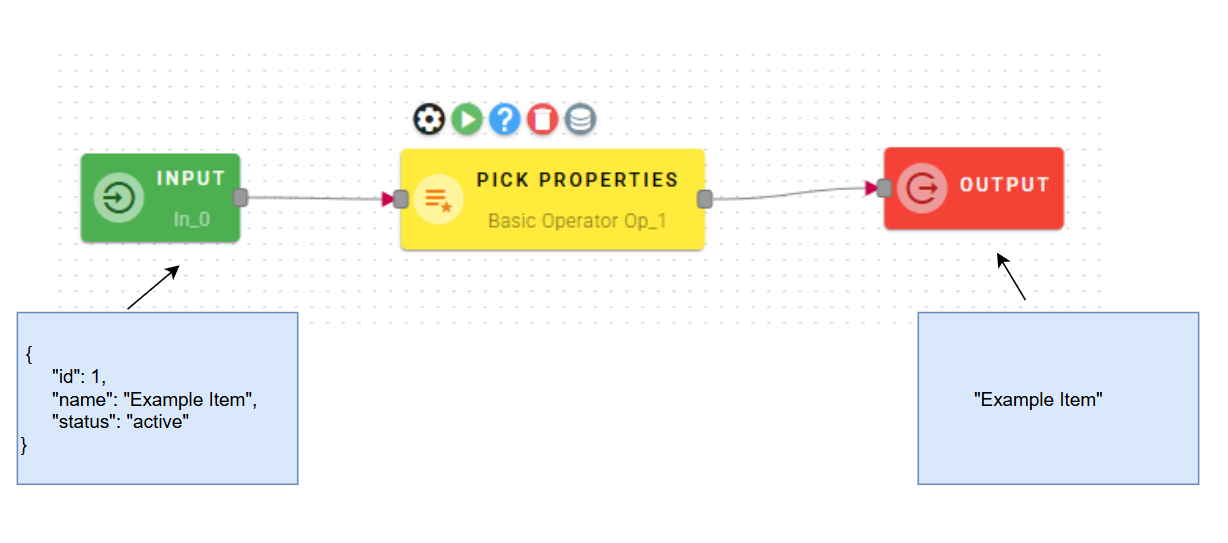
Pick properties
This operator allows tou to create a new object that contains only the selected properties from another object.

NOTE: This operator is designed to handle flexible inputs and can accept both single objects and arrays of objects. When it receives an array of objects as input, the operator automatically applies the operation to each element in the array iteratively. In this case the configured fields will be picked to all objects within the array.
Input/Output examples
How to use
After connecting your input into the operator you can drag-and-drop your object into the Source Object field.
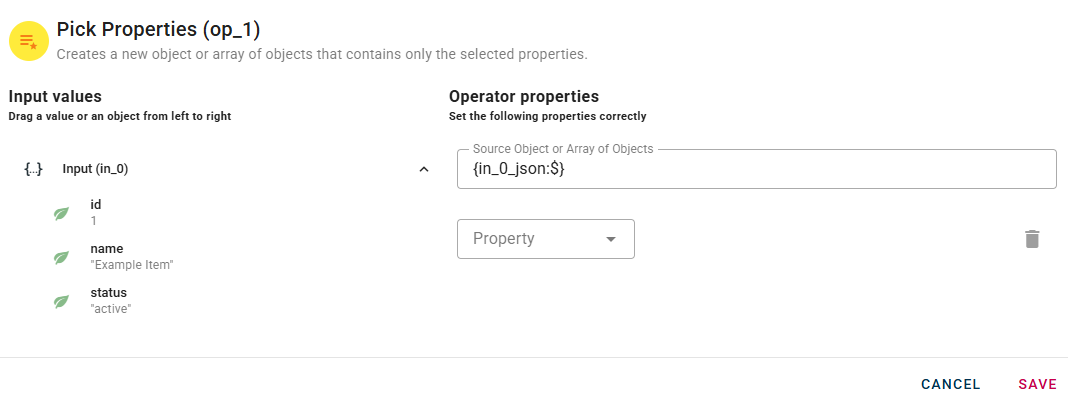
Below the source object, you will find the "Property" field.
The Property field contains a list of properties within the current source object. Click on it to reveal a drop-down list and select the desired property that you wish to include in your new object. When you enter a property, a new drop-down list will automatically appear to add another. This process allow you to enter as many properties as you need.
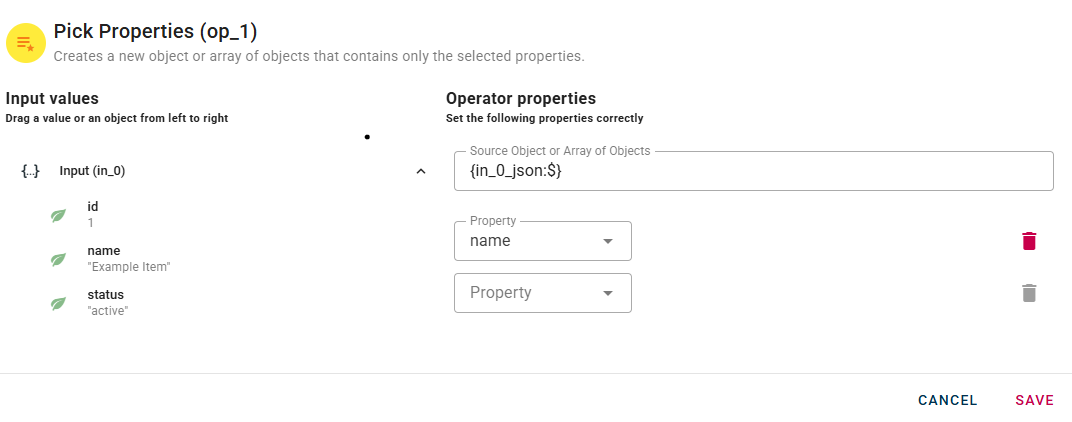
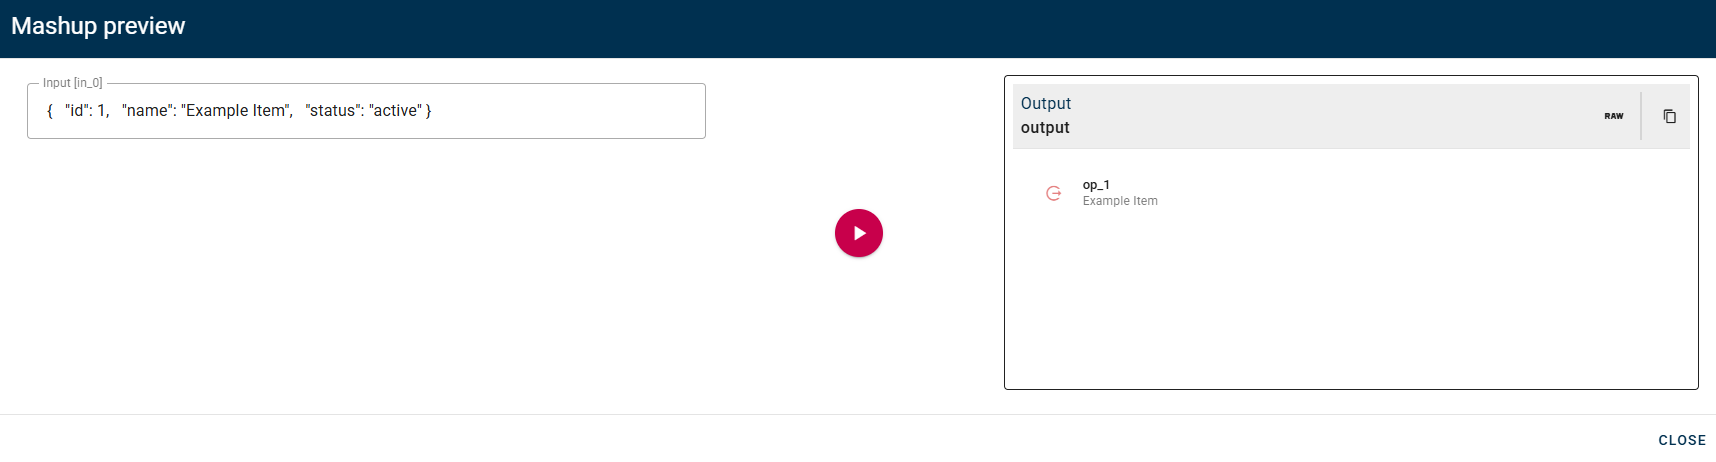
Observe that our property has successfully been included in our new object. If needed, you can remove an added property by utilizing the trash can icon located to the right of the property. Click SAVE button to save the configuration and then generate your output.
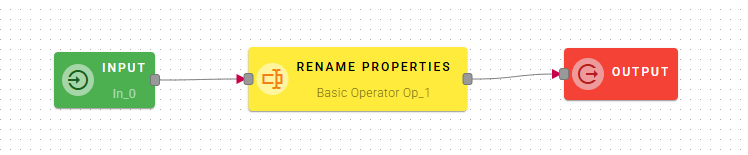
Rename properties
This operator allows you to rename properties of your object given in input.
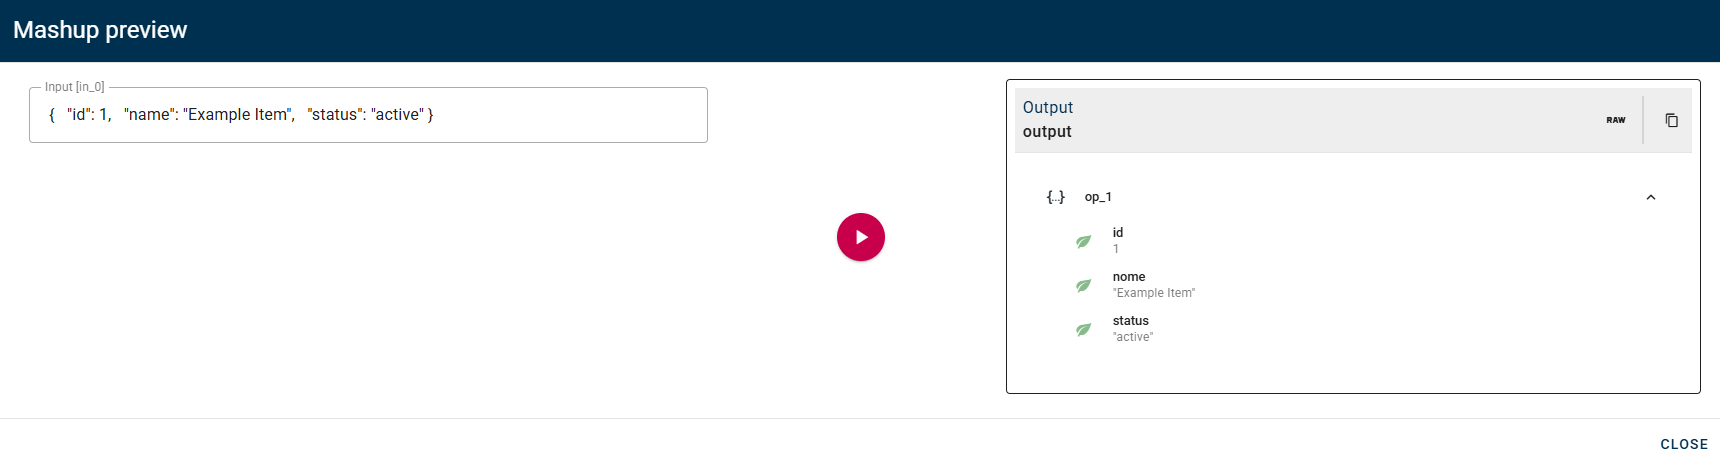
Input/Output examples
NOTE: This operator is designed to handle flexible inputs and can accept both single objects and arrays of objects. When it receives an array of objects as input, the operator automatically applies the operation to each element in the array iteratively. In this case the configured fields will be renamed from all objects within the array.

How to use
Connect your input and drag-and-drop it into the source object field.
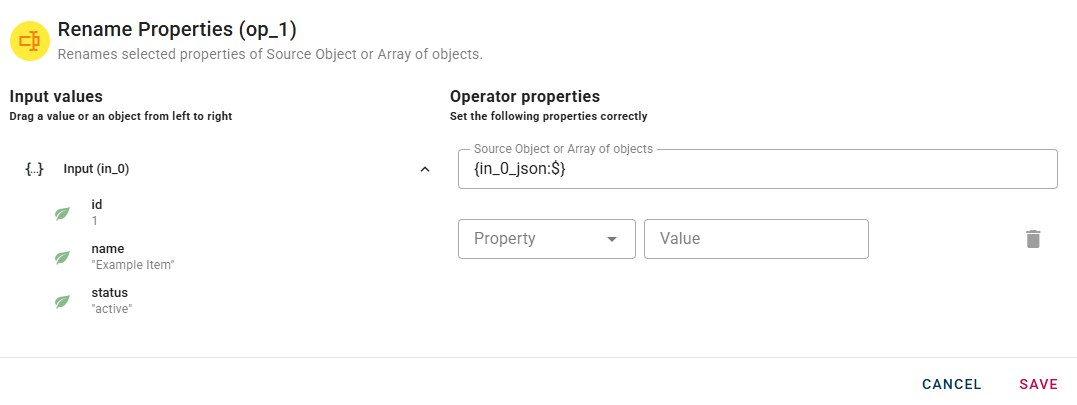
The property field will contains all the properties that you will rename, to do that you need to click on the drop-down list below property and select one.
When you enter a property, a new drop-down list will automatically appear to add another. This process allow you to enter as many properties to rename as you need.
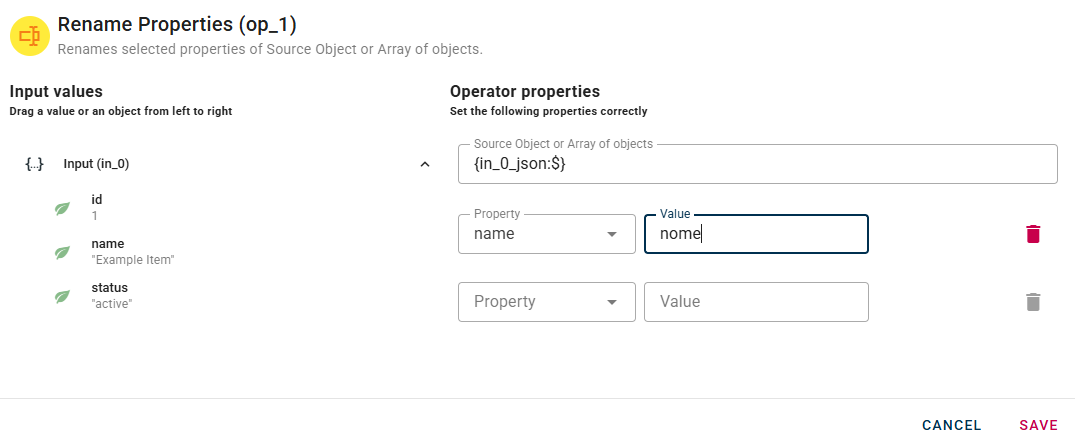
If needed, you can remove an added property by utilizing the trash can icon located to the right of the property. Click SAVE button to save the configuration and then generate your output.
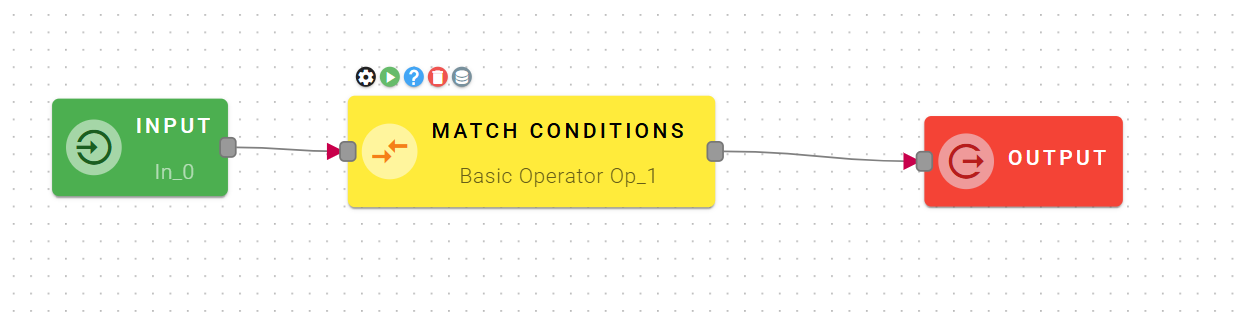
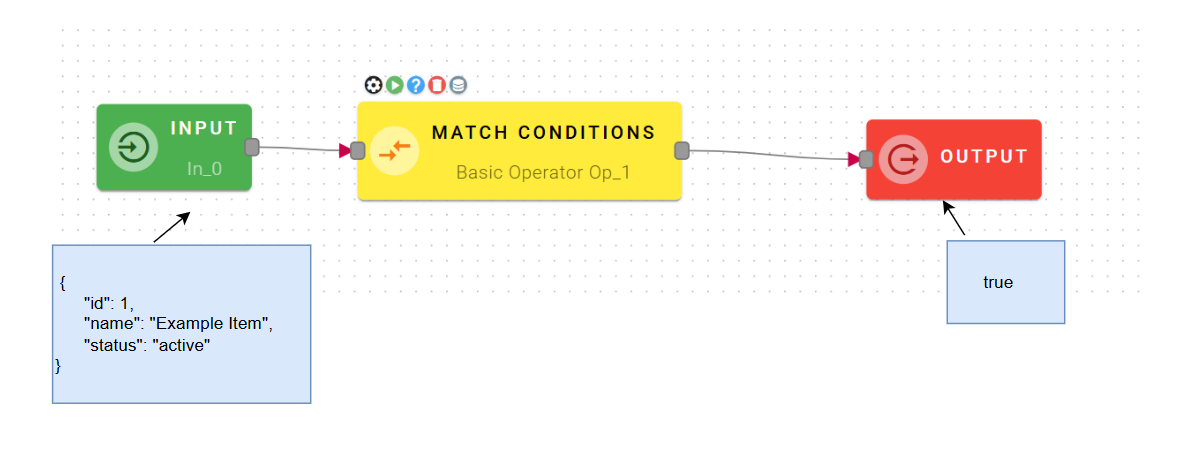
Match conditions
Checks conditions on the properties of Source Object and returns true or false
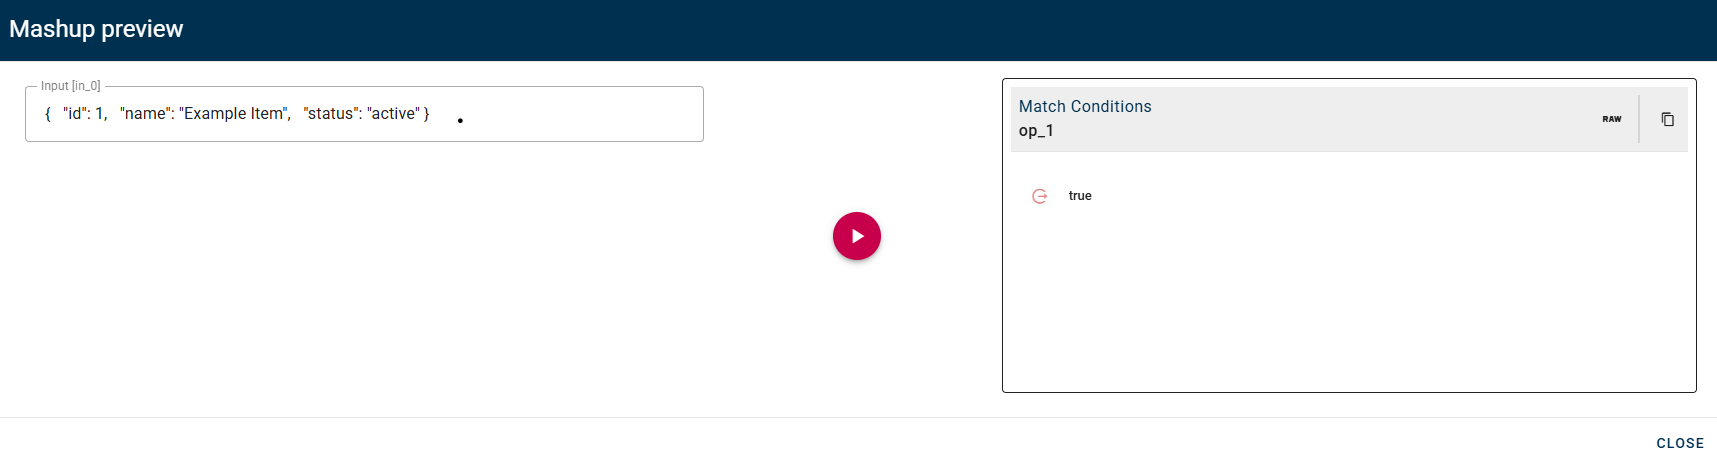
Input/Output examples
How to use
Within the source tree, locate and select from the input the object that has a property that you want to check. You can do this by clicking on the appropriate node within the source tree and drag-and-drop it into the source object field.
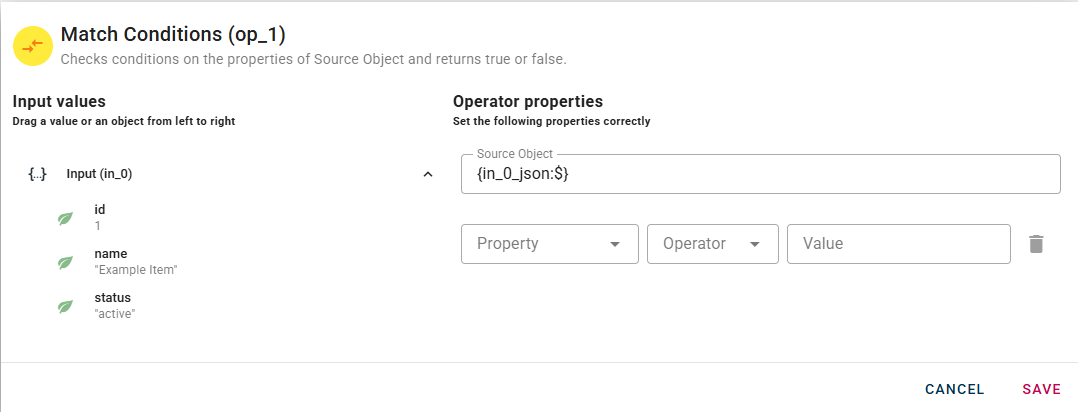
Once you have successfully dragged and dropped your object into the modal, three additional fields will appear.
The field property opens a dropdown menu where you can select the property to check. Then the field Operator permits you to choose whic condition to check. The options in the menu are:
- "=","1=",">","<","<=",">=", which are all mathematical operator to check on numerical field.
- includes/not includes, whick check if a strings is included in the selected field.
- matches, which let you add a regular expression to perform on the selected property -exists, which chechk if the field selected is not null
When you enter a condition, a row will automatically appear to add another. This process allow you to enter as many many conditions as you want. The differents condition will be evaluated as if there were ANDs between them.
In this example, I am configuring a condition to evaluate the "Field" id, checking if it's equal to 1 and the "Field" status, if it matches the word "active".
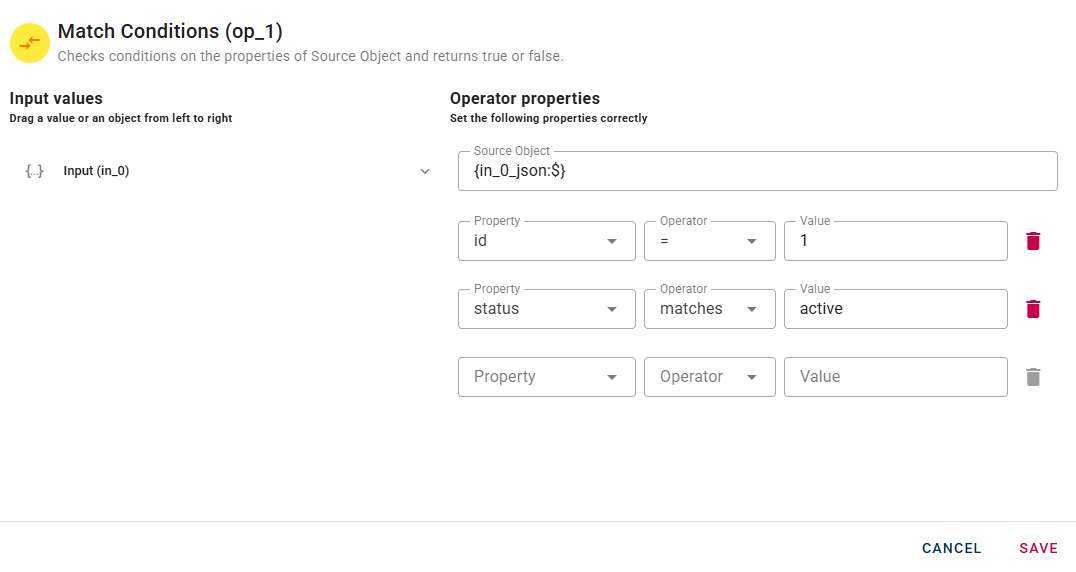
If needed, you can remove an added condition by utilizing the trash can icon located to the right of the condition. Click SAVE button to save the configuration and then generate your output.
Array
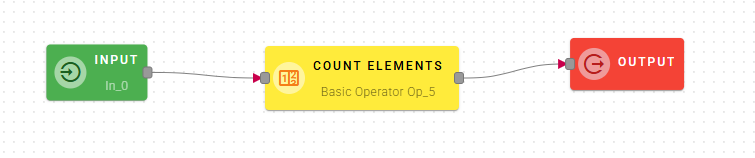
Count elements
This operator counts the number of elements of a given array.
Input/Output examples
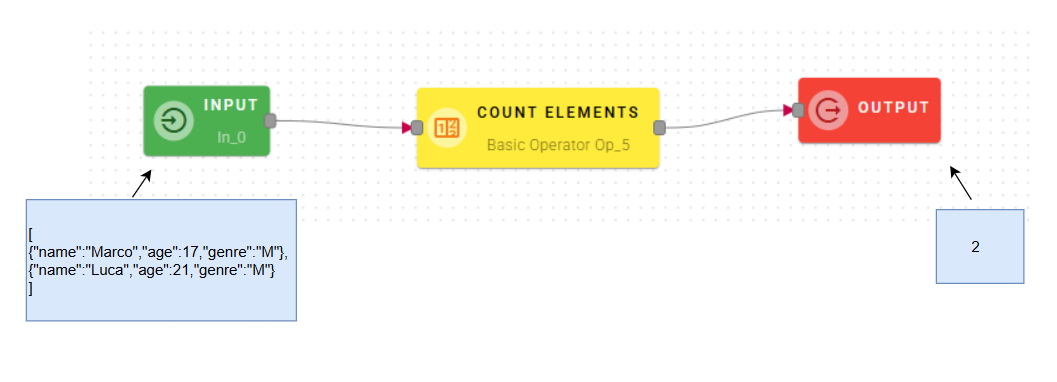
Connect your input with an array and drag-and-drop it into the source array field.
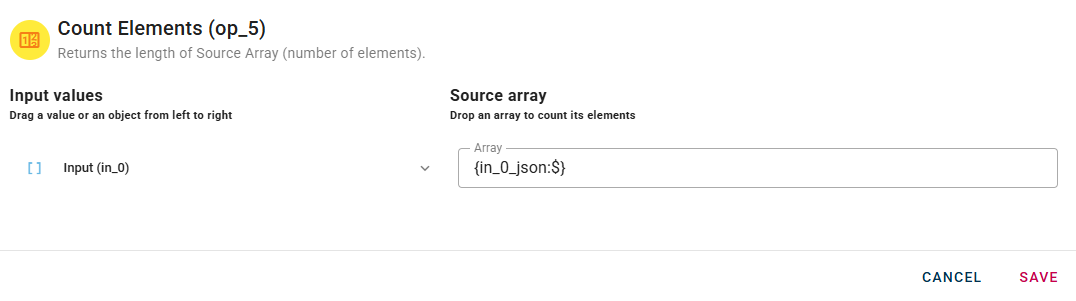
If you are unable to locate your array, I recommend expanding the field within your object. By expanding the field, you should be able to view the contents of the array and access the desired information.
Click SAVE button to save the configuration and then generate your output.

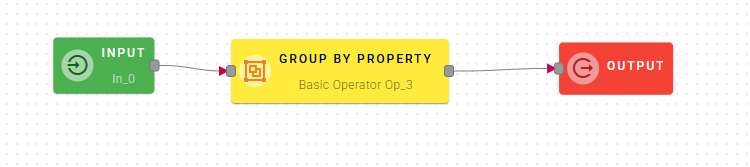
Group by property
This operator groups the elements of an array of objects according to the value of a property shared by the objects..
Input/Output examples
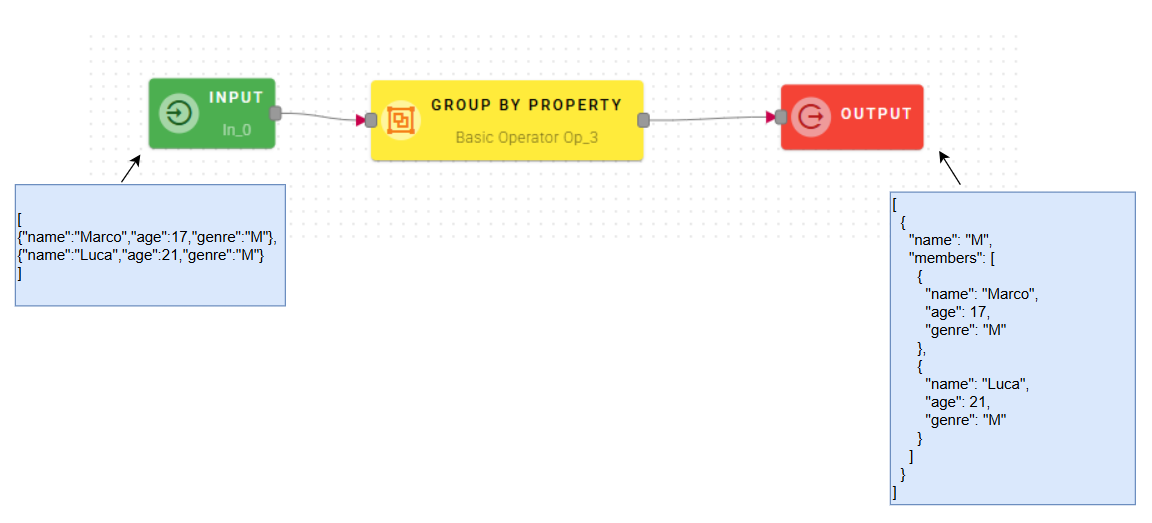
Connect the input to the operator and drag-and-drop your array into the source array.
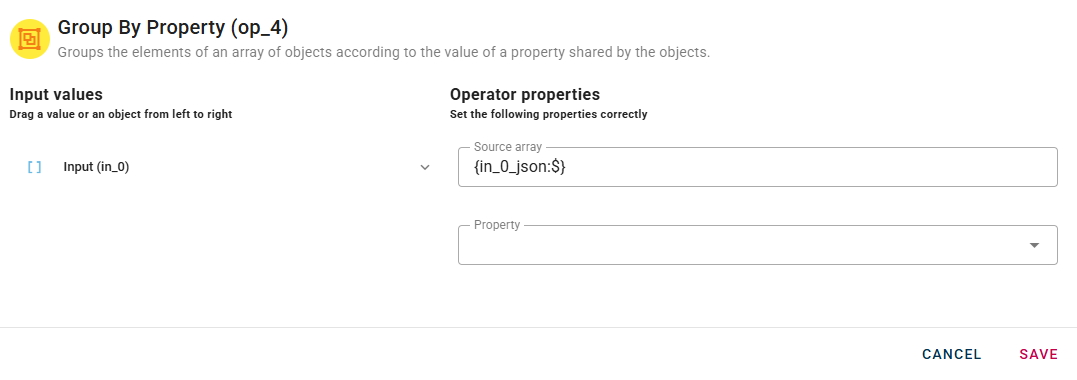
As the elements will be grouped based on a specific property, you need to select it using the drop-down menu located below the source array. The operator will create a group of elements which have the selected property value in common.
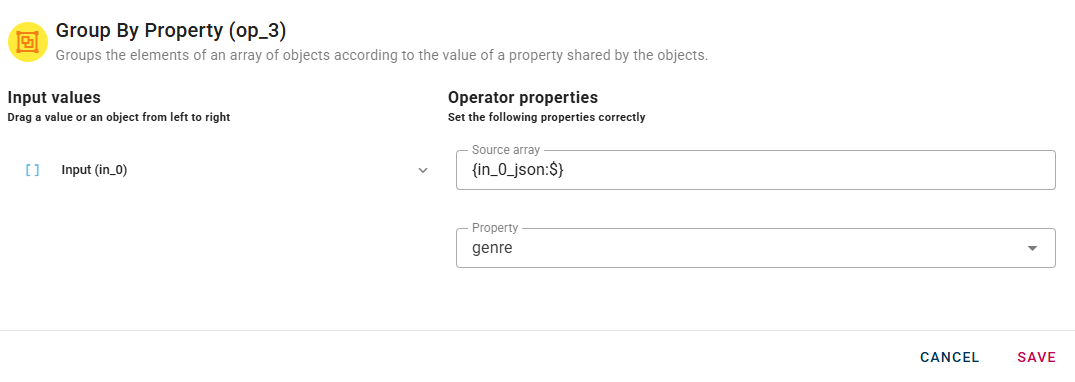
In this particular case, we will use the "genre" property to group the people in the array by gender.
Click SAVE button to save the configuration and then generate your output.
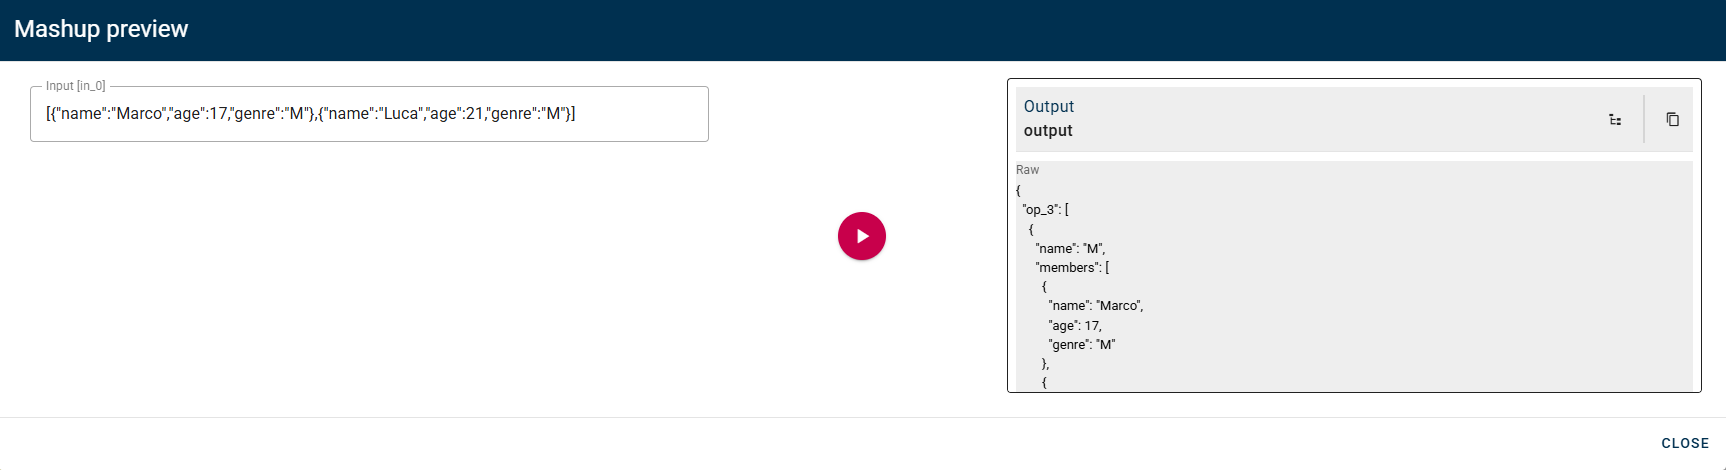
As you can observe, we have the "genre" property in the field name, which we selected to group the array, and the elements with the same genre listed as members within the array.
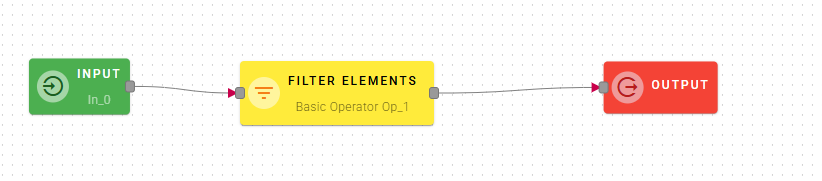
Filter Elements
Filter the array by validating each object against the defined conditions and return an array of conforming elements
Input/Output examples
How to use
Within the source tree, locate and select from the input the array of objects,in which every object has a property or more that you want to check. You can do this by clicking on the appropriate node within the source tree and drag-and-drop it into the source object field
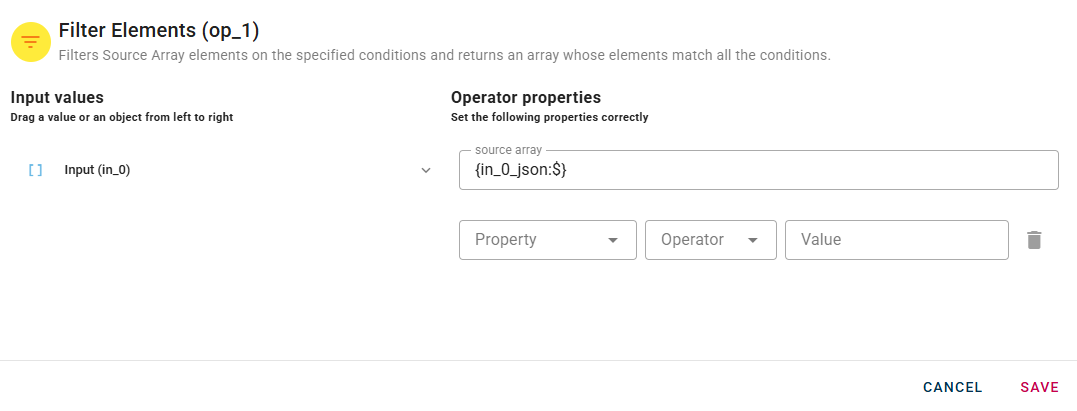
Once you have successfully dragged and dropped your array of objects into the modal, three additional fields will appear.
The field property opens a dropdown menu where you can select the property to check. Then the field Operator permits you to choose whic condition to check. The options in the menu are:
- "=","1=",">","<","<=",">=", which are all mathematical operator to check on numerical field.
- includes/not includes, whick checks if a strings is included in the selected field.
- matches, which lets you add a regular expression to perform on the selected property -exists, which check if the selected field is not null.
When you enter a condition, a row will automatically appear to add another. This process allow you to enter as many many conditions as you want. The different condition will be evaluated as if there were ANDs between them.
If needed, you can remove an added condition by utilizing the trash can icon located to the right of the condition. Click SAVE button to save the configuration and then generate your output.
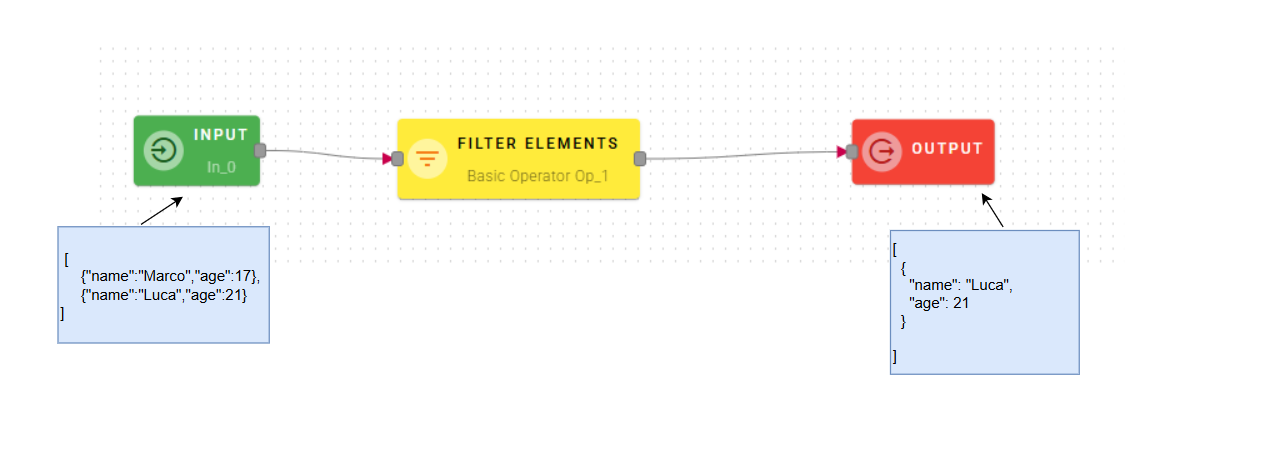
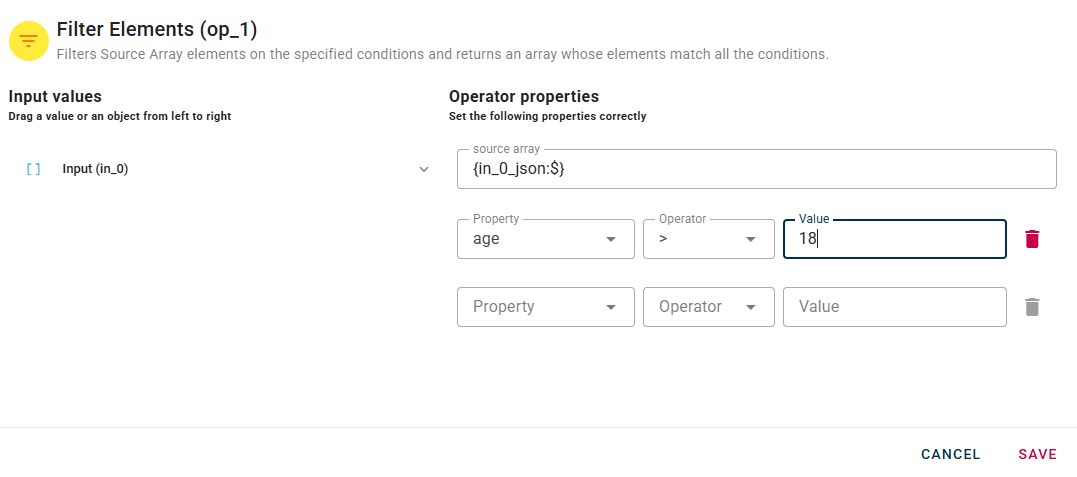
In this example, I am configuring a condition to evaluate the "Field" age, checking if it's greater than 18.
The preview will show an array with only the objects where the age is greater than 18.
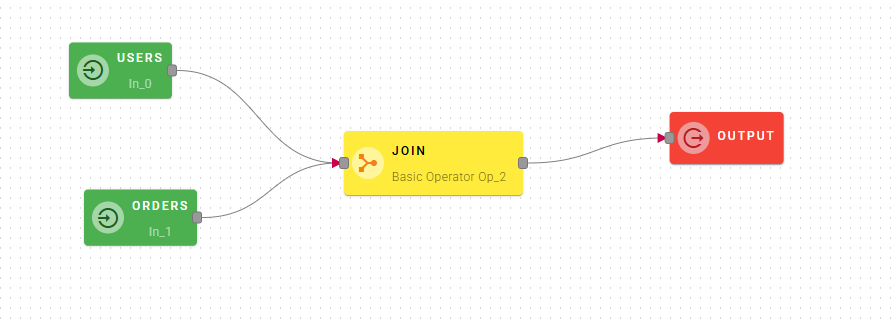
Join
This operator allows you to merge two arrays of objects by finding matching values in specific fields. You specify which field from each array should be compared, and when the values match, the objects are combined into a single result. It's like connecting related data from two different sources. It works similarly to SQL JOIN operations.
Input/Output examples
This operator needs two arrays as inputs.
How to use
Within the source tree, locate and select from the input the two arrays that you want to join. You can do this by clicking on the appropriate node within the source tree and drag-and-drop them into the source array field.
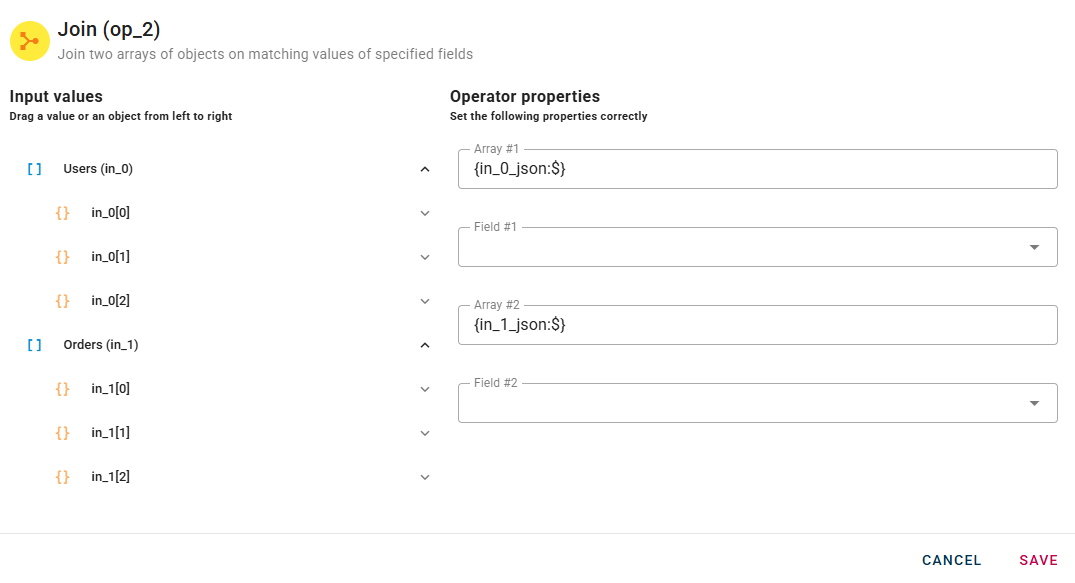
The fields under the arrays are the fields which you want to merge.
Choose the Field #1 from the first array and Field #2 from the second array to enable the join on this fields.
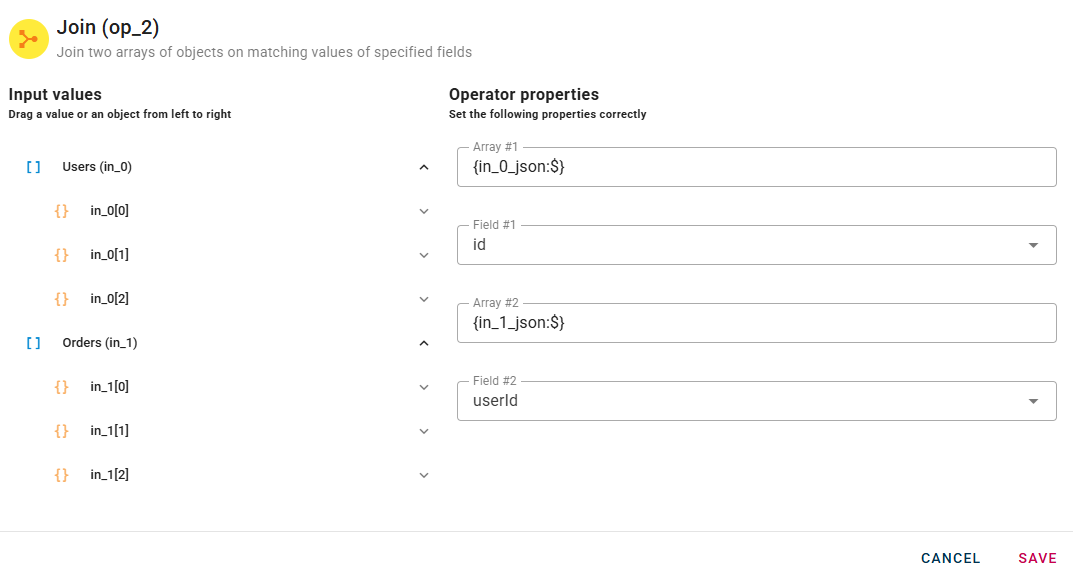
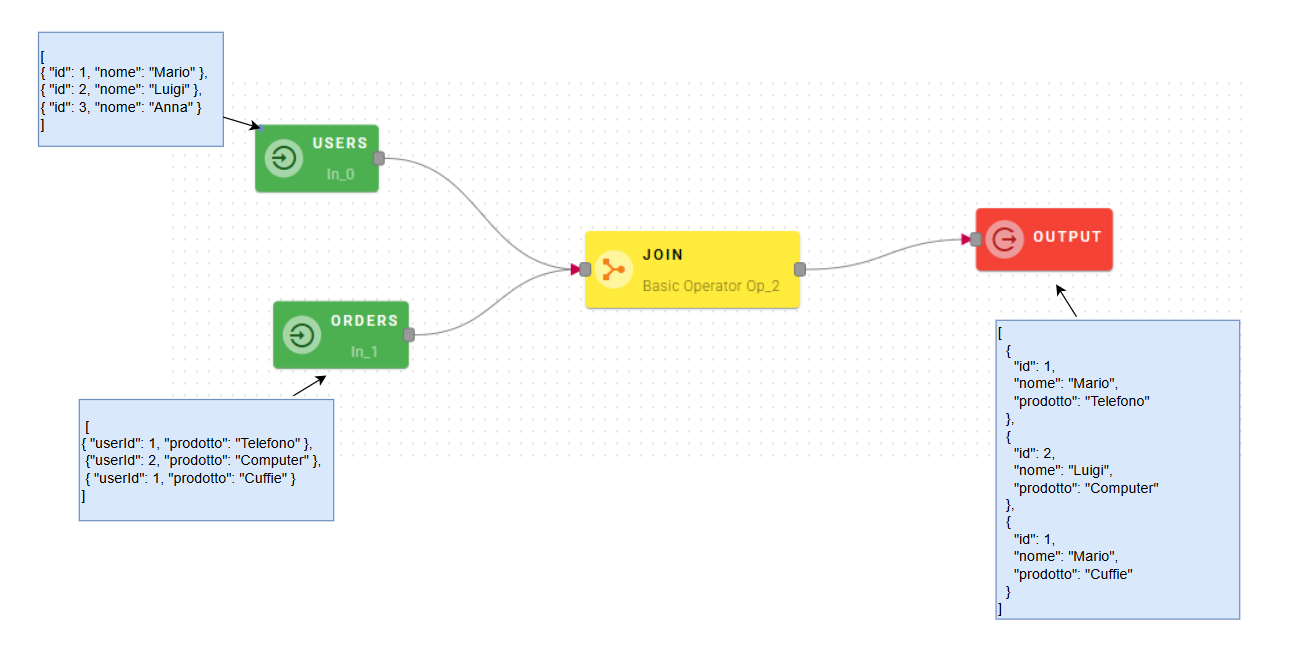
In other words, when merging two data arrays, you establish a correspondence between a key field in the first array and a key field in the second array. If the values of these key fields match, then the data from the two arrays can be merged together.
Click SAVE button to save the configuration and then generate your output.
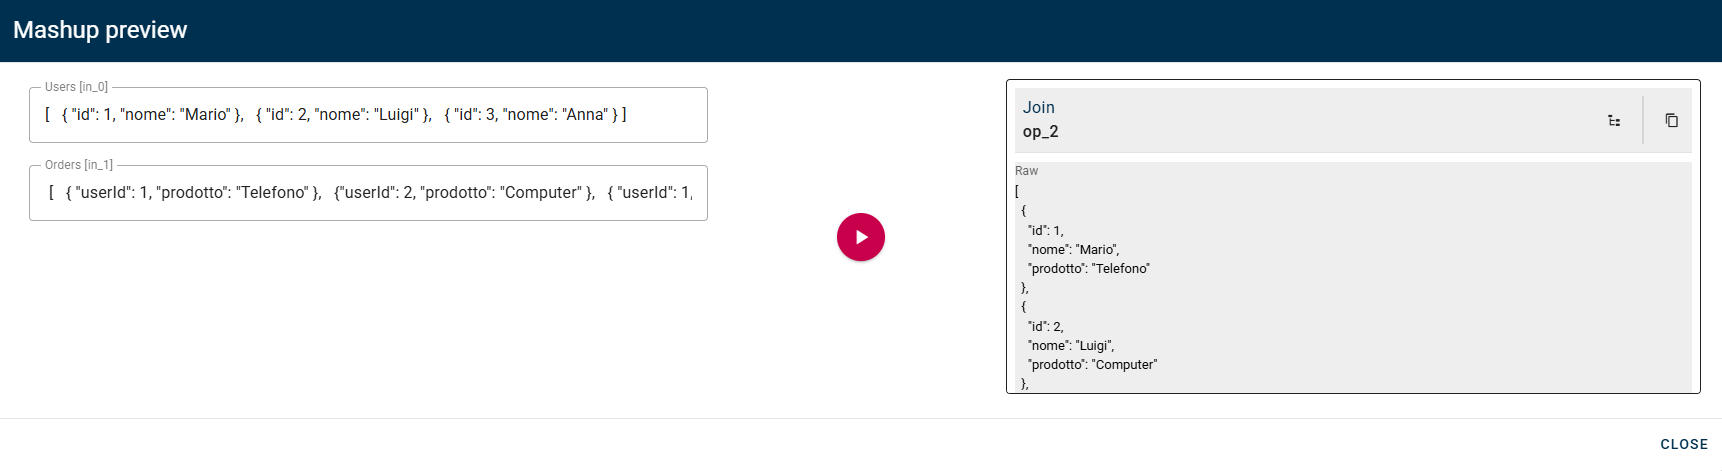
As you can see in this example, the operator will merge the users with their orders using the userId/id as matching field.
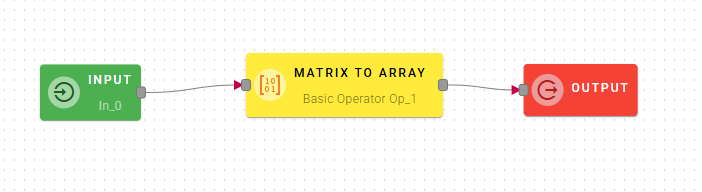
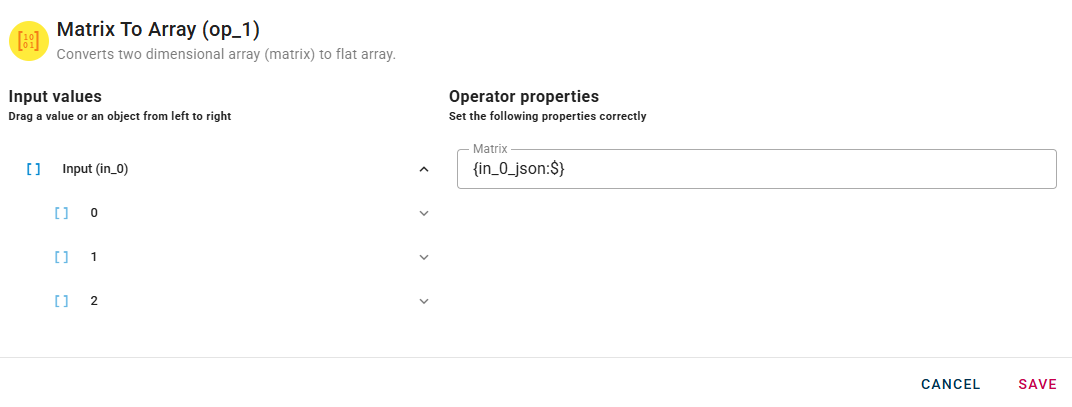
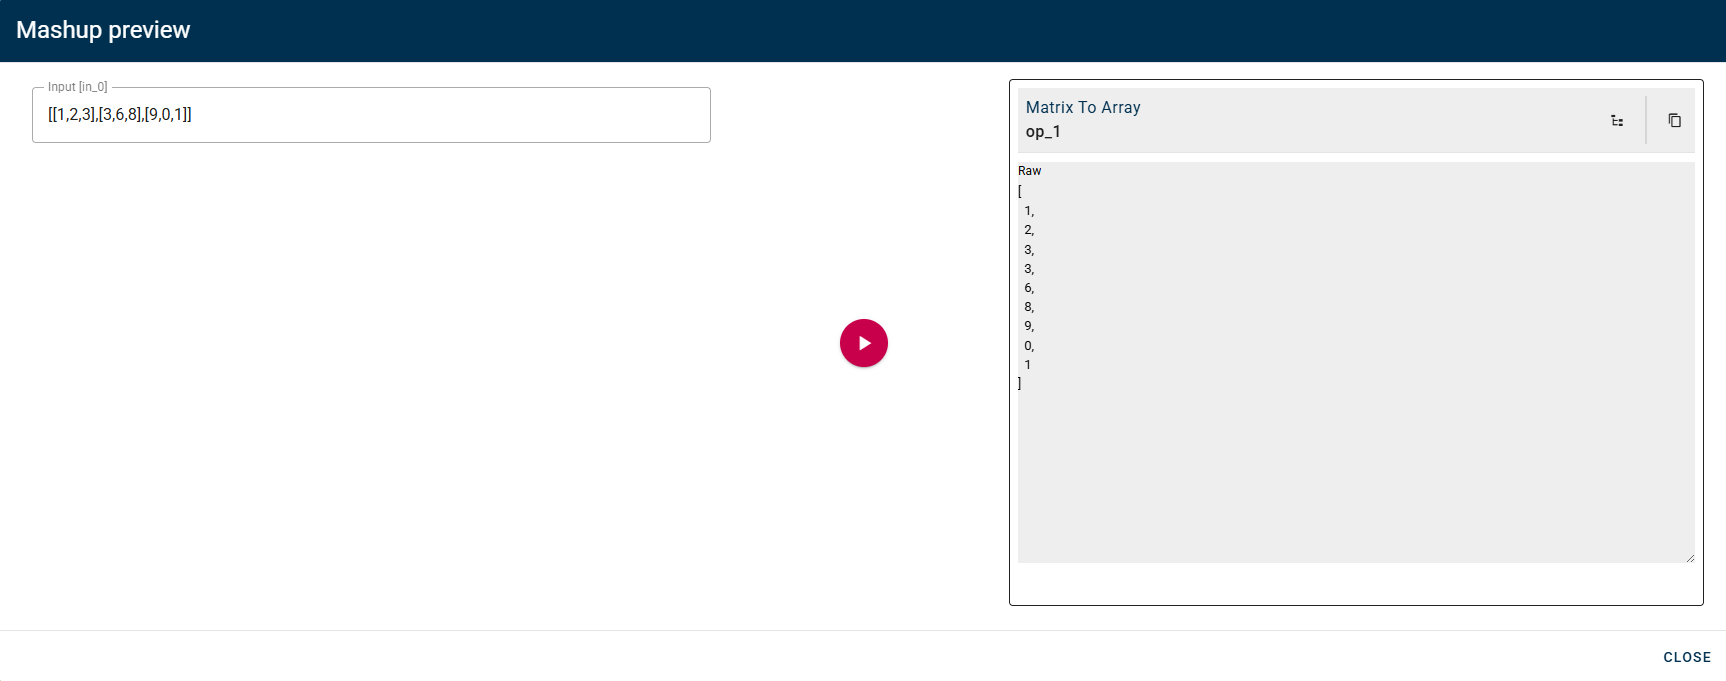
Matrix to array
Converts two dimensional array (matrix) to a flat array.
Input/Output examples
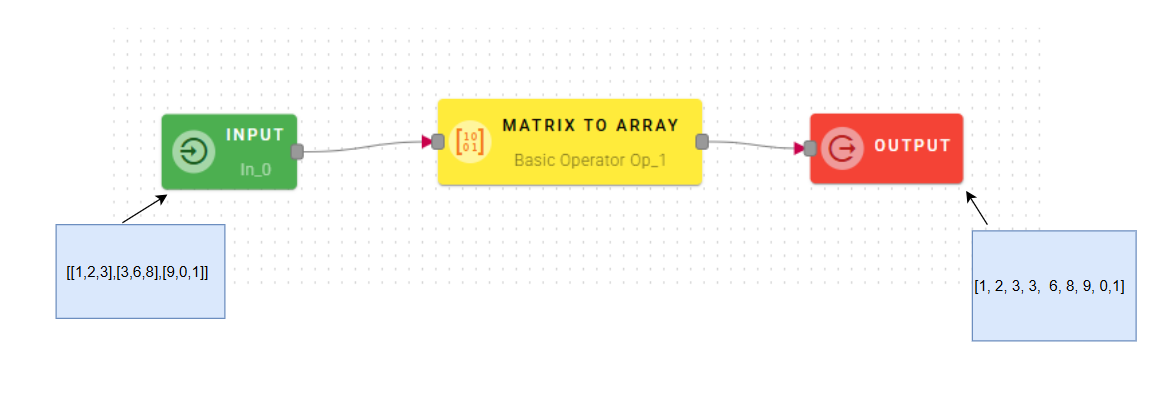
Drag-and-drop your matrix(Array of arrays) into the matrix source field
 Click SAVE button to save the configuration and then generate your output.
Then you will obtain a flat array with all the elements in the matrix.
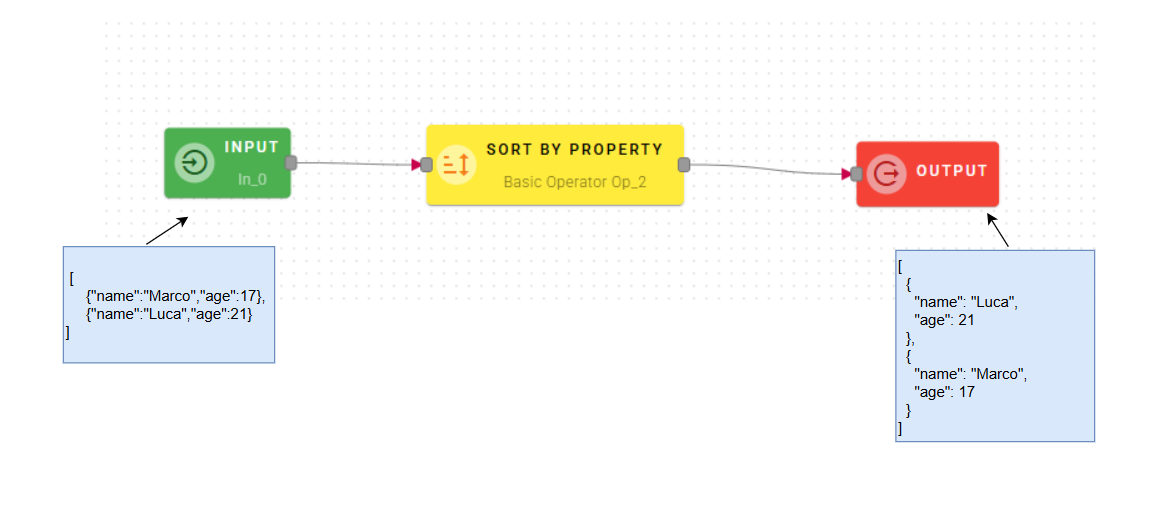
Sort by property
Sorts the elements of Source array by the values of Property.
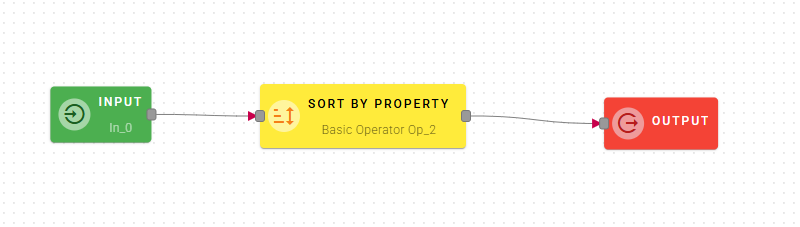
Input/Output examples
Connect your input to the operator, within the source tree, locate and select from the input the property that you want to sort. You can do this by clicking on the appropriate node within the source tree and drag-and-drop it into the source array field

To begin, select a property that will serve as the basis for sorting the array. After choosing the property, you can then specify the sorting direction. The direction can be set to either ascending (ASC) or descending (DESC) order.

Ascending order means the array will be sorted from the lowest value to the highest value. In contrast, descending order will sort the array from the highest value to the lowest value.
Click SAVE button to save the configuration and then generate your output.
Iterator
This operator is very powerful because it allows you to execute a specific mashup for each individual element within an input array.
In other words, if the input array contains N elements, the mashup connected to this operator will be executed N times, once for each element. Each execution will use the current array element as its input.
NOTE: If you click the purple button on top of the operator you will be redirected to the nested mashup.
Input/Output examples
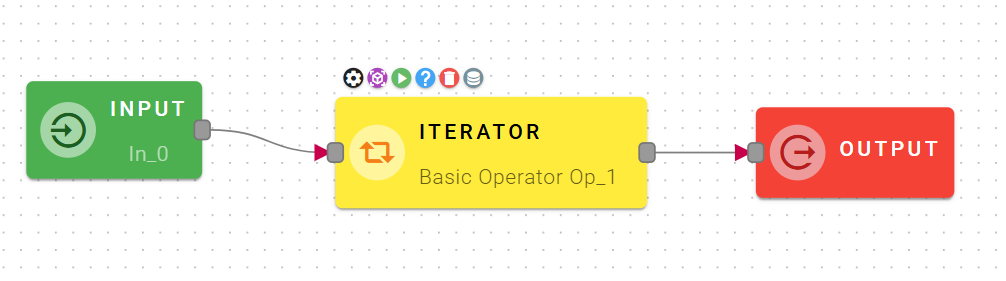
Before we proceed with configuring the iterator, let's take a moment to review the concept of a mashup, which requires certain inputs to function properly.
Our nested mashup for this example will be:
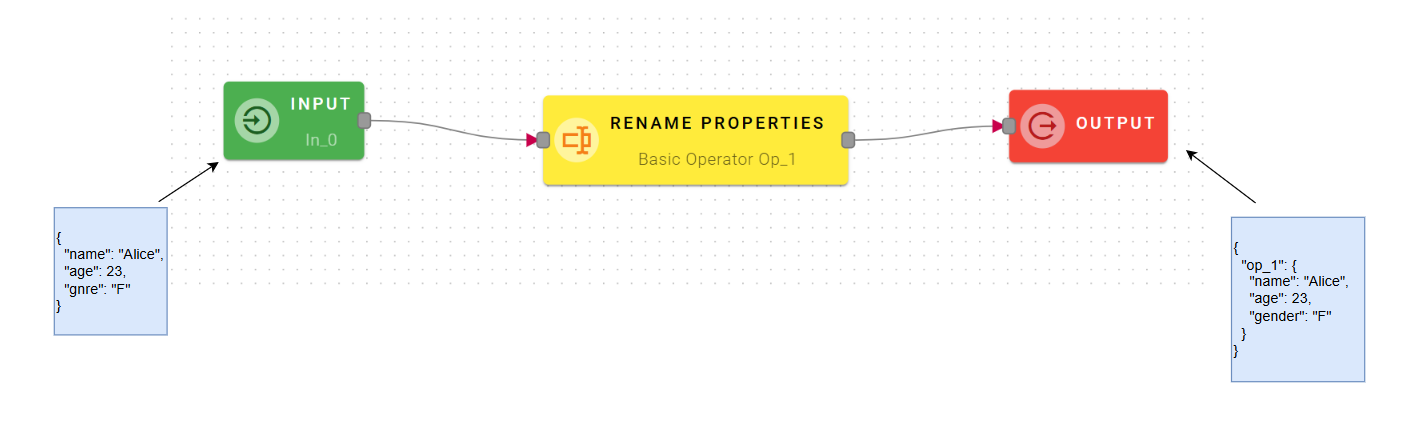
Which renames the property "gnre" in "gender".
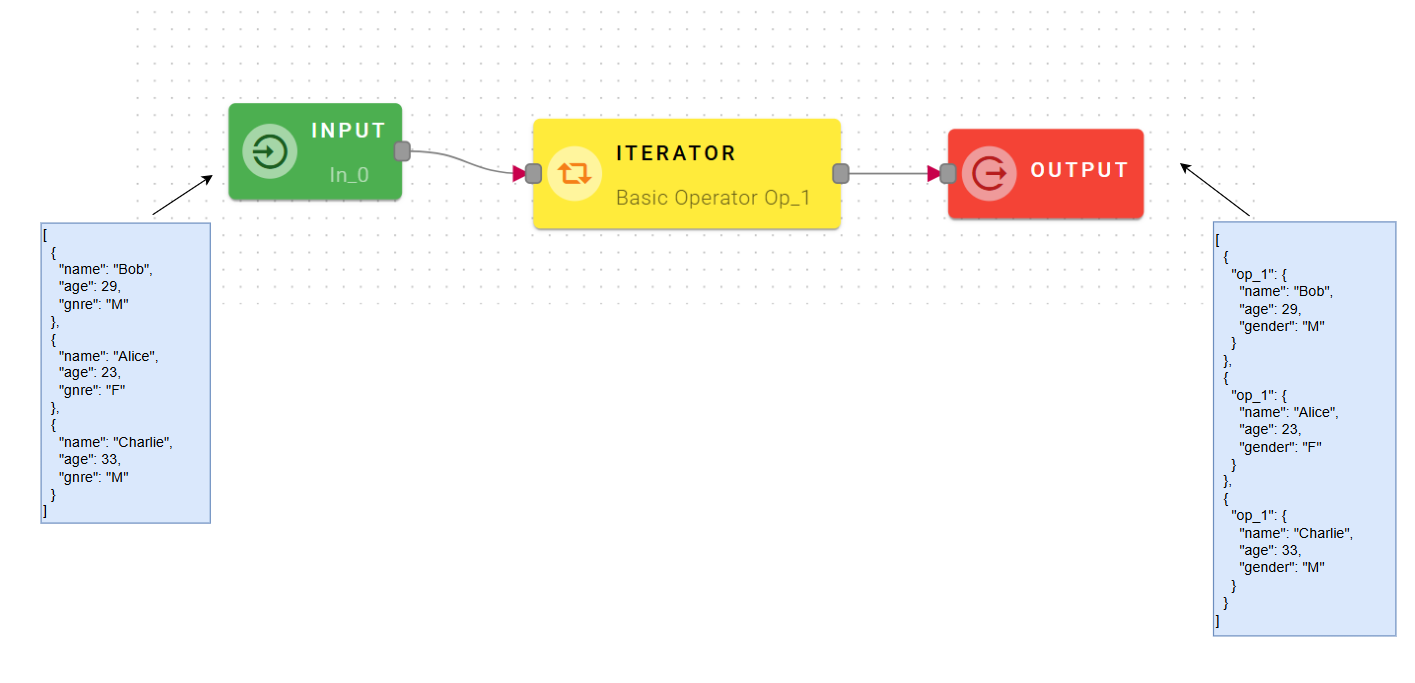
So the input of the external mashup will be an array with object which have the property "genre".
How to use
This operator will be more tricky than others operator to configure.
To configure this operator, establish a connection between your input and the operator. Within the source tree, locate and select the desired array of objects from your input. To do this, click on the corresponding node within the source tree, and then drag-and-drop it into the designated array field of the operator.
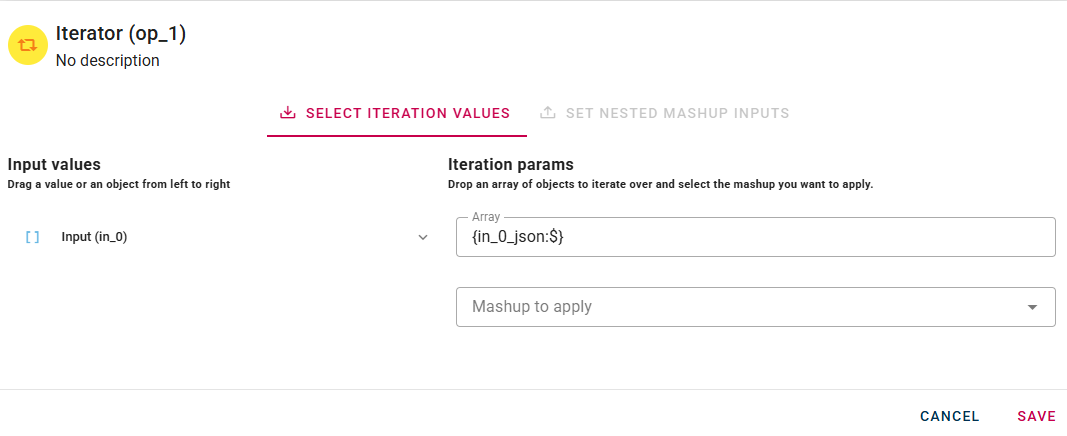
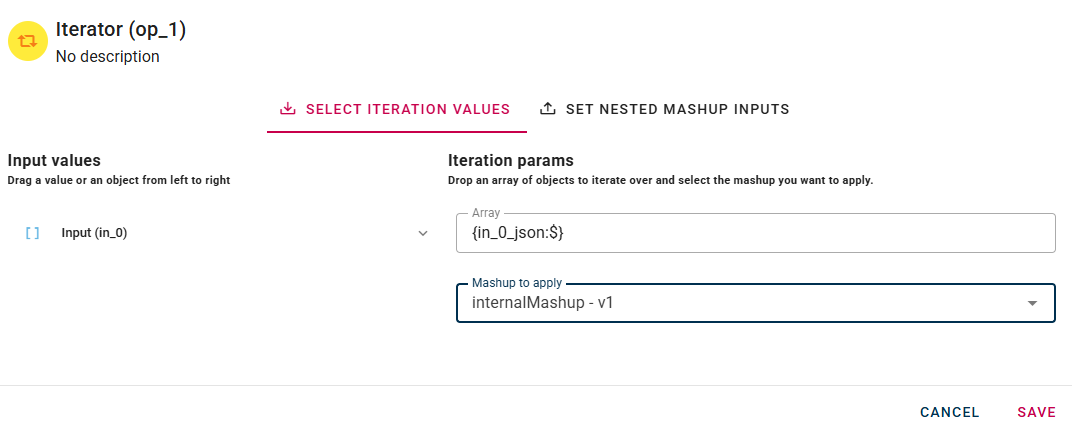
Once you have successfully dragged and dropped the array, you can proceed to the next step by clicking on the "Mashup to apply" modal. You will see a list with all the available mashup.

Choose the nested mashup to execute for each element of the array in input. Make sure that every element of the array follows the schema/type of the input of the internal mashup.
Now we can go to the next tab "SET NESTED MASHUP INPUTS":
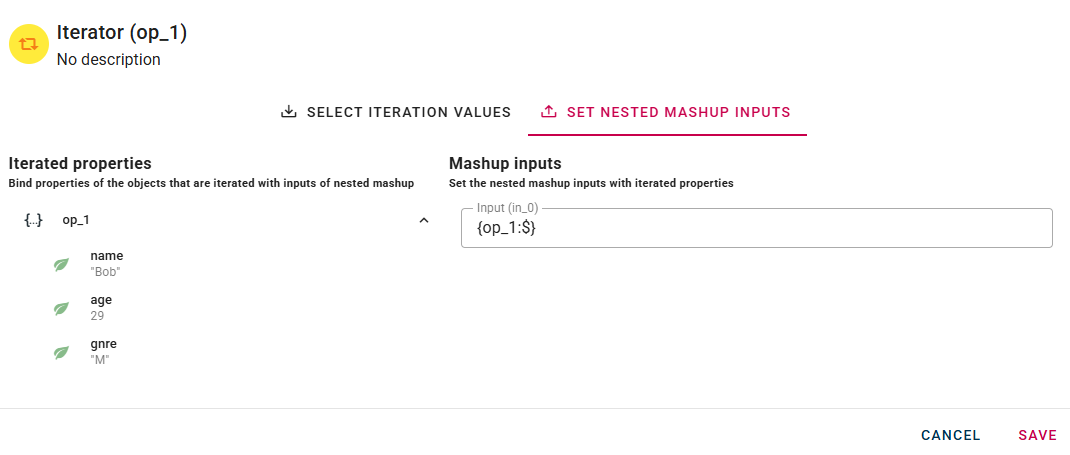
In this section, the left tab displays the first element of the input array. This element serves as a guide for configuration, allowing you to visualize the structure of the data that will be processed.
In the right section, you can drag and drop the specific element or part of it that will be used as input for each individual execution of the inner mashup. You have the flexibility to choose whether to pass the entire object or just a certain property/sub-part of the array element.
Important: The configuration defined here will be applied uniformly to all elements of the array during the iterated executions of the mashup.
Click SAVE to save the modal configuration and then preview the output.

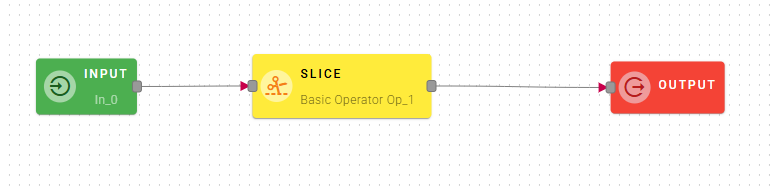
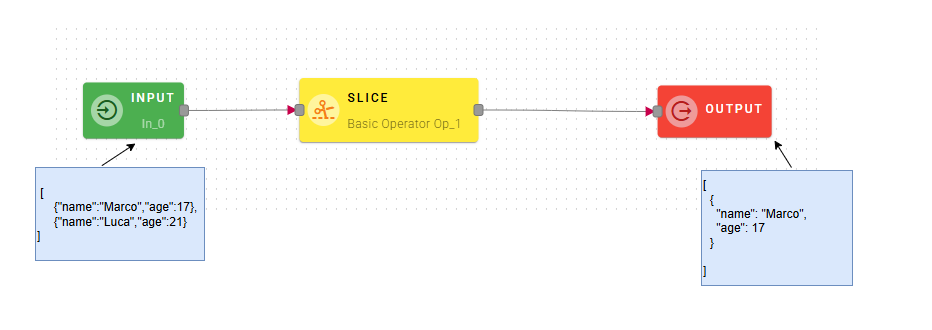
Slice
Cuts Source Array from Start Index to End Index (not included).
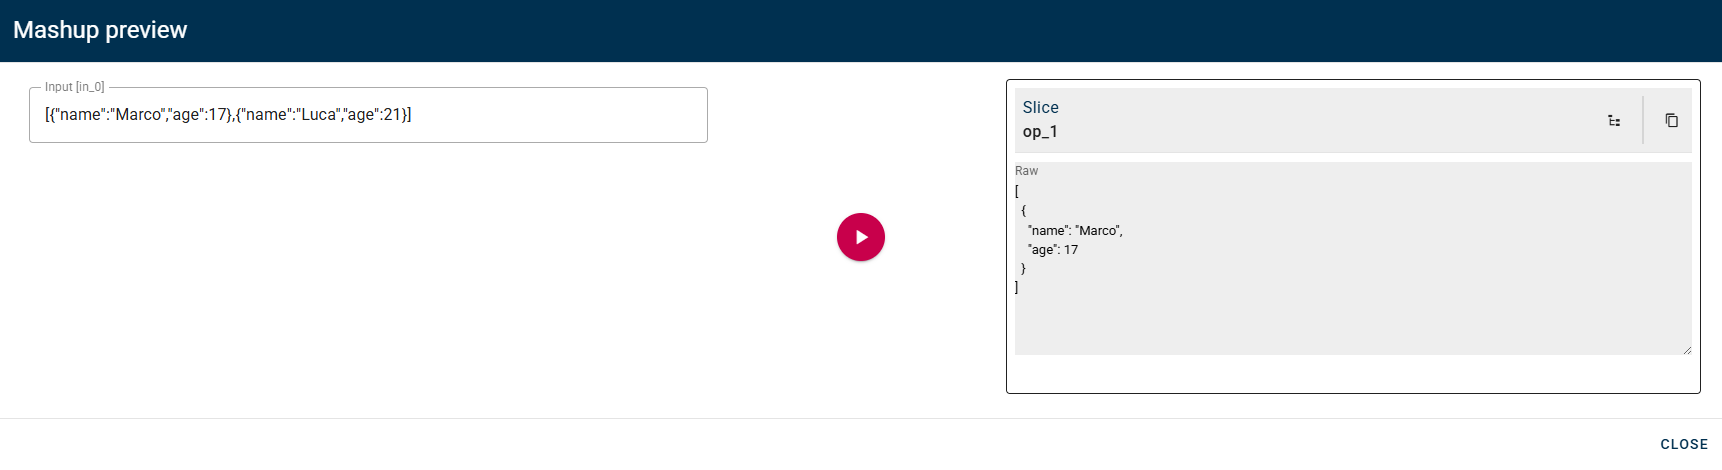
Input/Output examples
How to use
Connect your input to the operator, within the source tree, locate and select from the input the array that you want to slice. You can do this by clicking on the appropriate node within the source tree and drag-and-drop it into the source array field
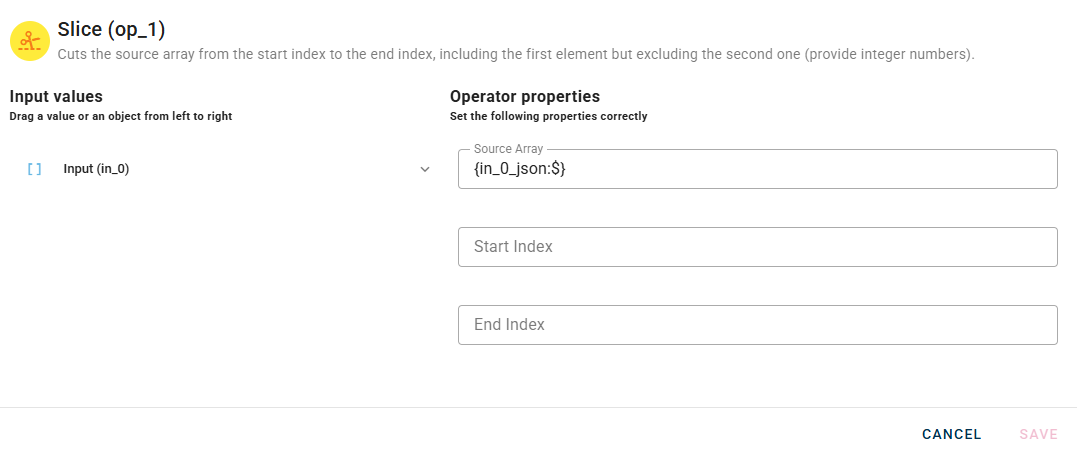
Then insert the value for Start Index and End Index.
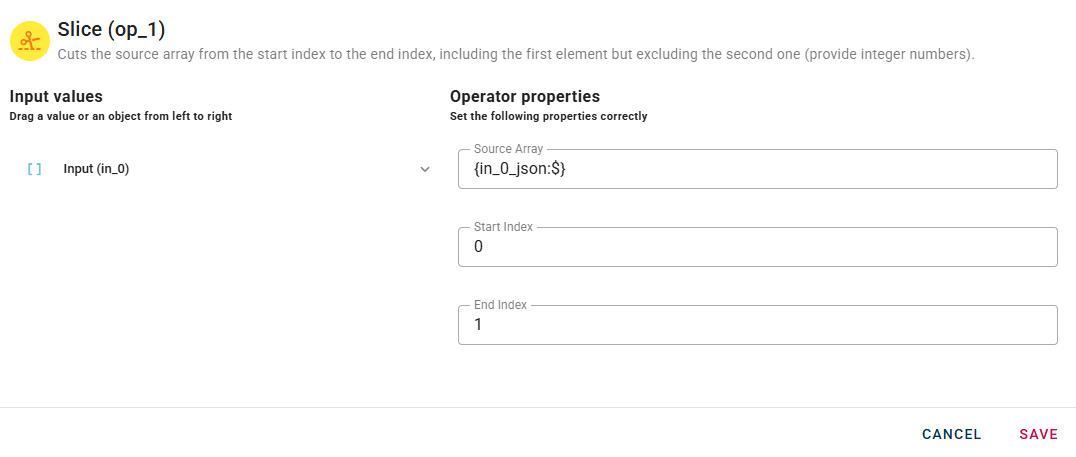
Please keep in mind that when using array slicing, the end index is not included in the slice. If you intend to include the last element of your array, you should set the end index as the number of elements plus one, denoted as 'n+1'.
Click SAVE button to save the configuration and then generate your output.
String
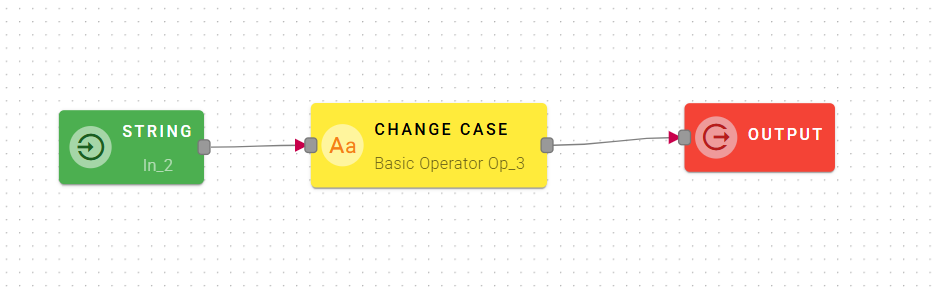
Change case
Change text case by selecting one of the options: upper, lower or camel.
Input/Output examples
How to use
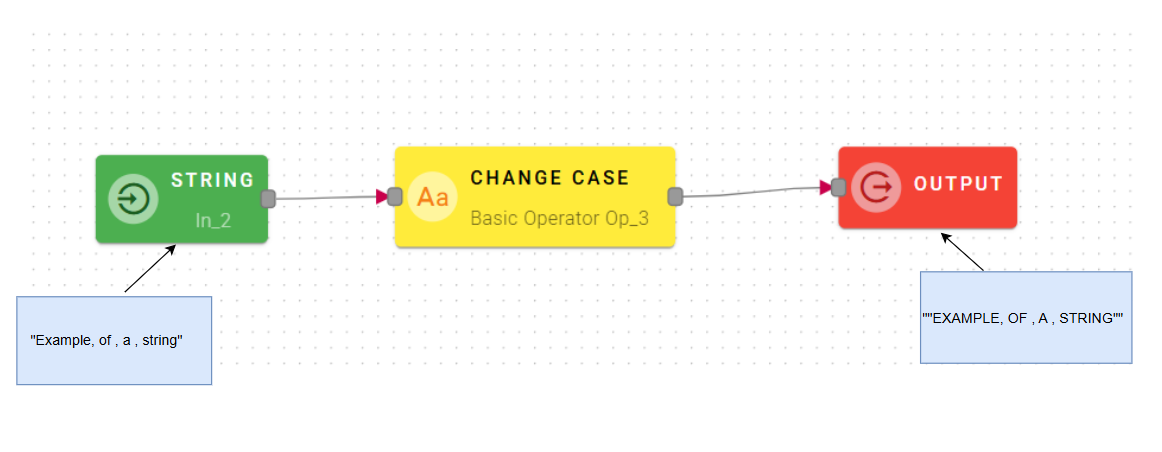
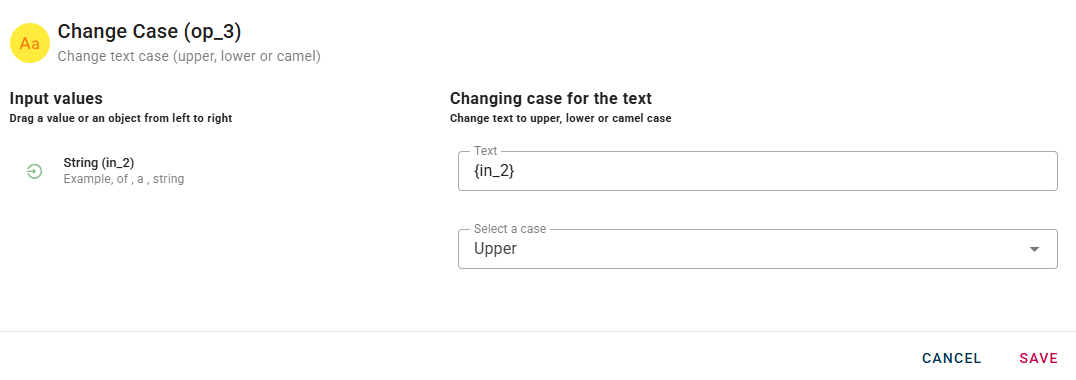
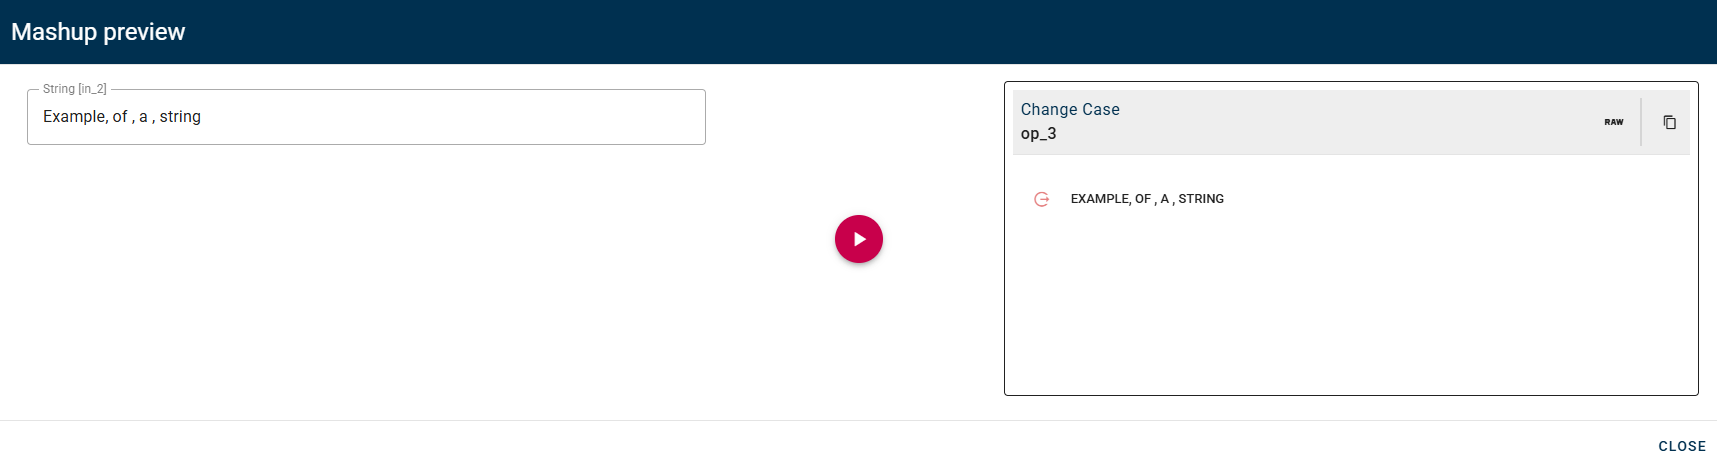
Connect your input to the operator, within the source tree, locate and select from the input the string that you want to change case. You can do this by clicking on the appropriate node within the source tree and drag-and-drop it into the string field
Lower: In this transformation, all the letters in your string will be converted to lowercase. For example, "HELLO" will become "hello".
Upper: This conversion will change all the letters in your string to uppercase. For instance, "hello" will become "HELLO".
Camel: By applying the camel case convention, the string provided as input will be modified. The first letter will be capitalized, and any subsequent words will have their first letter capitalized as well. For example, "hello" will be transformed into "Hello".
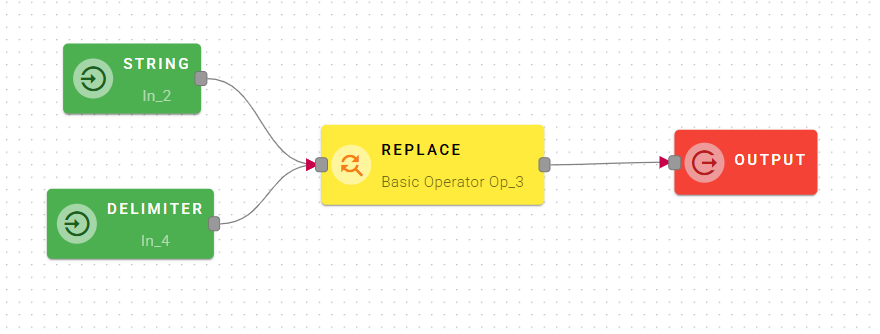
Replace
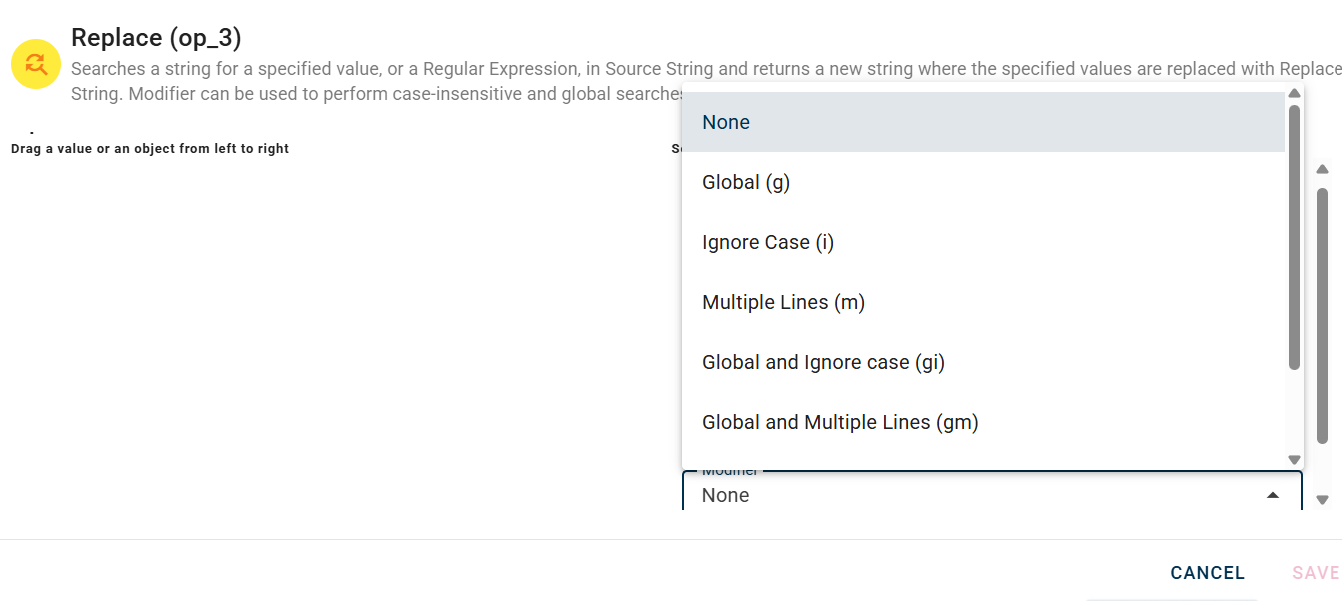
Searches a string for a specified value, or a Regular Expression, in Source String and returns a new string where the specified values are replaced with Replace String. Modifier can be used to perform case-insensitive and global searches.
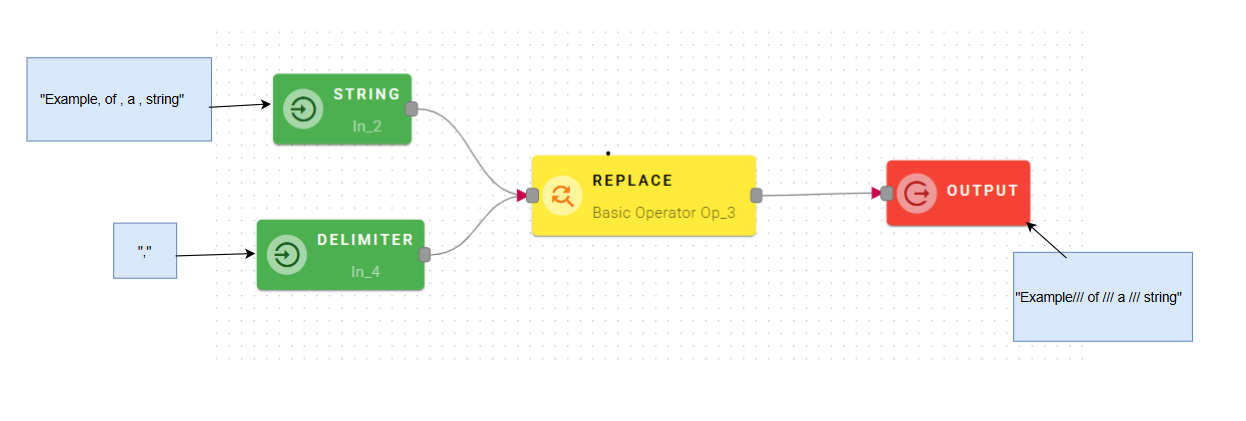
Input/Output examples
How to use
Connect your input to the operator, within the source tree, locate and select from the input the string where you want to replace something. You can do this by clicking on the appropriate node within the source tree and drag-and-drop it into the source field
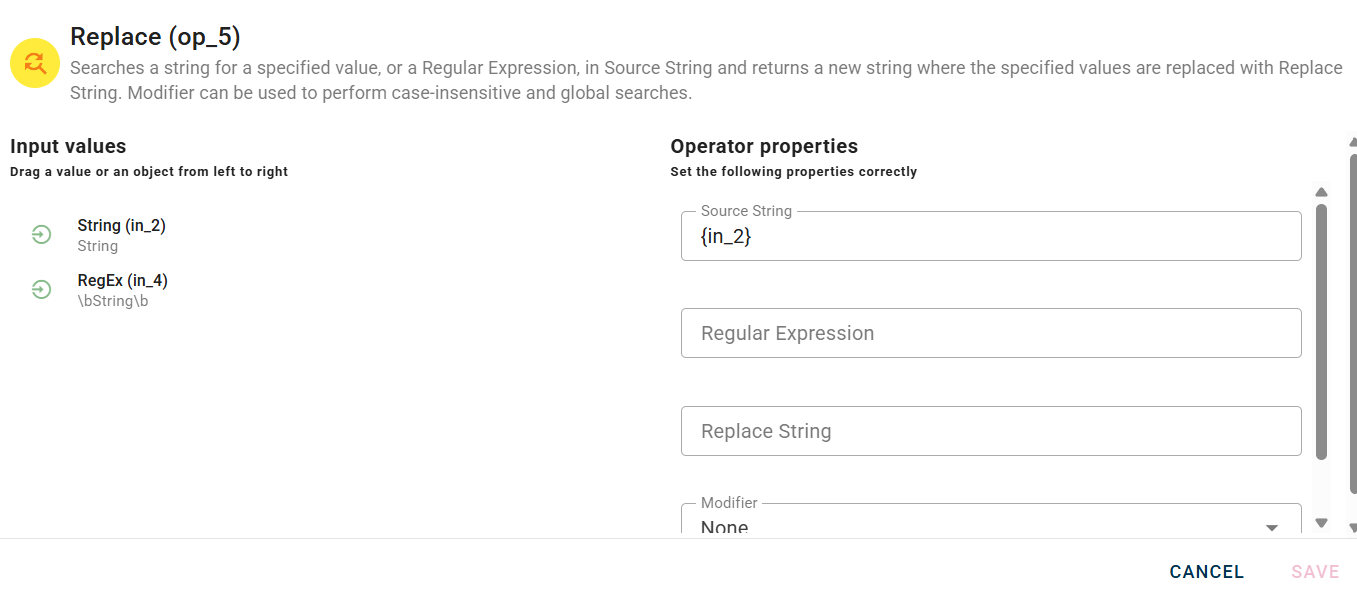
After you drag-and-drop you string your modal should look like this:
There are 3 different parameters to search a specified value and replace it with what it's in the Replace String field.
You can use a normal regular expression and a modifier:
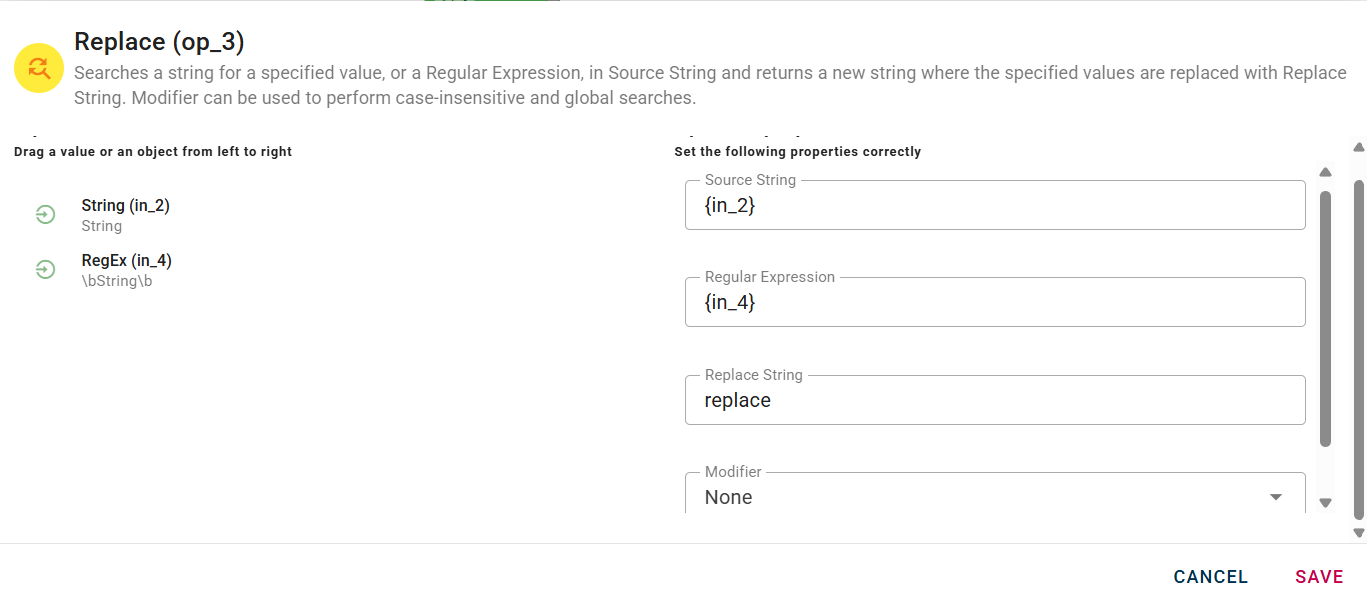
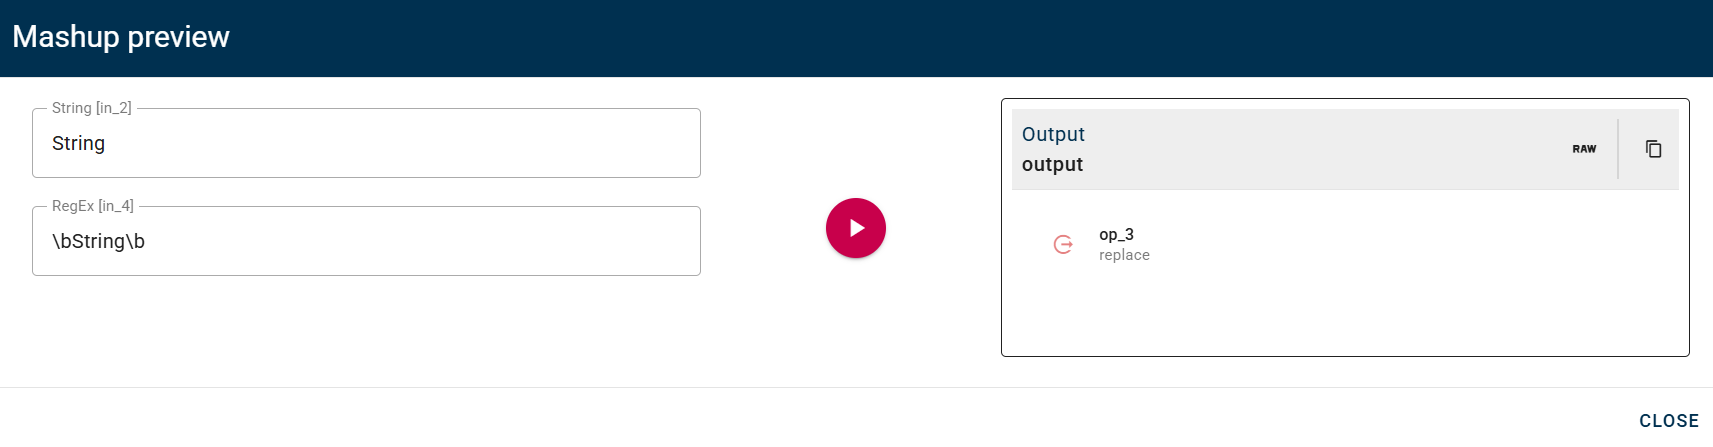
Drag-and-drop this input into the the regular expression field and insert in the replace string field something to use for the replace.
Click SAVE button to save the configuration and then generate your output.
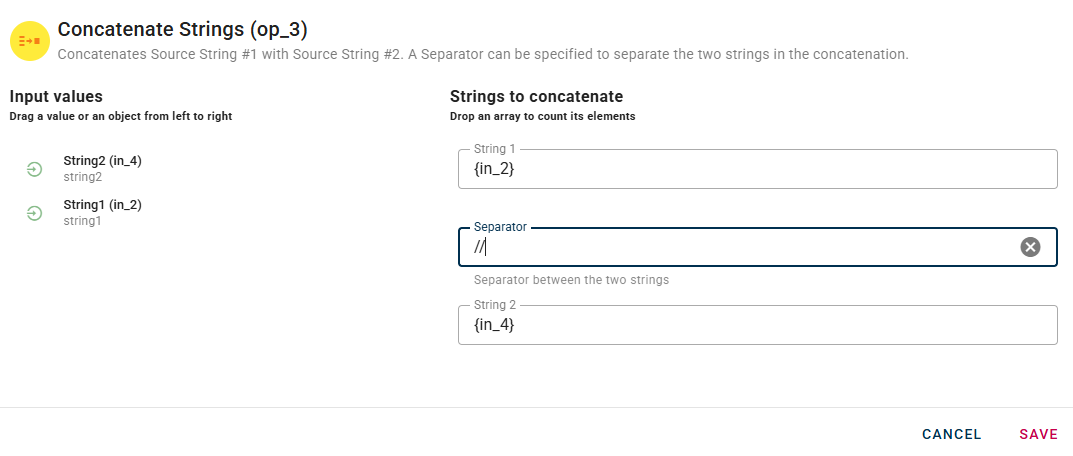
Concatenate strings
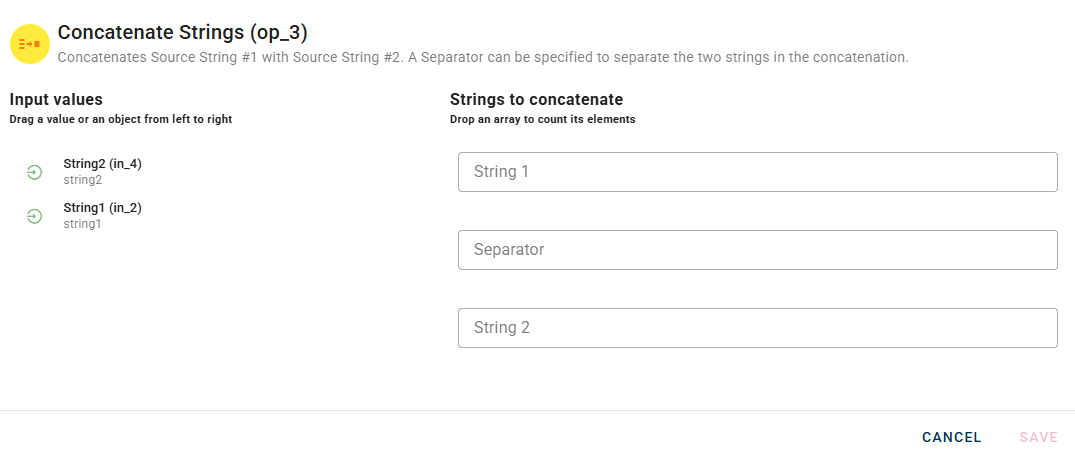
Concatenates Source String #1 with Source String #2. A Separator can be specified to separate the two strings in the concatenation.

Input/Output examples
How to use
Connect your input to the operator, within the source tree, locate and select from the input the string that you want to be your source string #1. You can do this by clicking on the appropriate node within the source tree and drag-and-drop it into the string field
Once you did it your modal should be like this below:
As you can see there is two new field:
One is the second input and it's name is Source string 2, the other one is the separator, this can be used to separate the string that you are trying to concatenate.
Connect to the operator a source string or use the same and drag-and-drop it in the source string #2
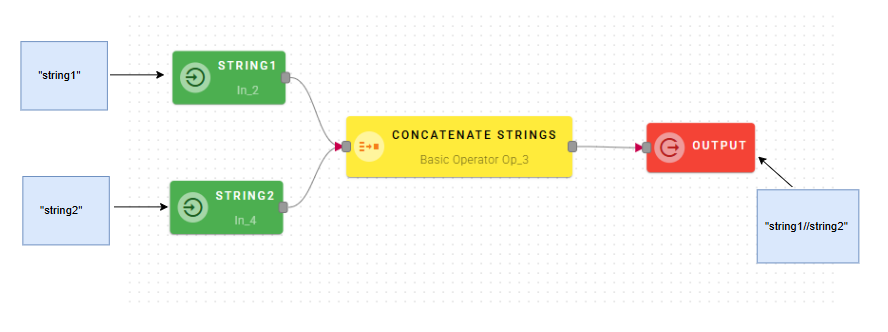
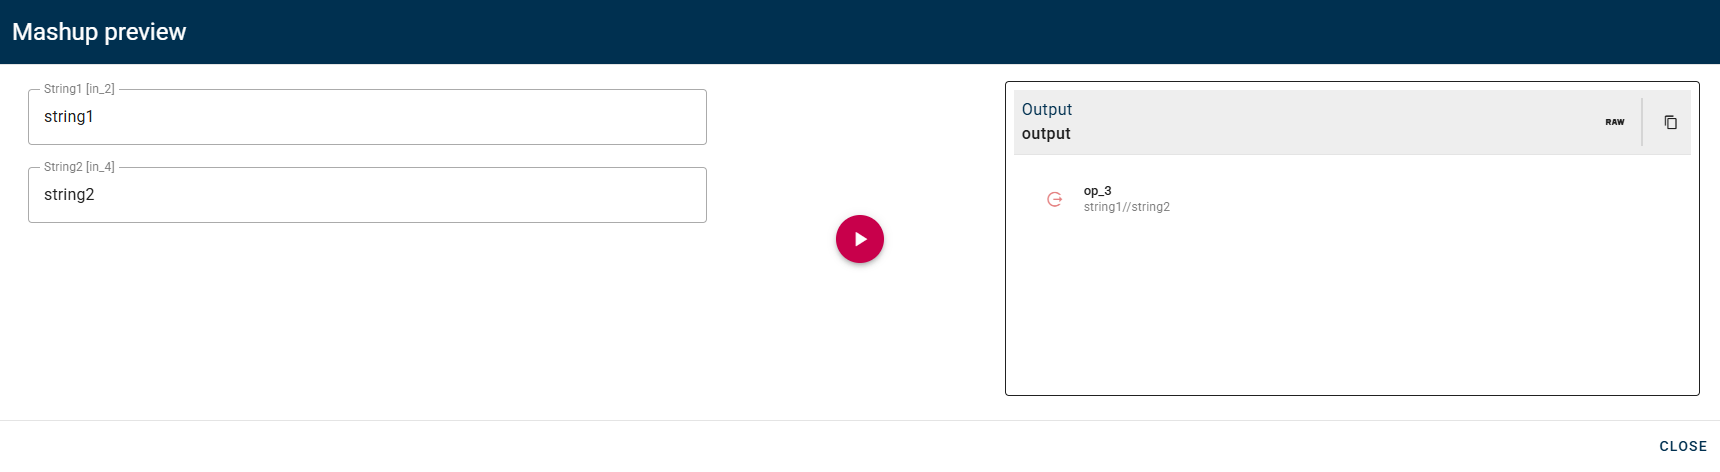
For this example I'll concatenate the string1 and string2 using the "//" as separator.
Click SAVE button to save the configuration and then generate your output.
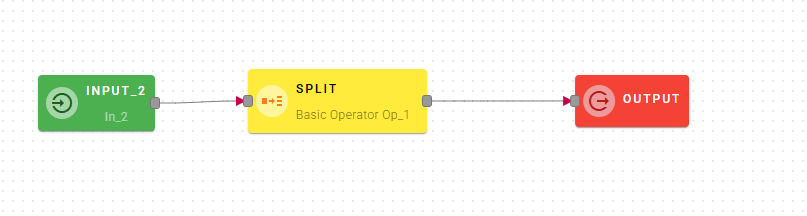
Split
Splits a string on a Delimiter character and returns a new array where each element contains a part of the original string.
Input/Output examples
How to use
Connect your input to the operator, within the source tree, locate and select from the input the string that you want to split. You can do this by clicking on the appropriate node within the source tree and drag-and-drop it into the source string field
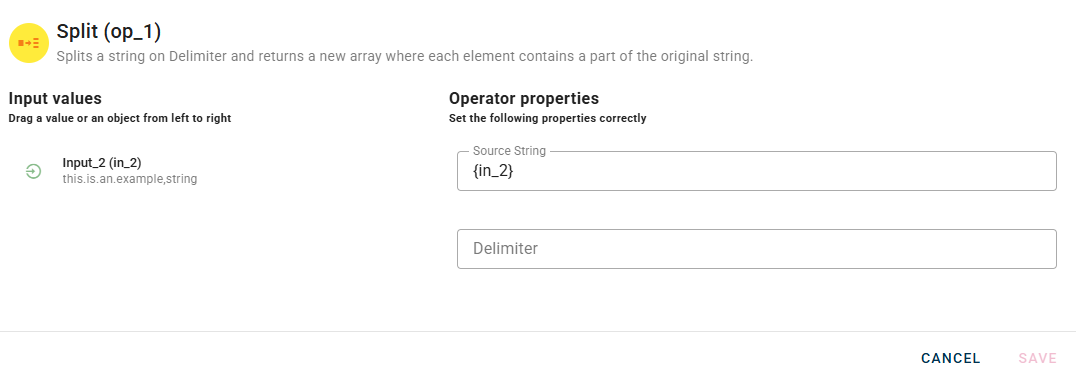
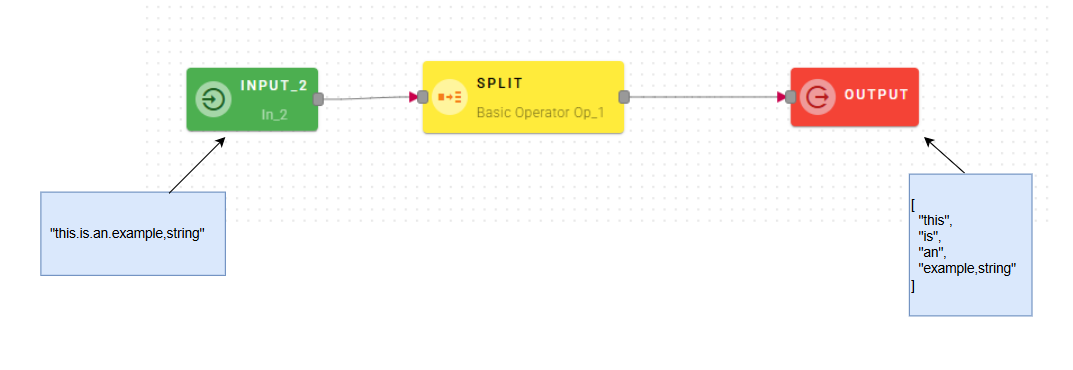
Once you have dragged and dropped your string, you will need to provide another input known as the delimiter. This field represents the token by which the string will be separated.
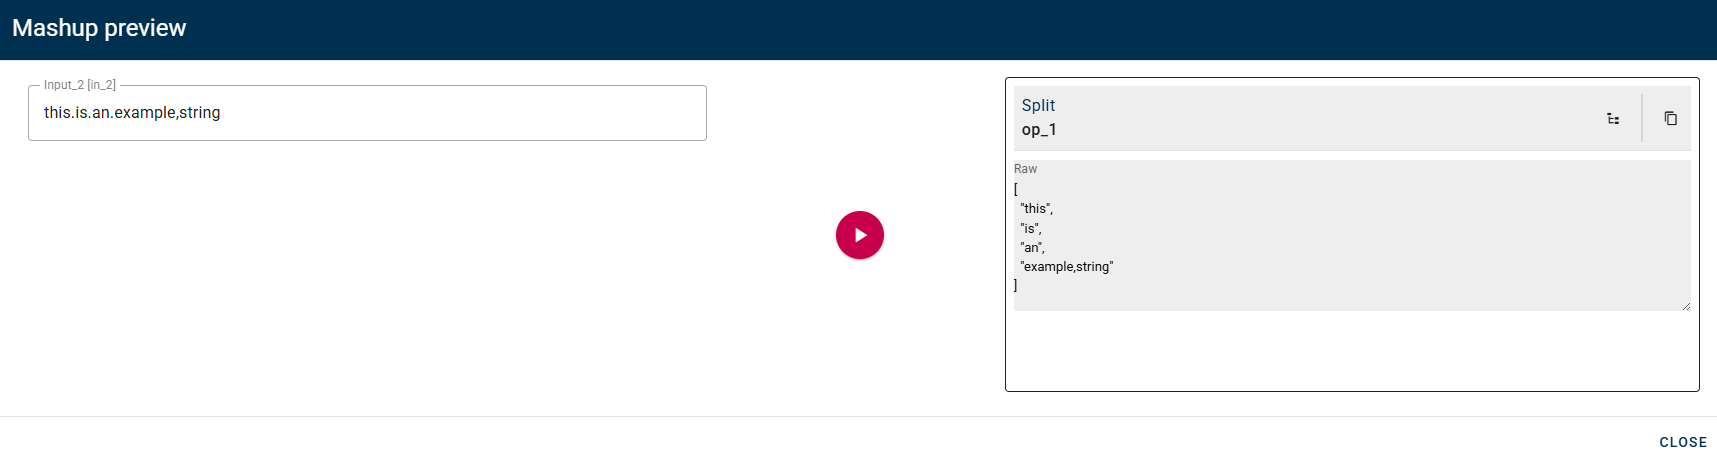
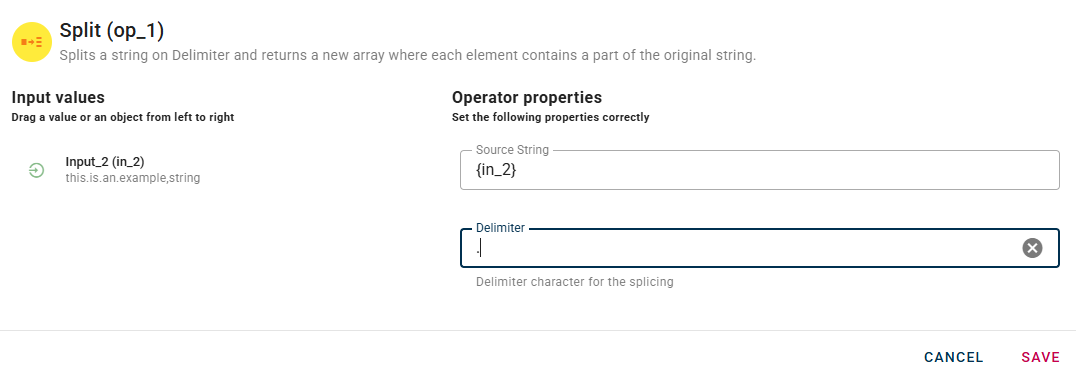 Each part of the string, separated by the specified token, will be inserted as an element in a new array.
Click SAVE button to save the configuration and then generate your output.
Mashup operators
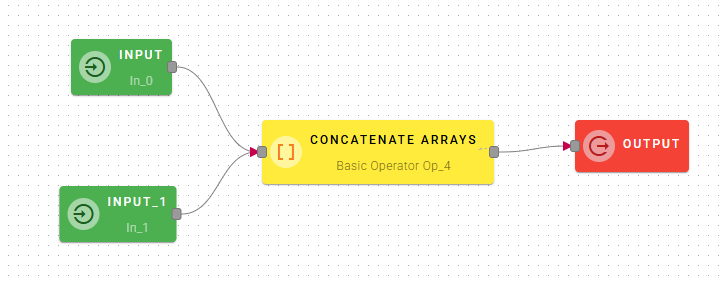
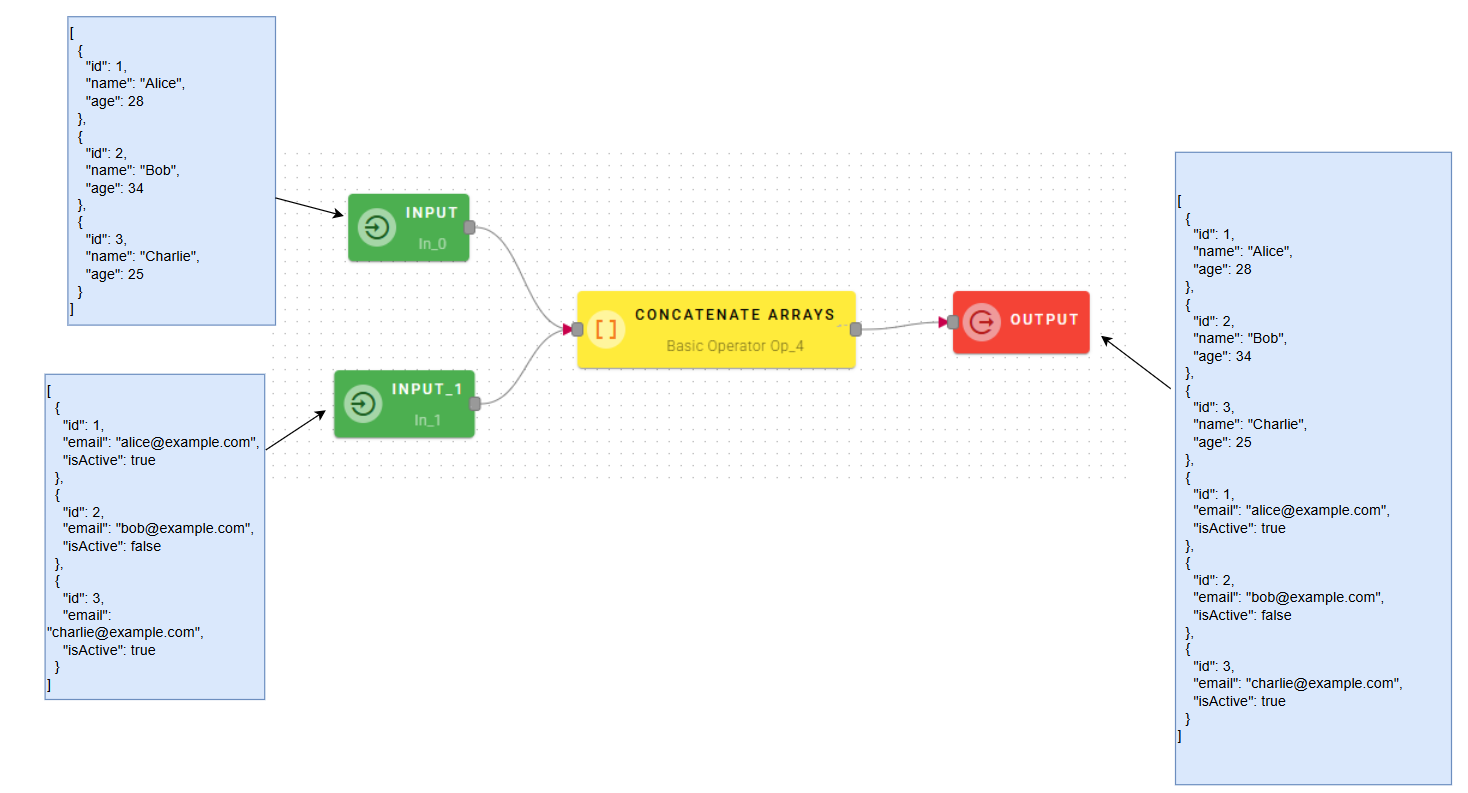
Concatenate arrays
Concatenates two or more arrays and creates a new array that contains all the elements of the source arrays.
Input/Output examples
How to use
Connect your input to the operator, within the source tree, locate from the input the arrays that you want to concatenate.
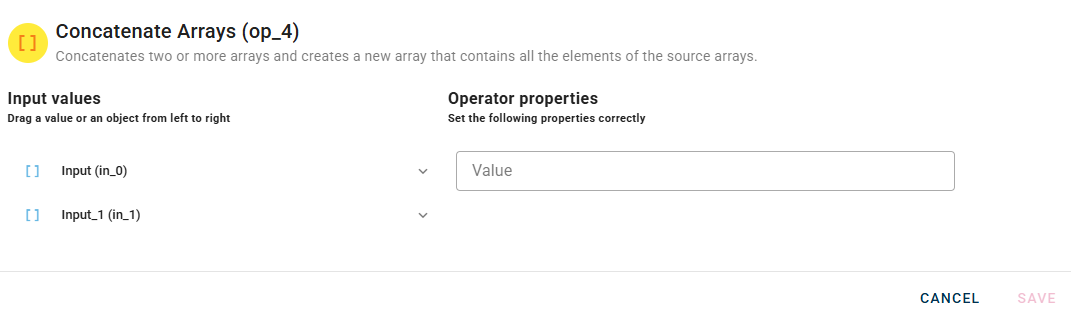
When you enter an array, a new empty line will automatically appear to add another. This process is repeated for each array you add, allowing you to enter as many as you need. If you have entered an array incorrectly you can easily remove it by selecting the trash bin button.
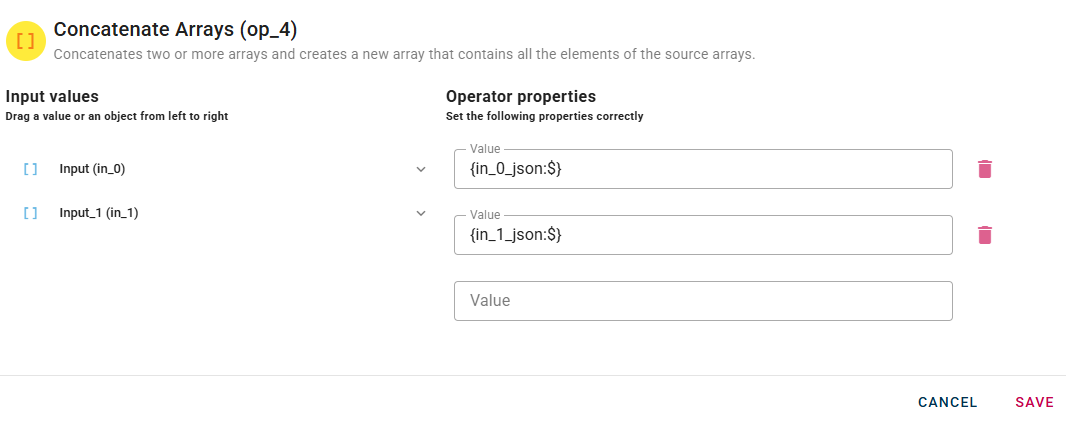
Click SAVE button to save the configuration and then generate your output.

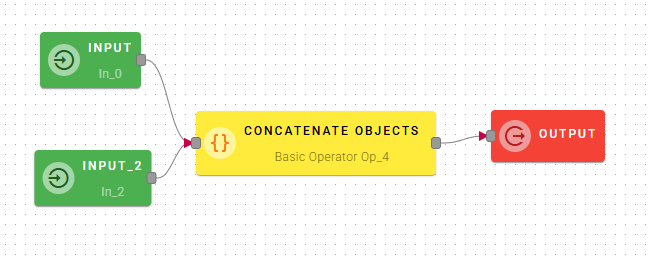
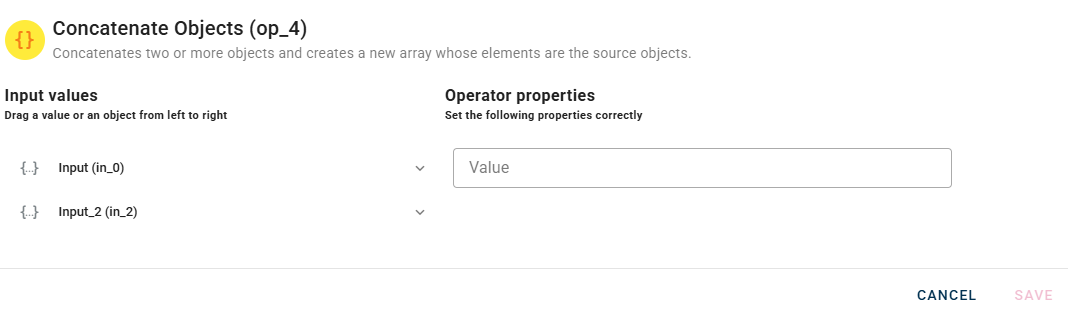
Concateate objects
Concatenates two or more objects and creates a new array where the elements are the source objects.
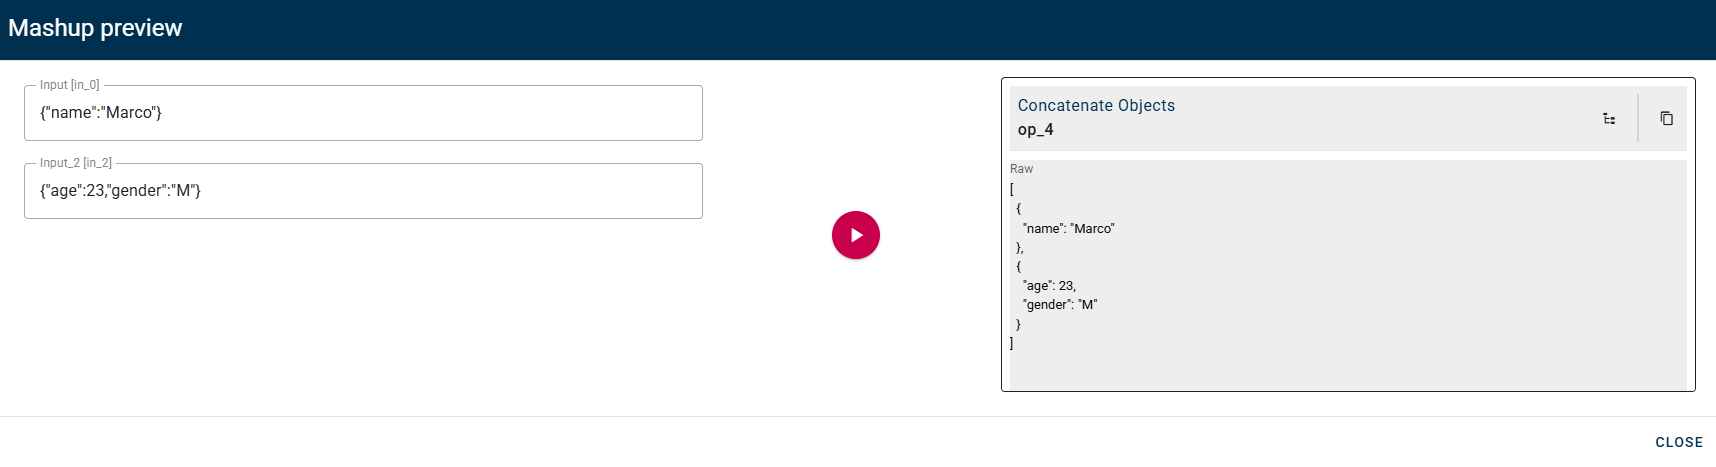
Input/Output examples

How to use
Connect your input to the operator, within the source tree, locate and select from the input an object that you want to add to an array.
When you enter an object, a new empty line will automatically appear to add another. This process is repeated for each object you add, allowing you to enter as many as you need. If you have entered an object incorrectly you can easily remove it by selecting the trash bin button.
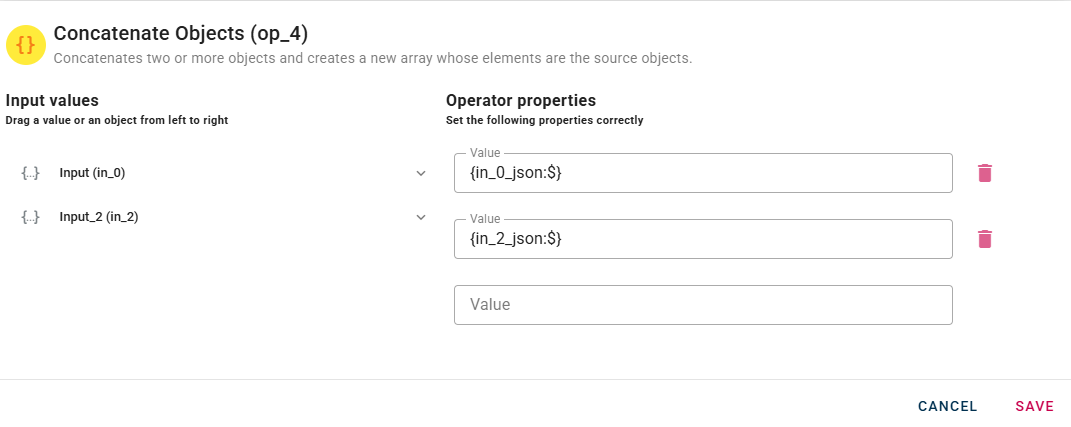
Click SAVE to save the modal configuration and then preview the output.
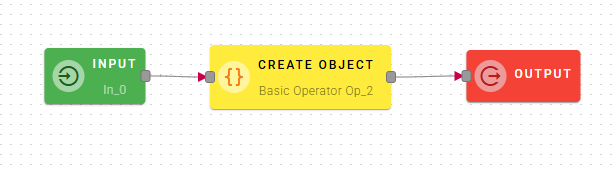
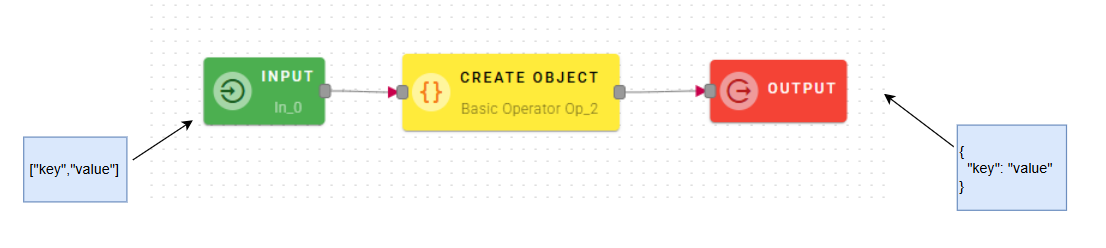
Create Object
Creates a new object with the properties defined by Key and Value.
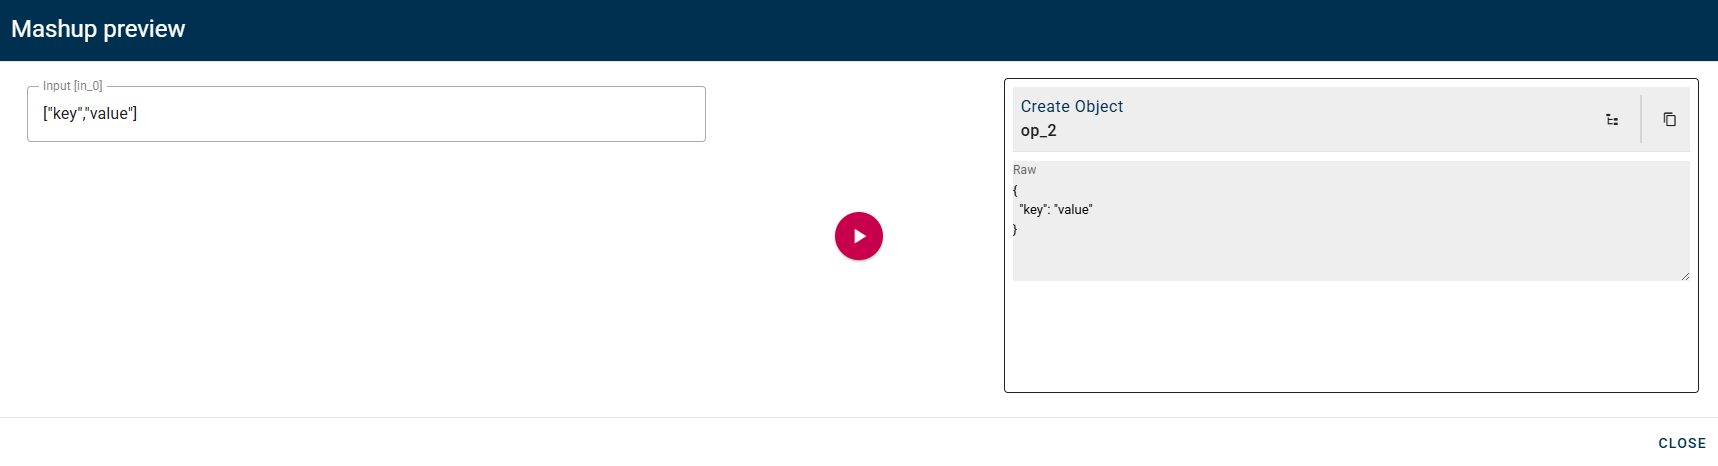
Input/Output examples
How to use
Connect your input to the operator, within the source tree, locate from the input the Key/Value pairs that you want to use to define a new object.
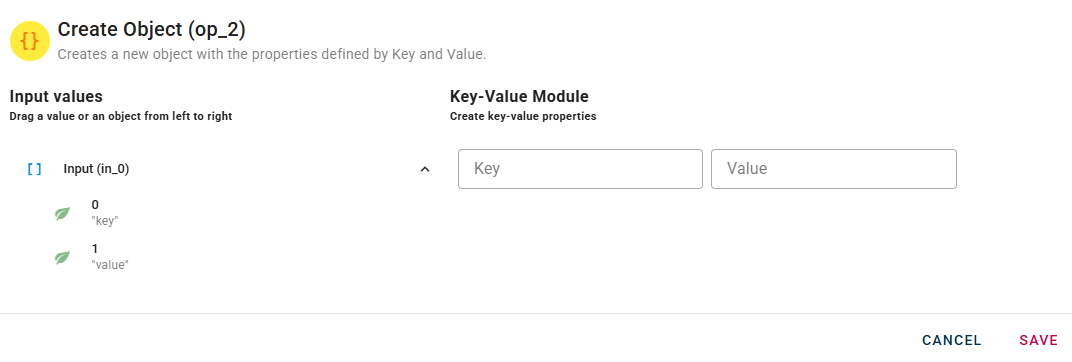
Upon opening the modal, you will come across two fields: Key and Value. To create a new object, you can click on the respective nodes within the source tree and drag-and-drop them into the corresponding fields.
When you enter a key and value pair, a new empty line will automatically appear to add another. This process is repeated for each pair you add, allowing you to enter as many as you need.
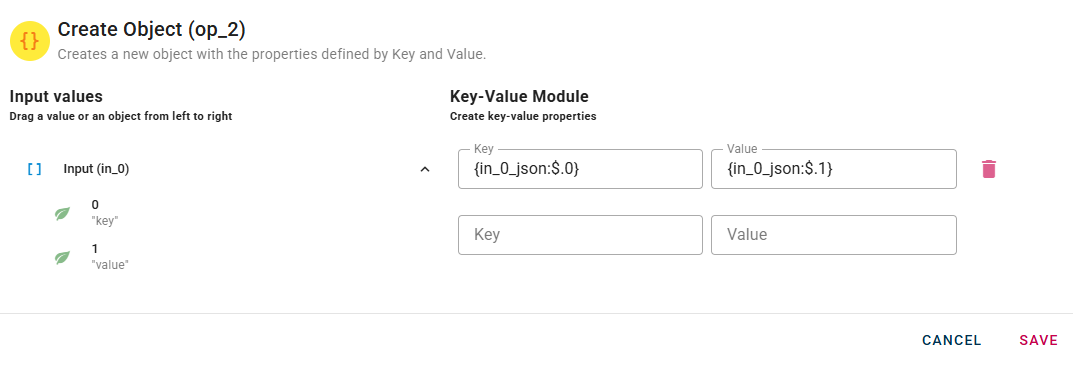
If you have entered a pair incorrectly you can easily remove it by selecting the trash bin button, and if you have entered a value incorrectly you can easily change it by clicking on the relevant field and changing it as you wish. When you have added all the desired key and value pair you can click SAVE button to save the configuration and then generate your output.
For instance, if your input consists of an array with two strings, you can drag-and-drop each element into the desired field that you wish to populate.
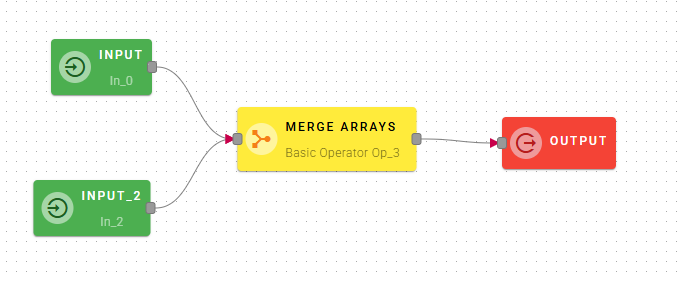
Merge Arrays
Merges two or more arrays and creates a new array where each element contains all the properties of the elements of the source arrays (i.e. applies Merge Objects to the corresponding elements of the source arrays).
In simpler terms, merging two or more arrays means combining them into a single array. The resulting array will contain elements that combine the properties of the corresponding elements from the source arrays
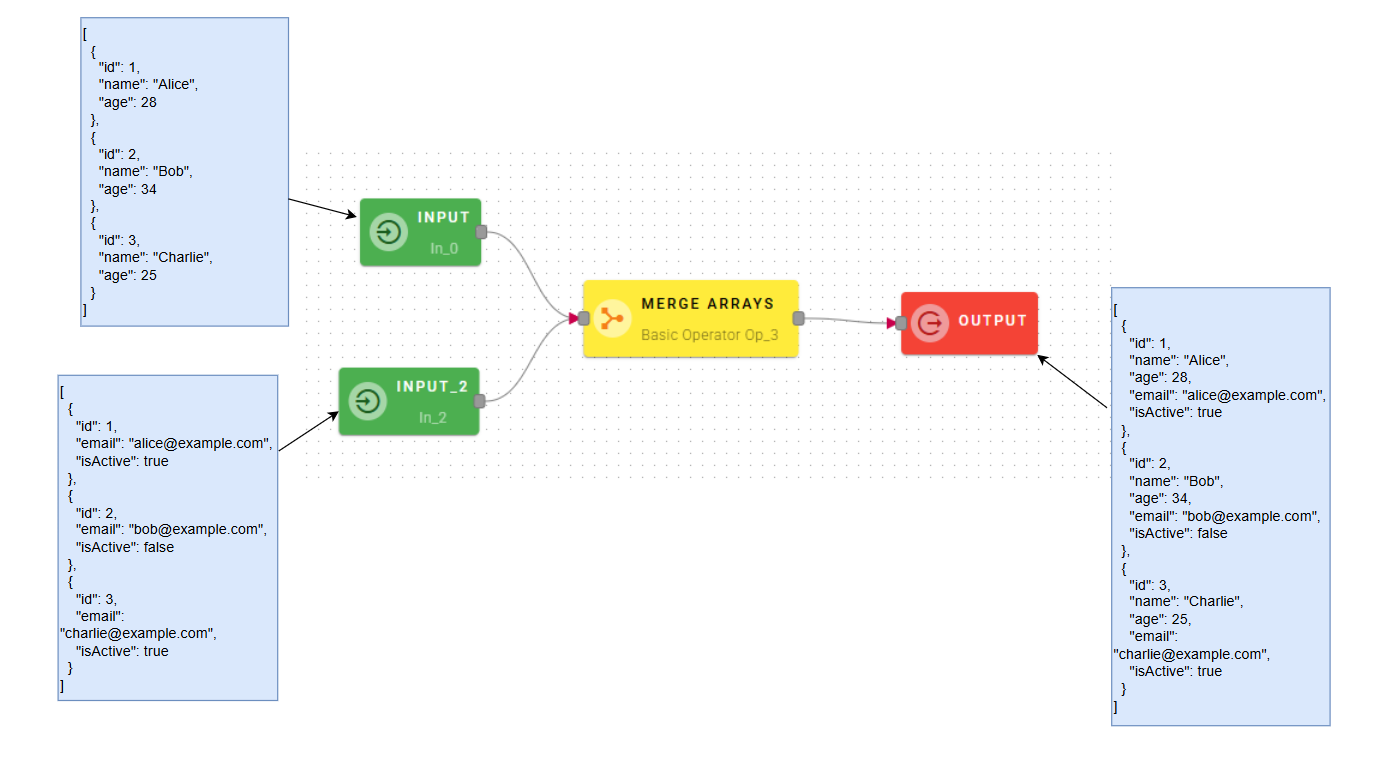
Input/Output examples
How to use
Connect your input to the operator, within the source tree, locate from the input the array of objects that you want to use to create a new arrays.
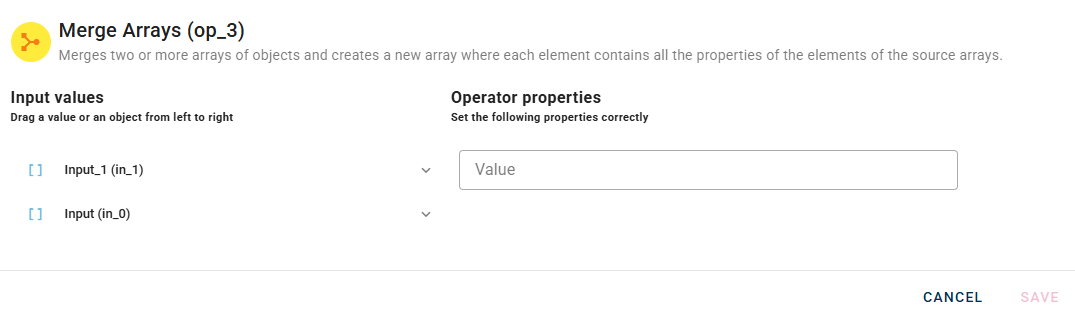
By clicking on the appropriate nodes within the source tree and drag-and-drop it in the Array field.
When you enter an array, a new empty line will automatically appear to add another. This process is repeated for each array you add, allowing you to enter as many as you need.
If you have entered an array incorrectly you can easily remove it by selecting the trash bin button.
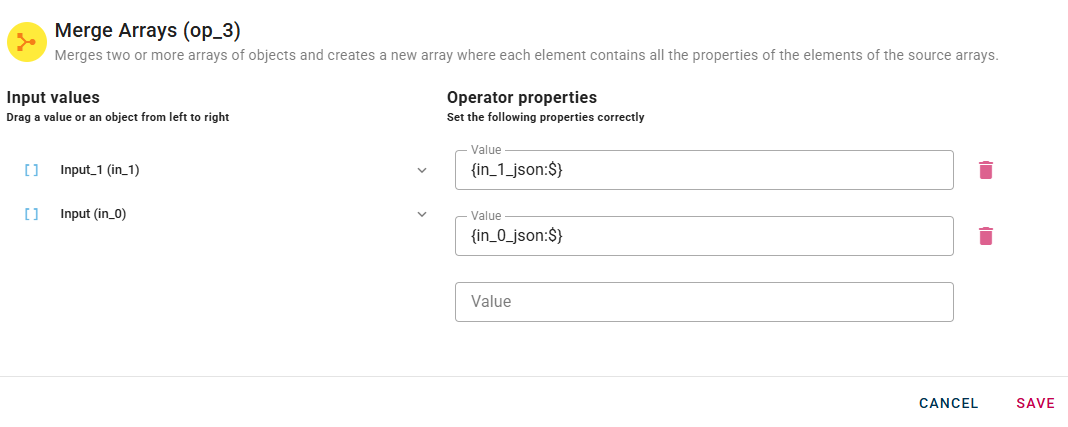
Click SAVE to save the modal configuration and then preview the output.
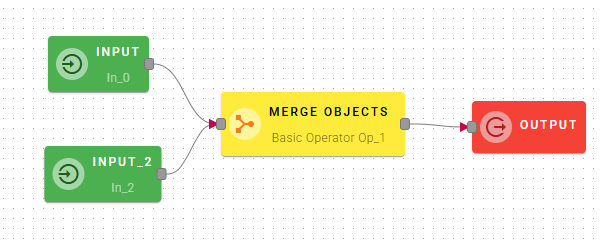
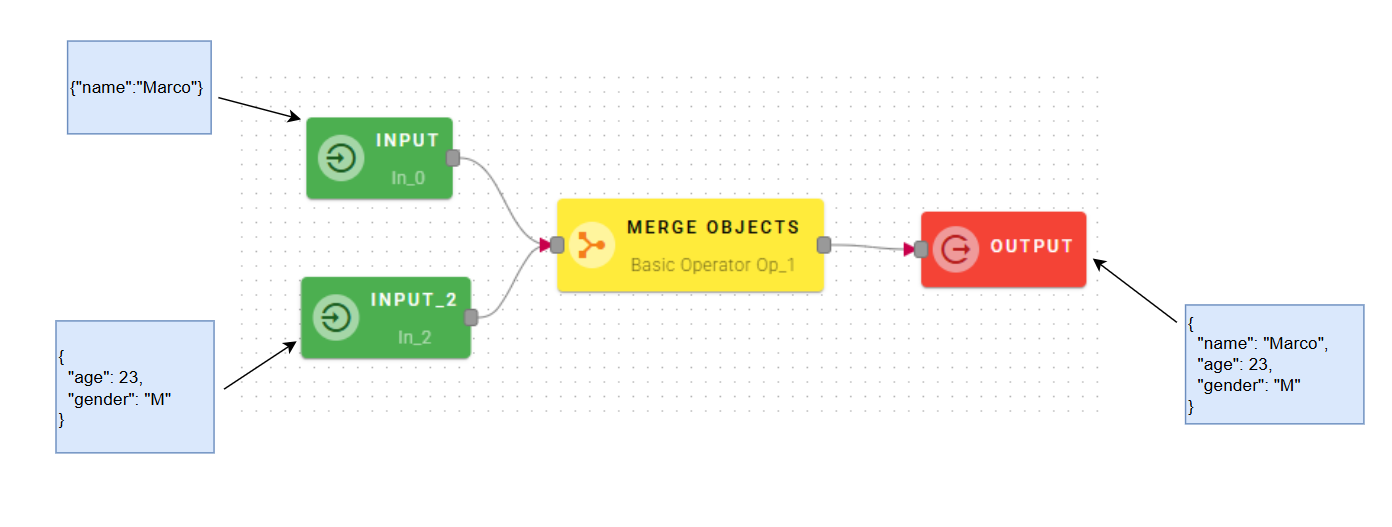
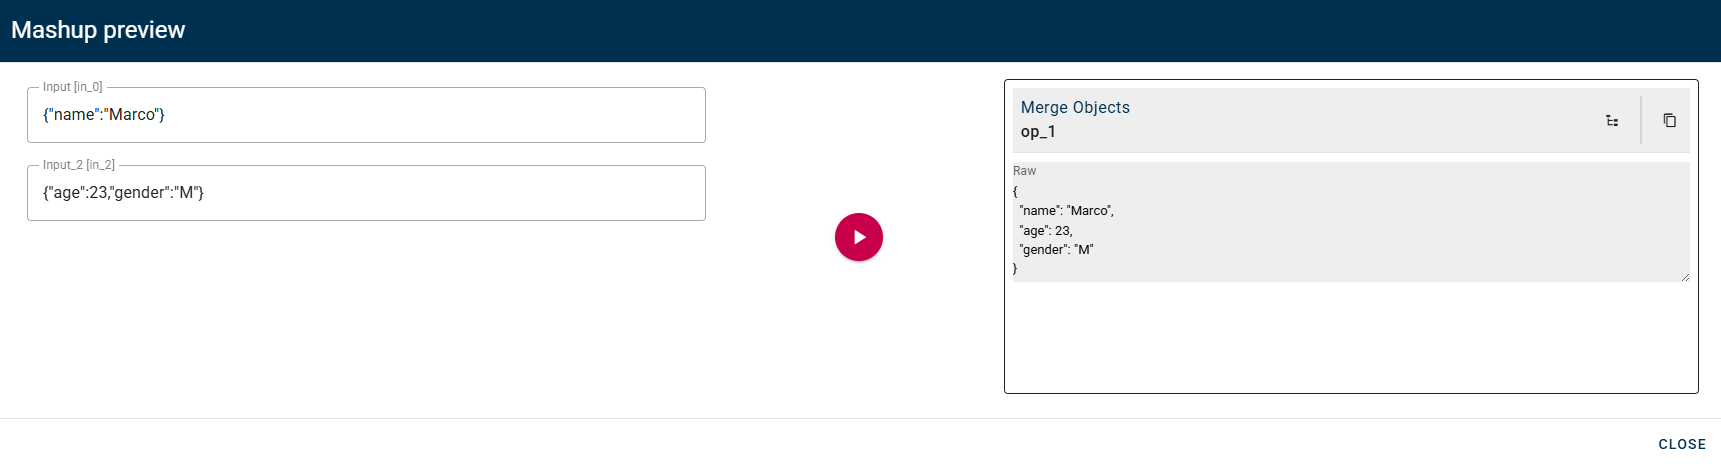
Merge Objects
Merges two or more objects and creates a new object that contains all the properties of the source objects.
Input/Output examples
How to use
Connect your input to the operator, within the source tree, locate and select from the input one of the object that you want to merge. You can do this by clicking on the appropriate node within the source tree and drag-and-drop it into the source object field
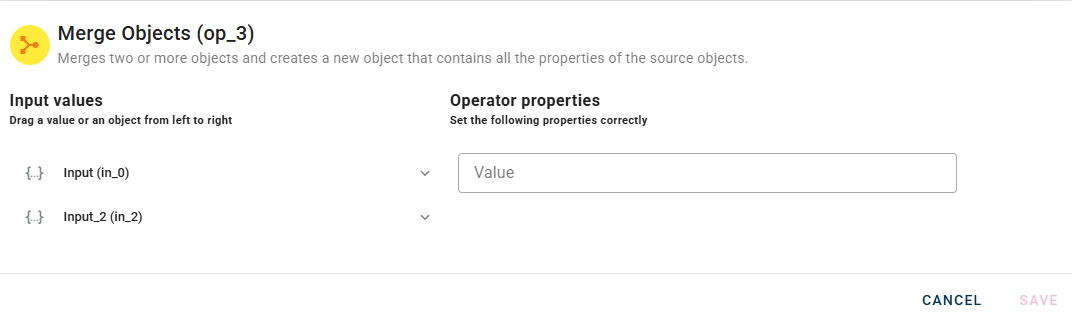
When you enter an object, a new empty line will automatically appear to add another. This process is repeated for each object you add, allowing you to enter as many as you need. If you have entered an object incorrectly you can easily remove it by selecting the trash bin button.
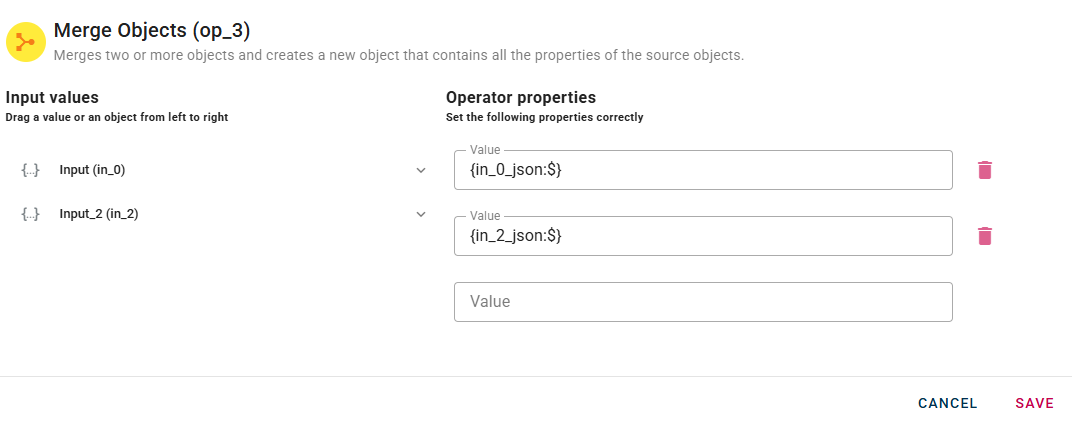
Click SAVE to save the modal configuration and then preview the output.
Utils
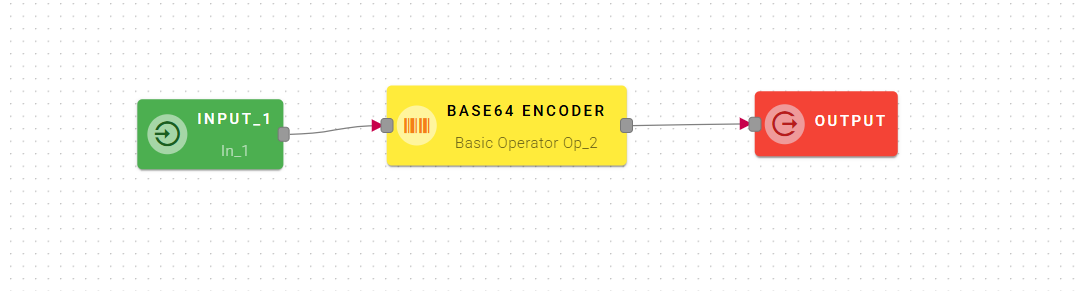
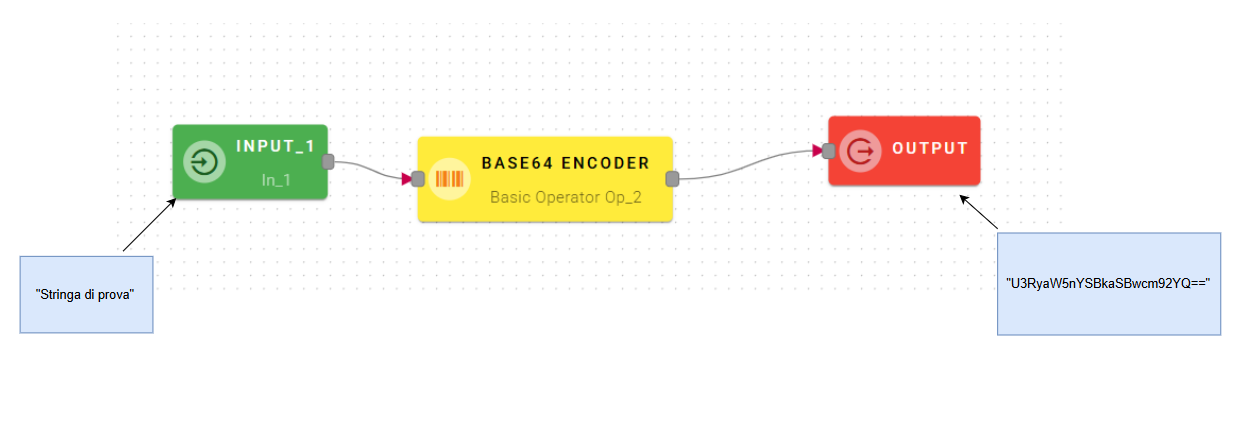
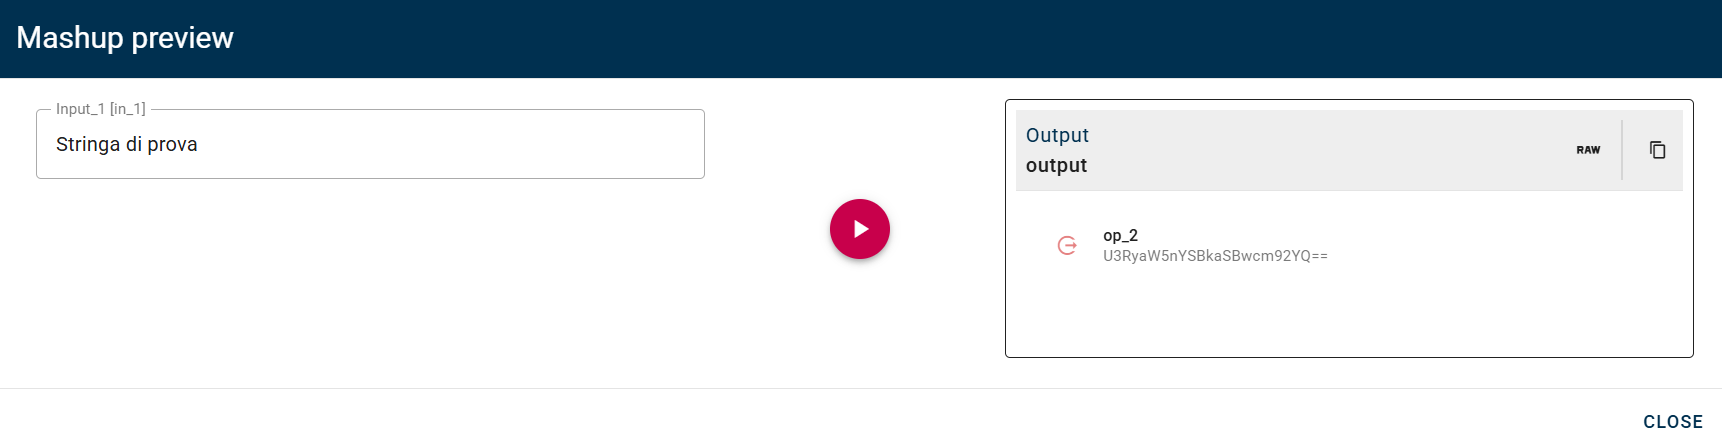
Base64 encoder
Encode text to Base64
Input/Output examples
How to use
Connect your input to the operator, within the source tree, locate and select from the input the string that you want to encode in base64. You can do this by clicking on the appropriate node within the source tree and drag-and-drop it into the source text.
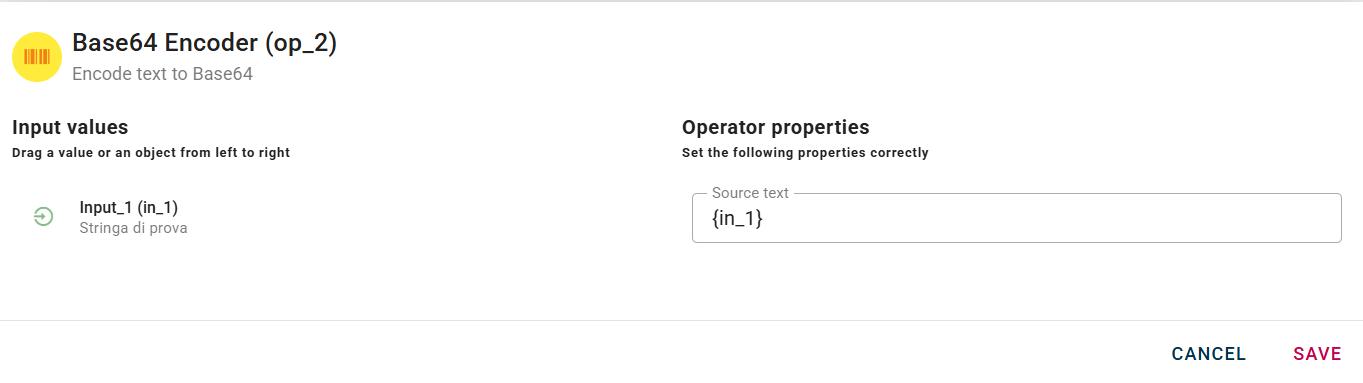
Click SAVE button to save the configuration and then generate your output.
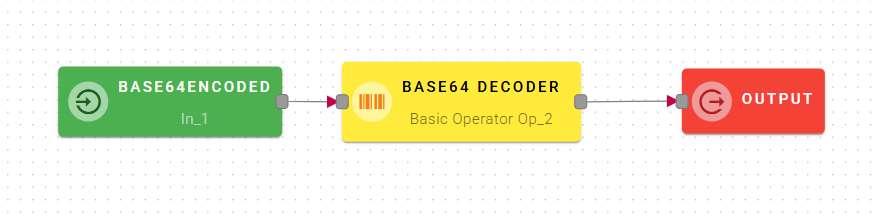
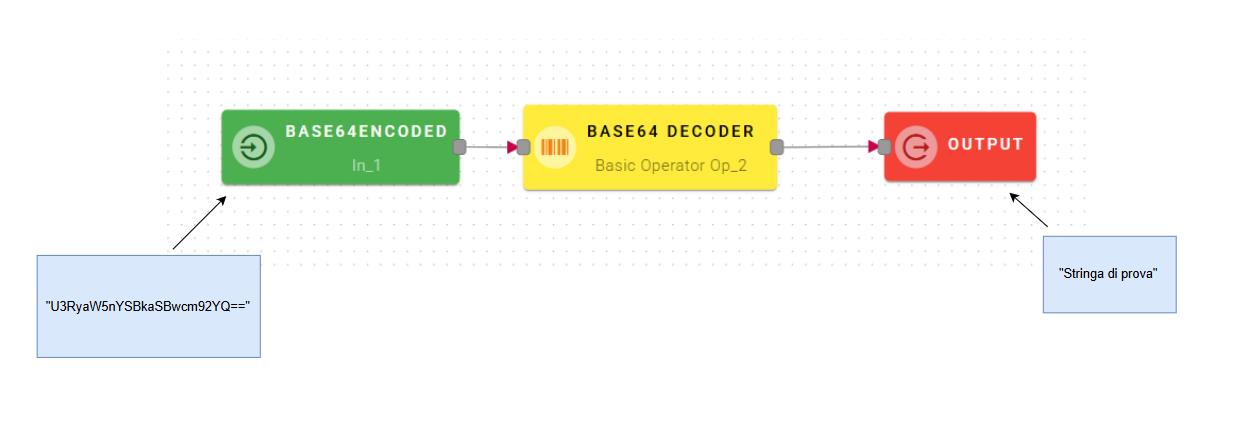
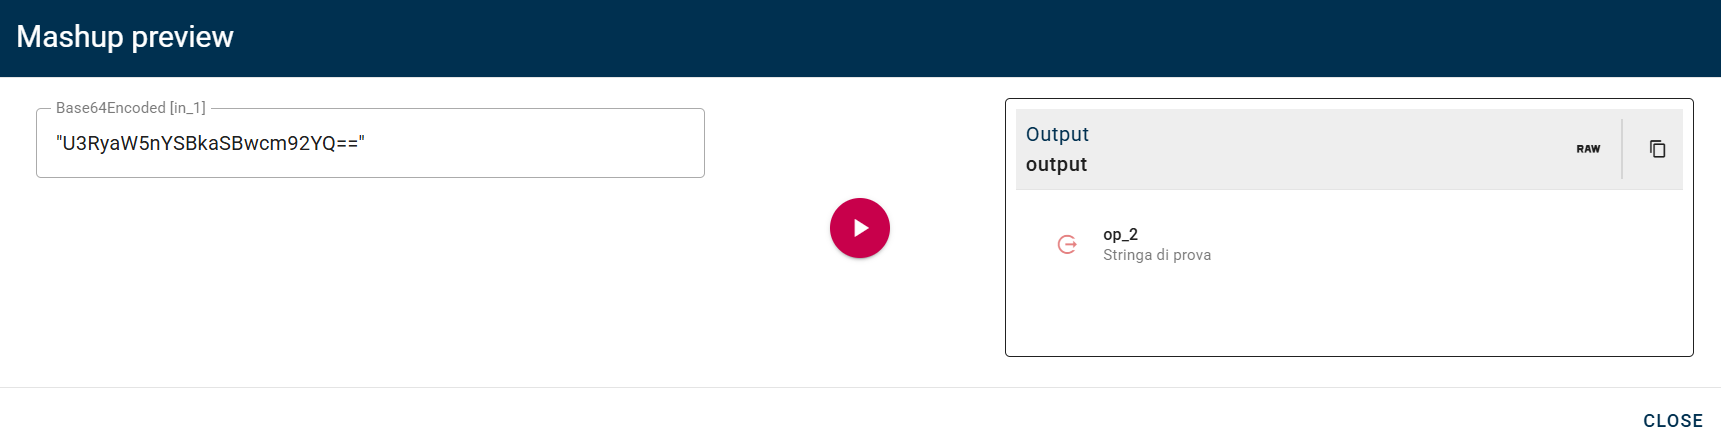
Base64 decoder
Decode Base64 text
Input/Output examples
How to use
Connect your input to the operator, within the source tree, locate and select from the input the string that you want to decode by base64. You can do this by clicking on the appropriate node within the source tree and drag-and-drop it into the source text.
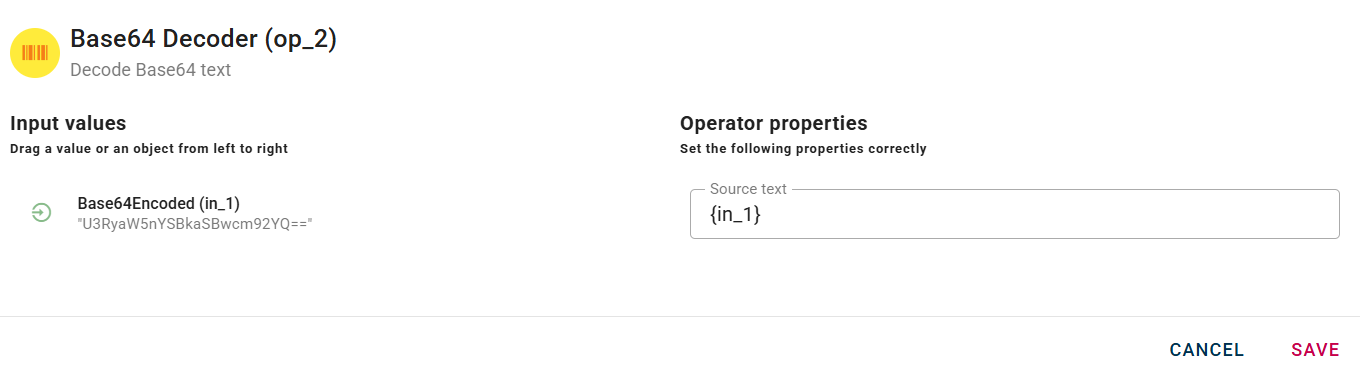
For example in this scenario we take as input the output of a Base64 encoder operator, but you can do this with a string encoded in other ways as well. Click SAVE button to save the configuration and then generate your output.
If-else
The if-else operator directs the flow of data along a specific path based on a condition.
Input/Output examples
It takes a Boolean condition (true or false) as input and, depending on its value, determines which subsequent operator should be executed.
If the condition is true, the flow proceeds to the node connected to the "true" path; if the condition is false, the flow is redirected to the node associated with the "false" path. This allows to create intuitive and dynamic decision-making logic within your process.
It also includes an optional parameter called "Param to forward." This parameter allows you to define what output the operator should produce, making it more convenient to use with subsequent operators in the chain.
Since this is an optional parameter, if it's not specified, the necessary inputs for other nodes can be easily added via a dedicated green input block.
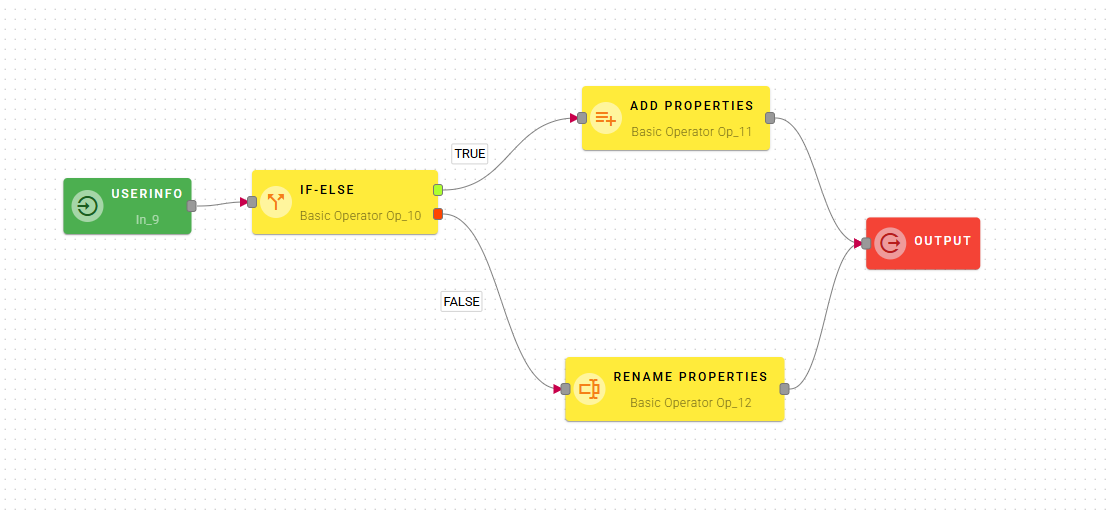
Path Configuration
Defining the paths is extremely intuitive:
True Path: Connect the green dot of the if-else operator to the operator that should be executed when the condition is true.
False Path: Similarly, connect the red dot of the if-else operator to the operator that should be executed when the condition is false.
How to use
Before open the modal of the operator, connect the green dot with the next operator to process if the condition is true and connect the red dot with the next operator to process if the condition is false.
Then open the modal and Within the source tree, locate and select from the input the condition that you want to check. You can do this by clicking on the appropriate node within the source tree and drag-and-drop it into the source object field.
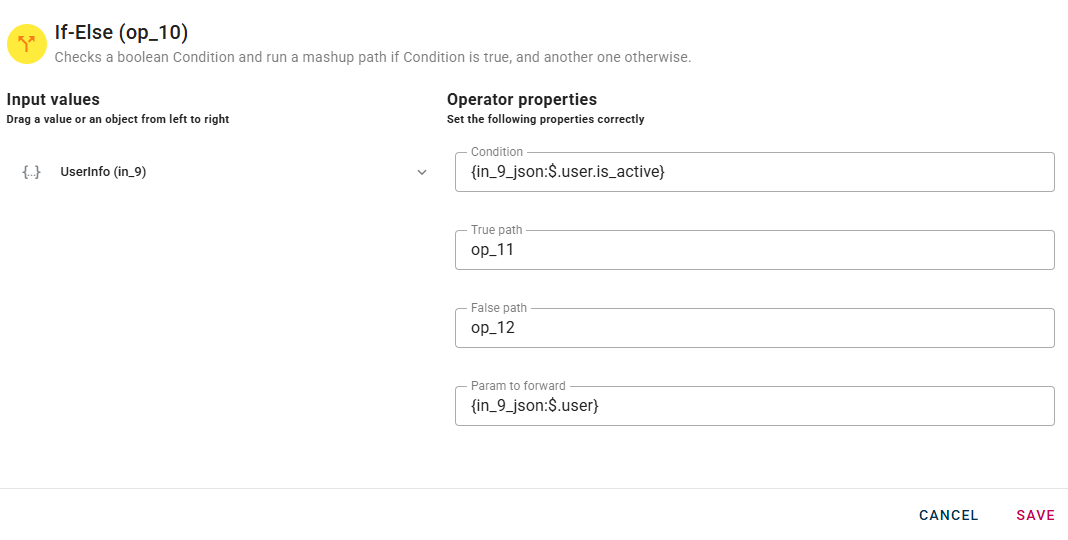
You will notice that the "True Path" and "False Path" parameters are already inserted.
Once you have successfully dragged and dropped your condtion into the modal, you can also drop in the "Param to forward" section the parameter to forward to the next operator by performing the preview of the If-Else operator.
Next, you can configure the operators connected to the If-Else operator.
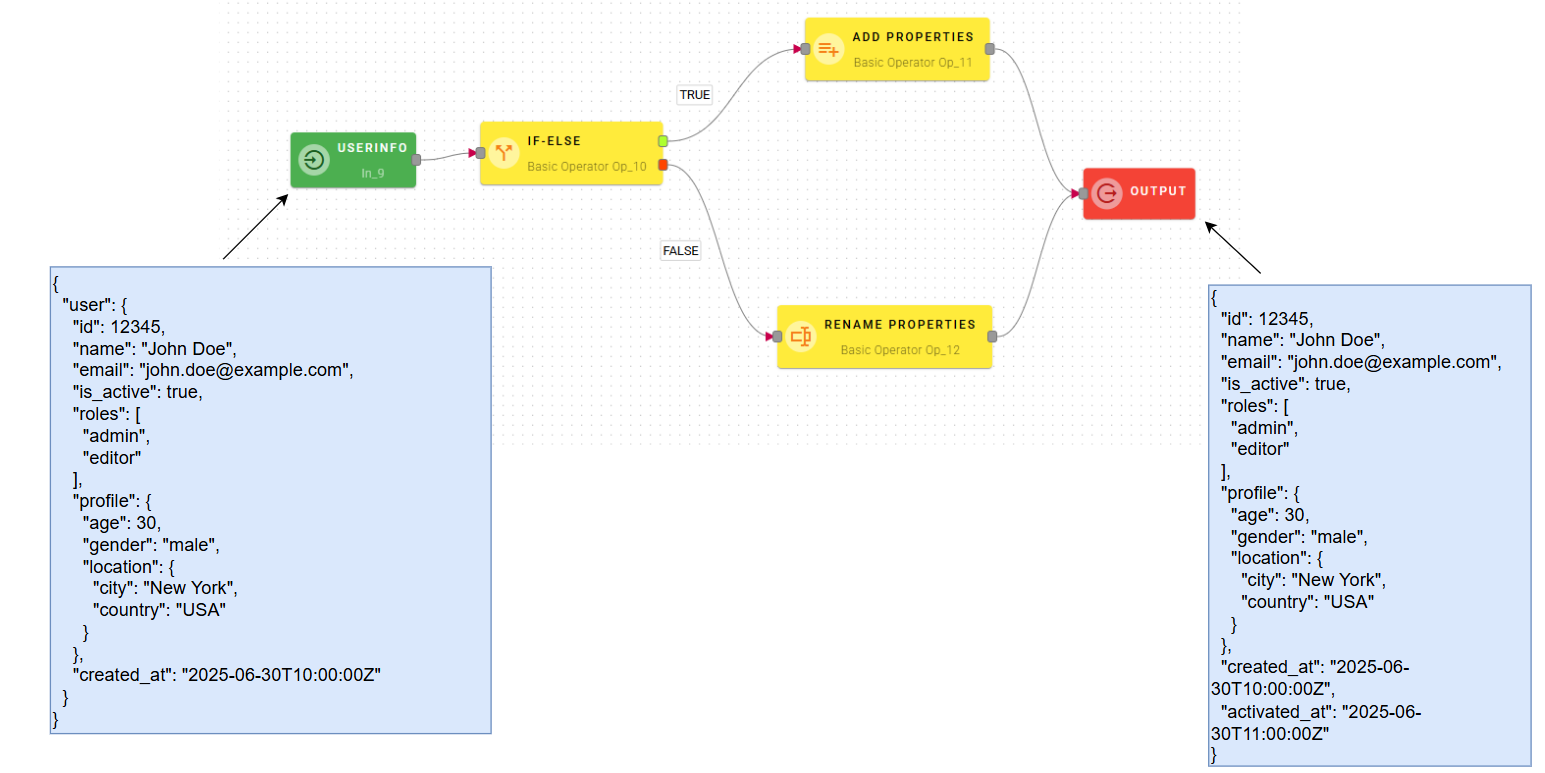
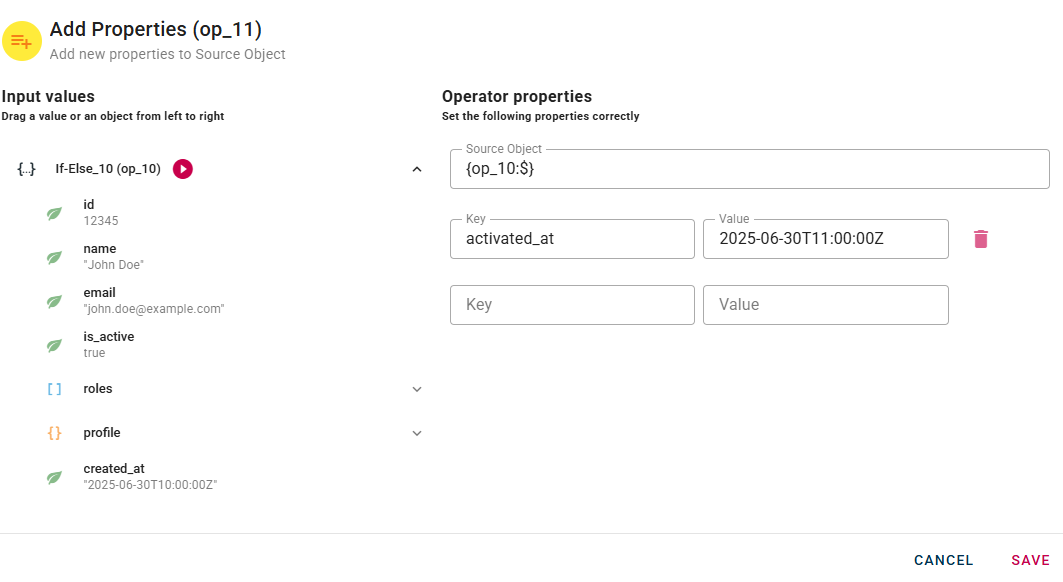
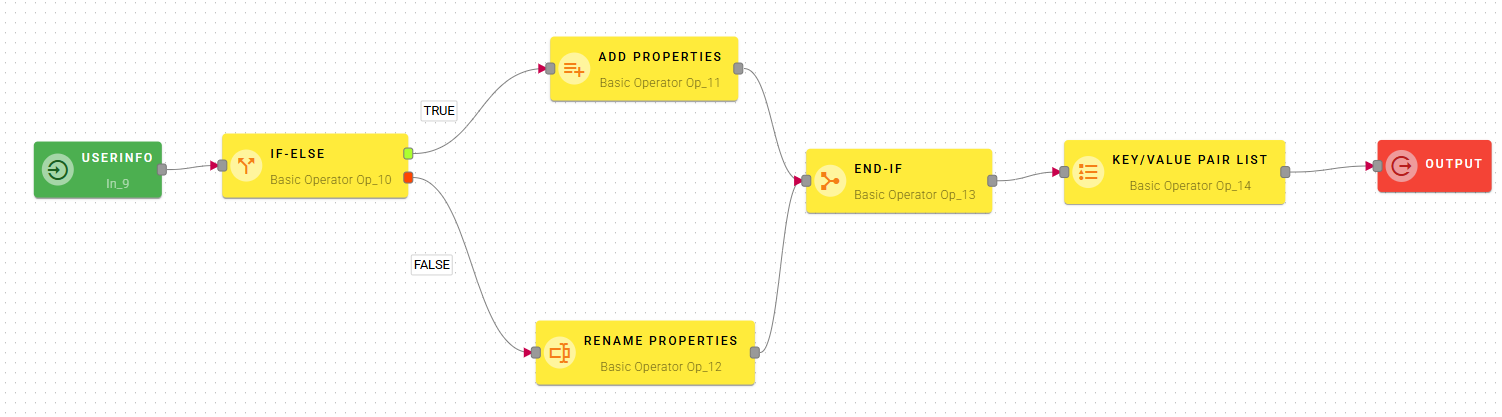
Here’s a practical example:
- the condition is true (in our case, activated is true), the activated_at property, with a date as its value, will be added to the source object.
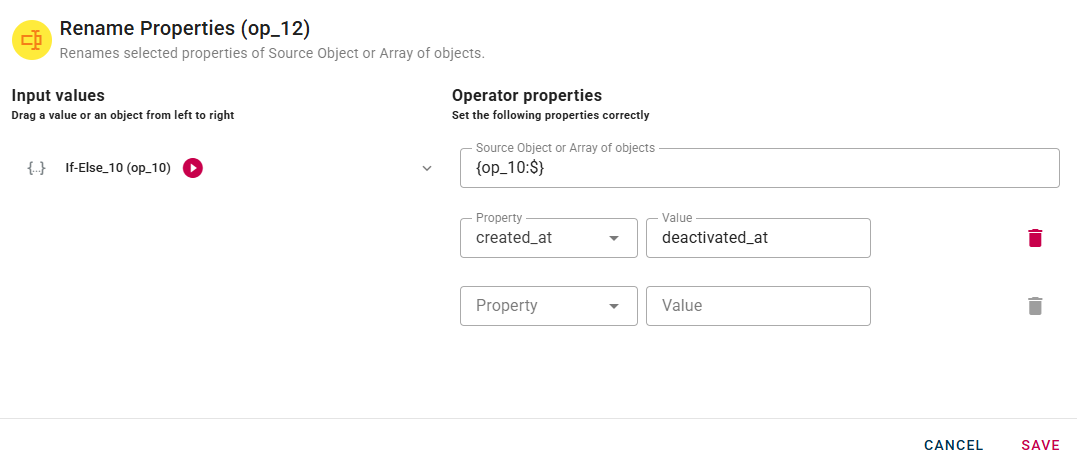
- the condition is false, the created_at property will be renamed to deactivated_at.
Both of these operators will be connected to the input block. Keep in mind that, while not mandatory, you could insert additional operators into each path to create more complex logic.
When everything is correctly configured you can perform the general preview and you will see the output of the operator based on the condition.
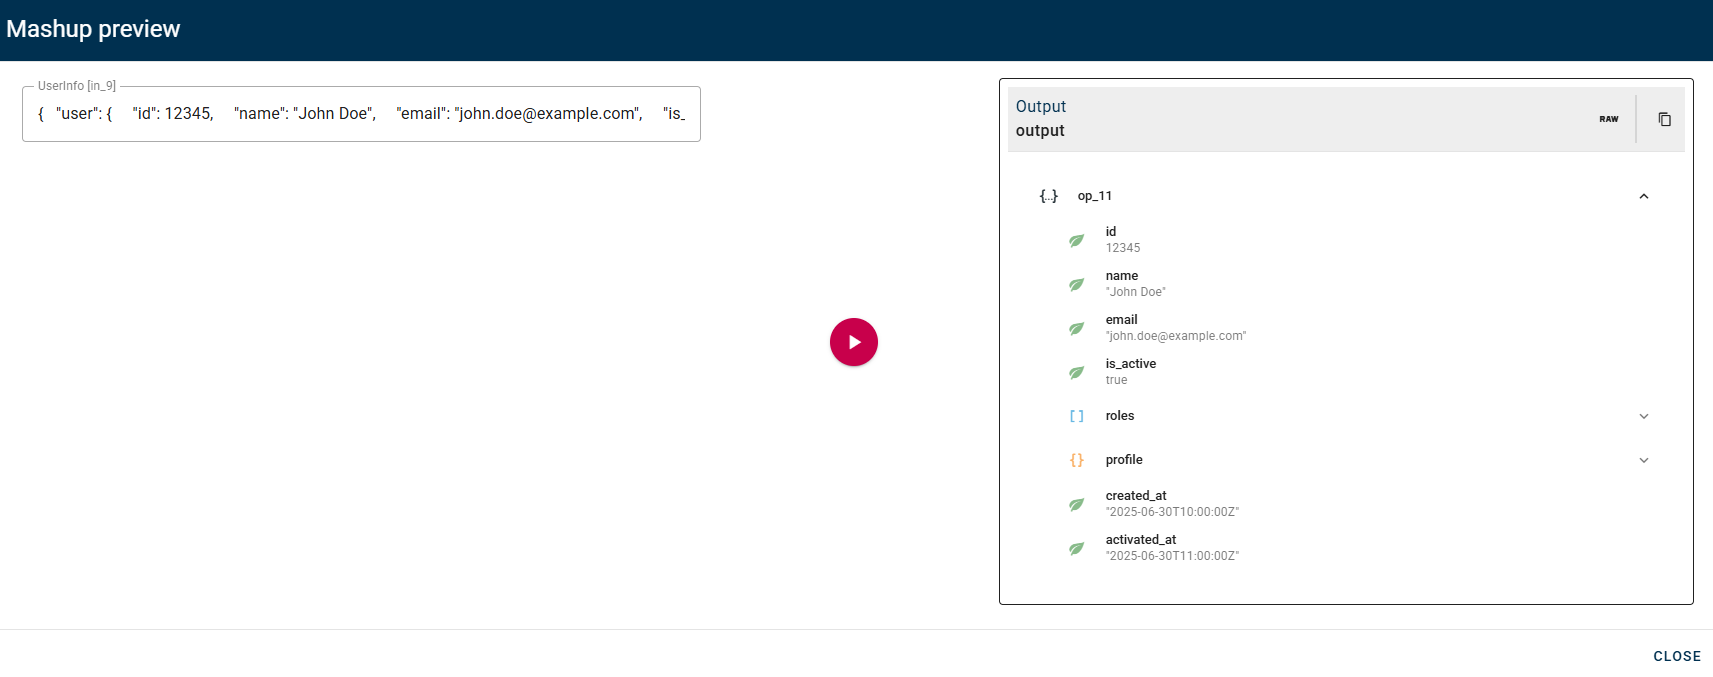
In our example the condition checked was true, so the mashup follows the true path which consist of the add property node. So the output will be the source object with the activated_at property added.
End-If
The "End-If" operator is crucial when the two paths separated by the If-Else operator (the "true" branch and the "false" branch) need to converge back into a single flow. Its primary purpose is to consolidate the outputs from these two branches to ensure that a single, consistent input is available for subsequent operators in the pipeline.
Imagine the "End-If" operator as a mandatory "meeting point" after a conditional bifurcation. Regardless of which path was followed (true or false), both results must merge to allow the process to continue in a unified manner.
Its role is to pass a single output that will be used by downstream nodes.
An important aspect of the "End-If" operator concerns the preview display for subsequent operators. Within its configuration, you are required to choose which of the two outputs (from the "true" branch or the "false" branch) should be used for the preview.
It is crucial to understand that this choice does not affect the actual data flow behavior during execution. The selection solely serves the purpose of providing an example data structure for the previews of downstream operators.
During actual runtime, the "End-If" operator will forward the actual output coming from the branch that was indeed traversed (true or false), based on the result of the If-Else condition.
In summary, the "End-If" operator ensures that:
- Conditional flows rejoin into a single path.
- A unique output is available for subsequent nodes.
- Previews are functional by providing a reference data structure.
How to use
Within the source tree, locate and select from the input one of the two nodes coming from the true/false path.
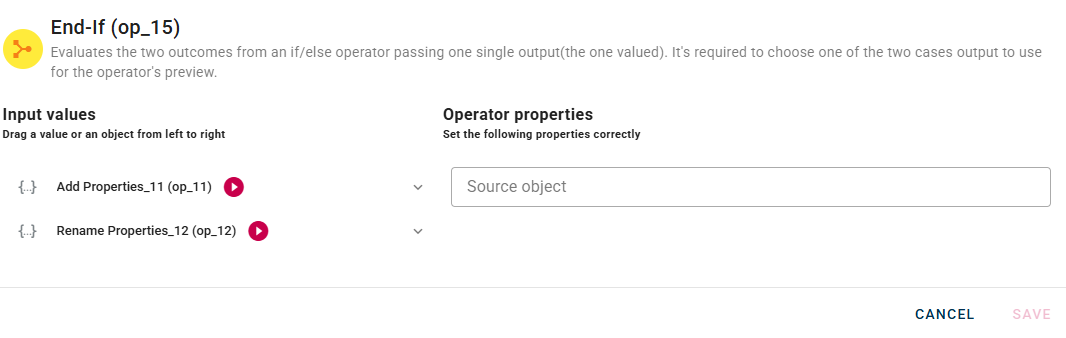
You can do this by clicking on the appropriate node within the source tree and dragging and dropping it into the "Source object" field.
This parameter does not affect the actual data flow behavior during the general execution of your mashup. Its sole purpose is to provide an example data structure for the previews of downstream operators.
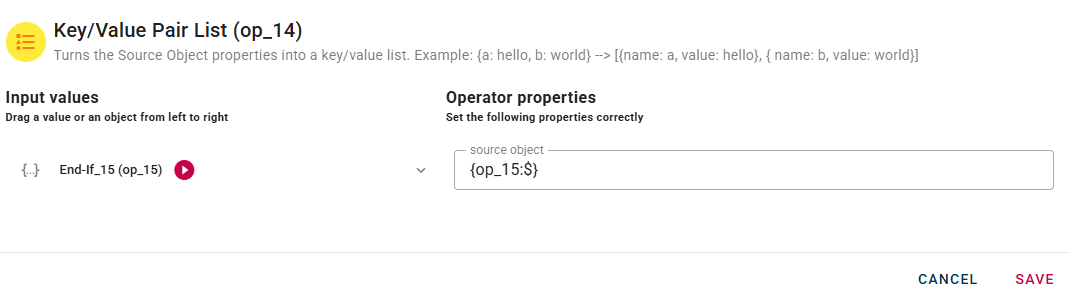
Let's illustrate this with an example where the "End-If" output is used as input for the next operator, a "Key/Value Pair List" operator.
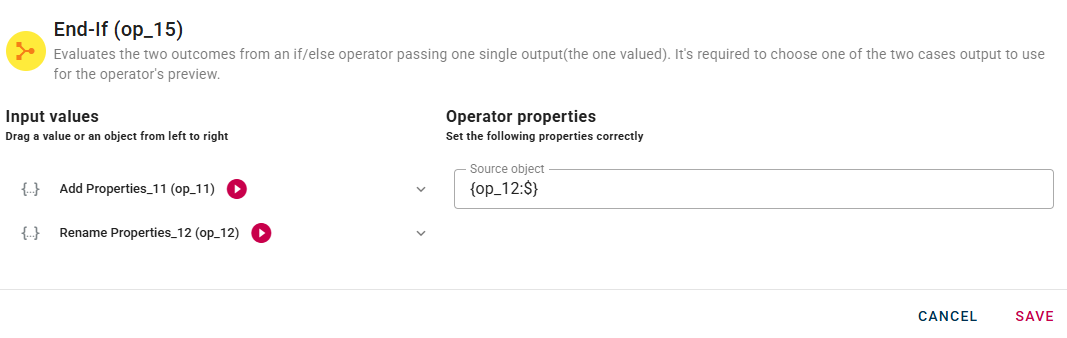
In our specific example, we choose to use the output from the "false" case to perform the preview for the "Key/Value Pair List" operator. Therefore, the preview output of this operator will reflect the data structure of the "false" path (as you can see with the deactivated_at field).
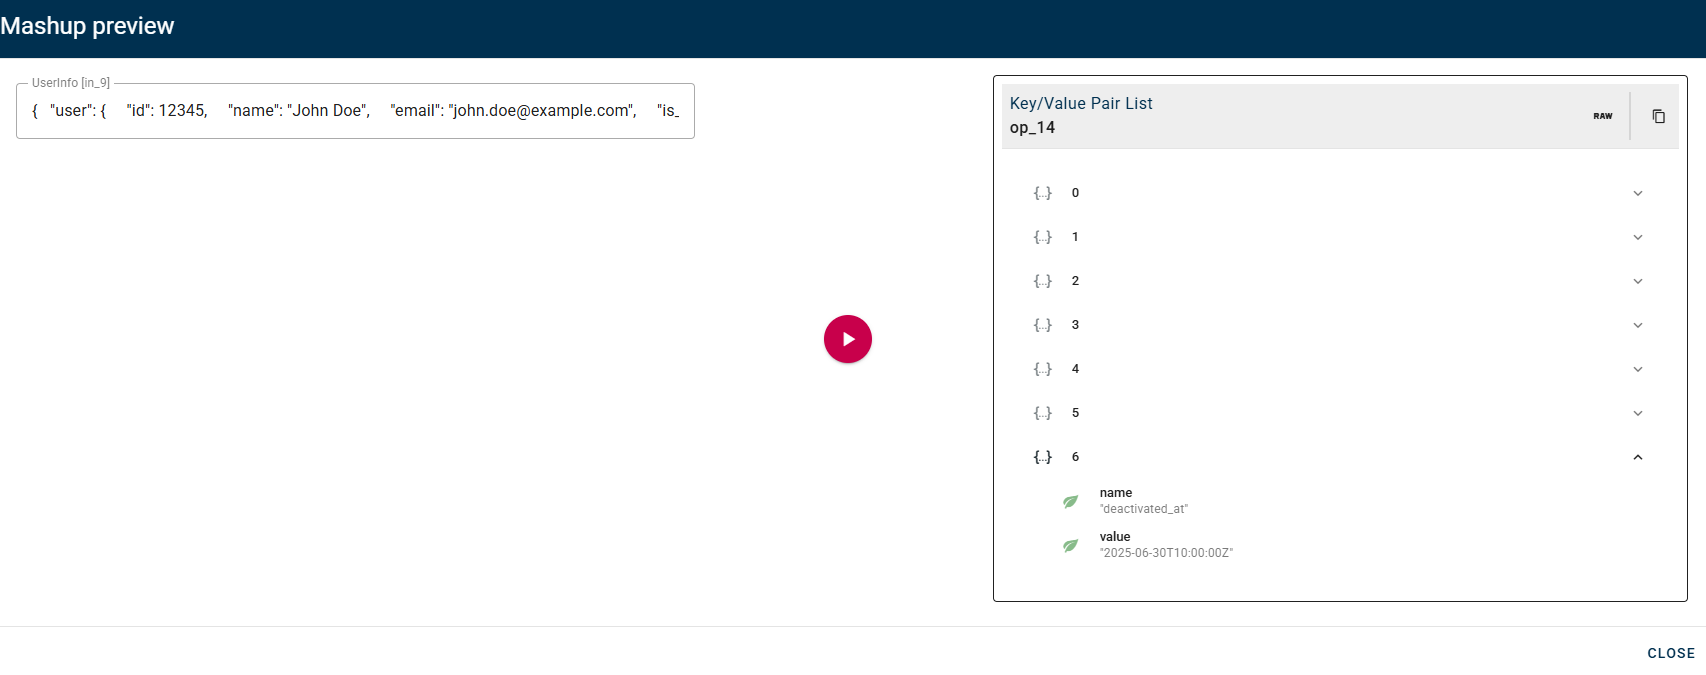
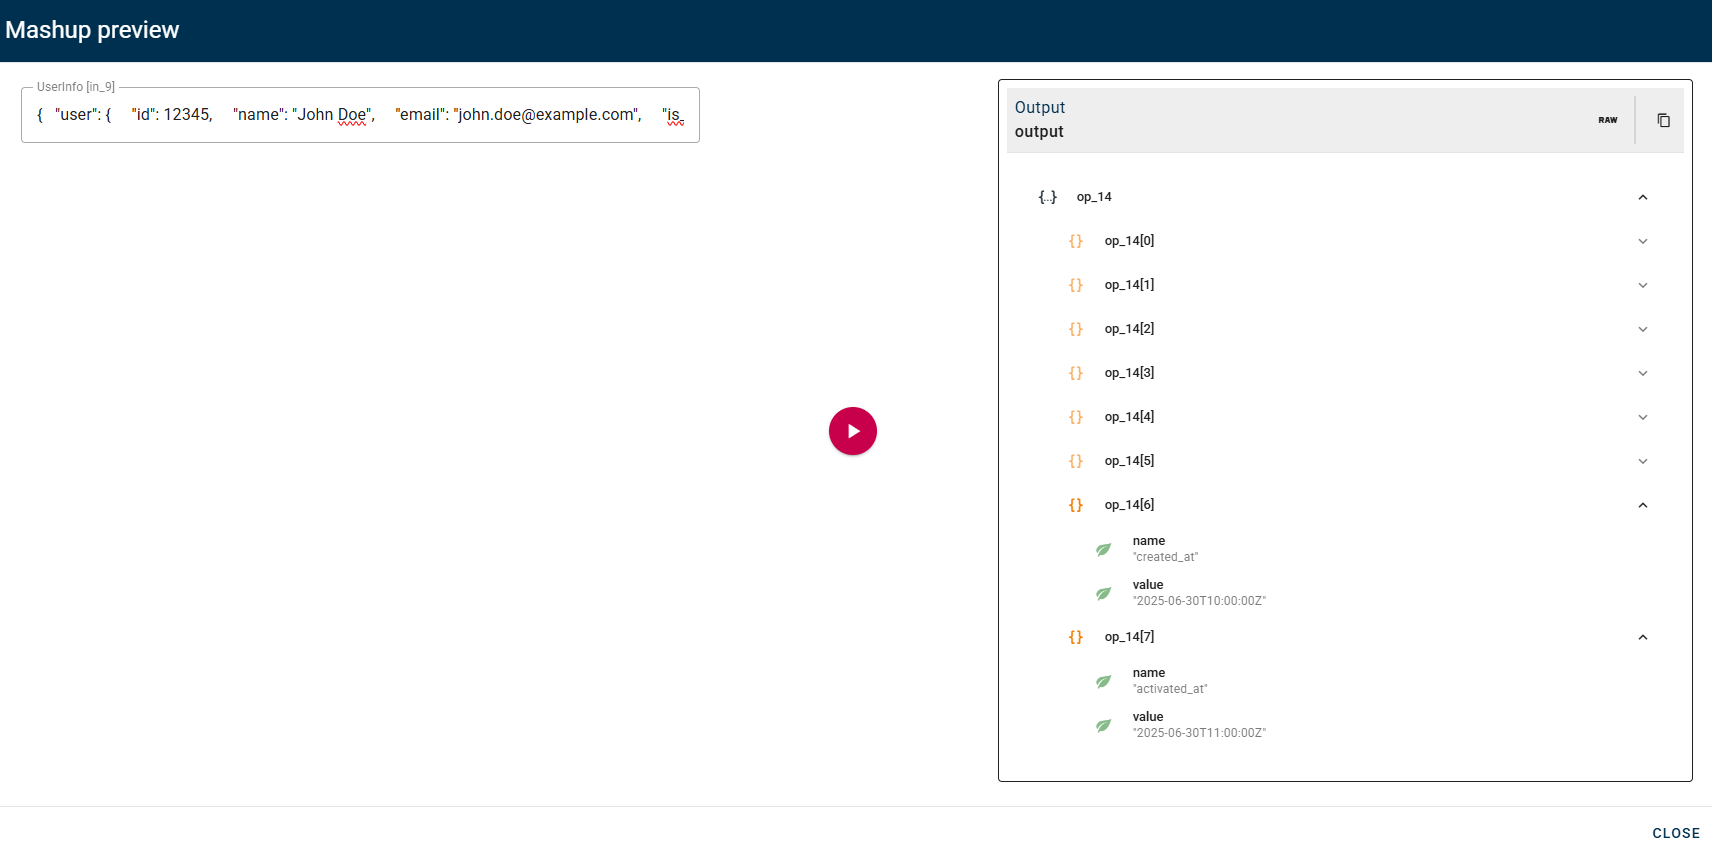
However, if you perform a preview of the entire mashup, you will observe the "Key/Value Pair List" output corresponding to the "true" case. This is because the overall mashup preview evaluates the actual condition, and in this specific scenario, the "true" path is the one being effectively evaluated.
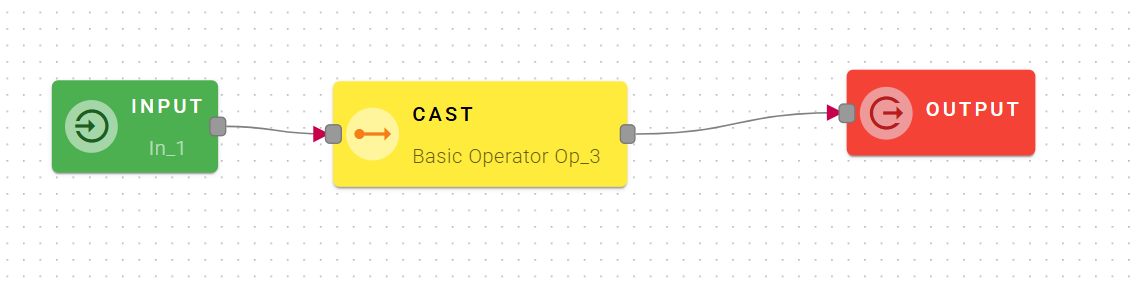
Cast
Converts Value to a different data type
Input/Output examples
How to use
Connect your input to the operator, within the source tree, locate and select from the input the value that you want to cast to other types. You can do this by clicking on the appropriate node within the source tree and drag-and-drop it into the value field.
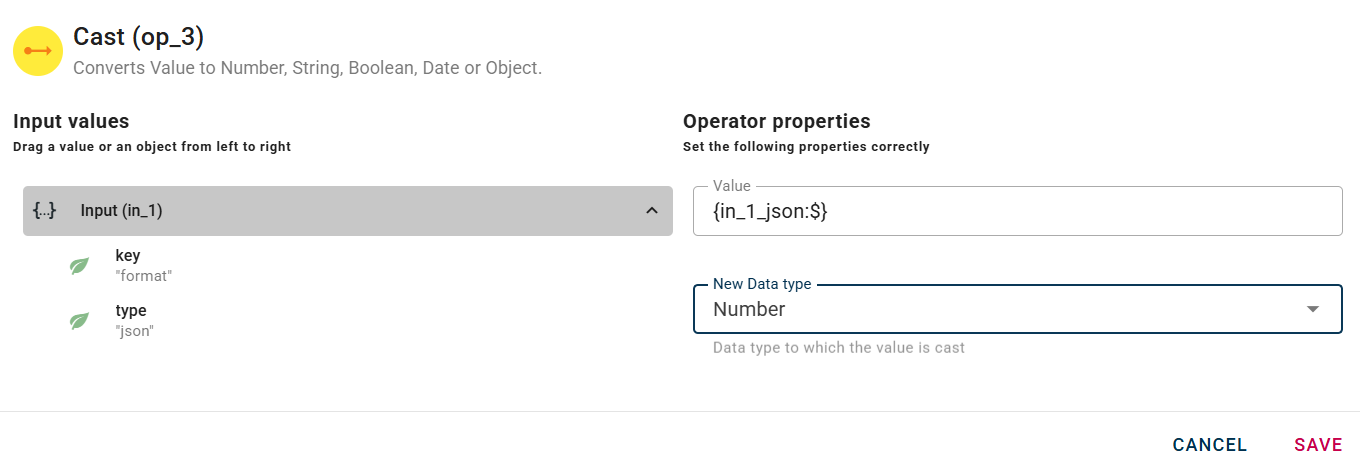
Notice the presence of the "New Data Type" field, which allows you to convert the initial input into a different data type. There are differents choices to cast the value.

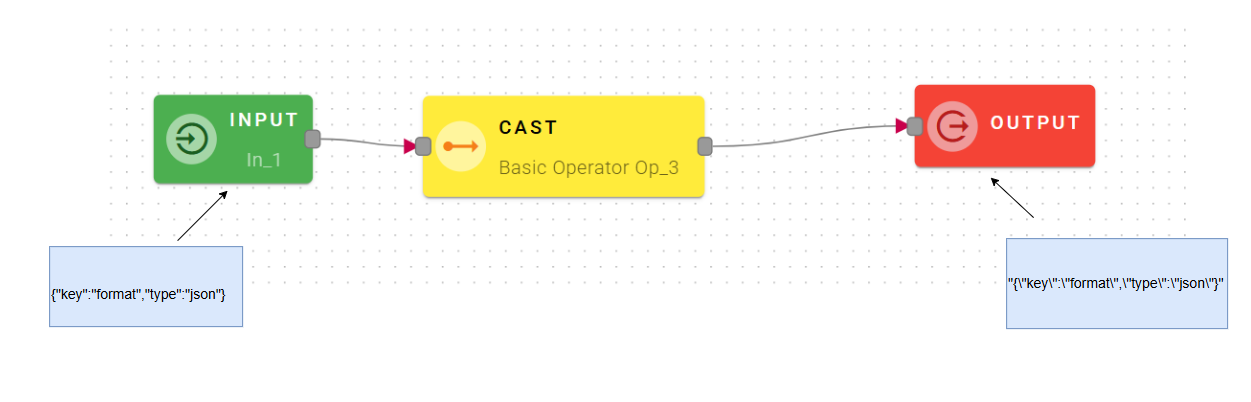
In this particular scenario, we have chosen to cast our object to a string data type.
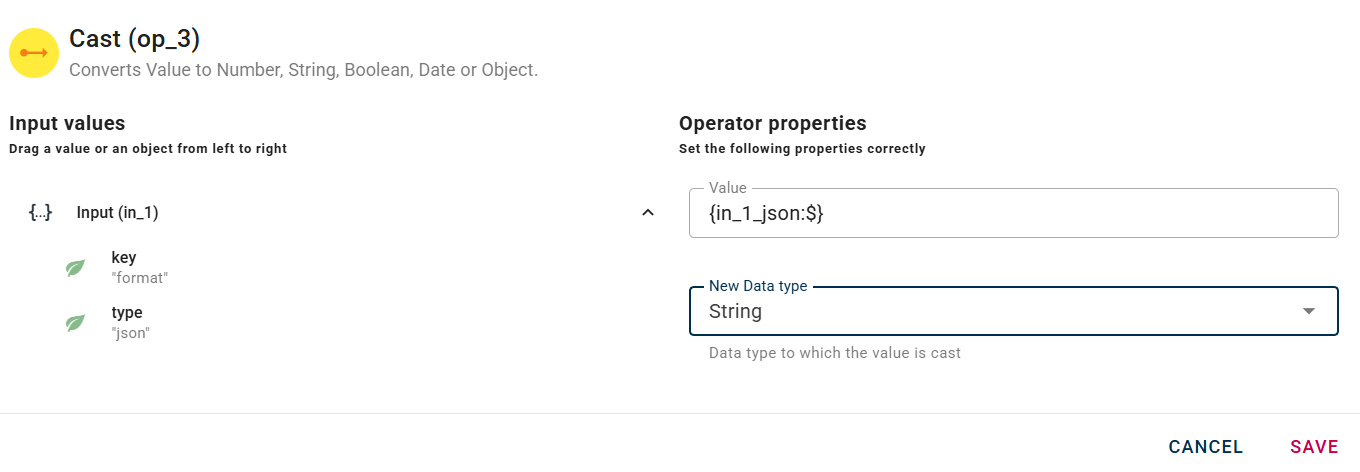
Click SAVE button to save the configuration and then generate your output.
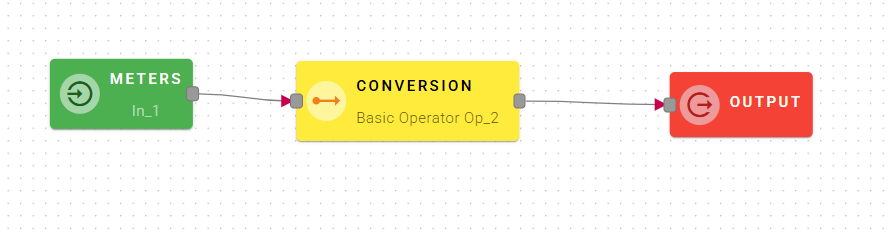
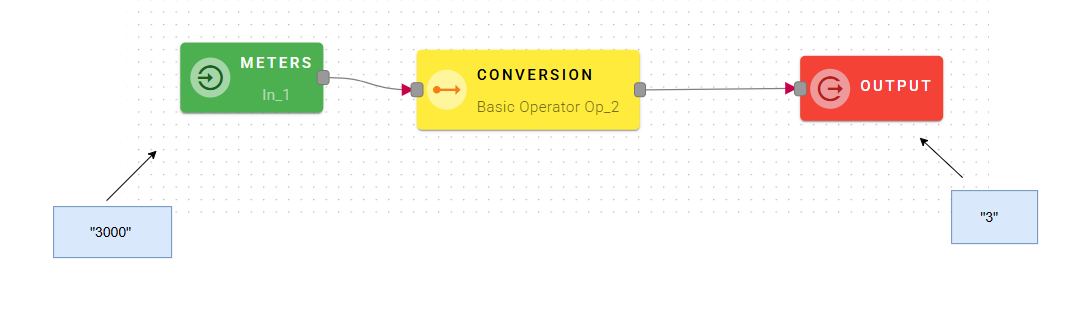
Conversion
Turns Value from Input unit to Output unit . Values can be transformed from one unit of measurement to another.
Input/Output examples
This is how your modal will look like when you connect the input to the operator.
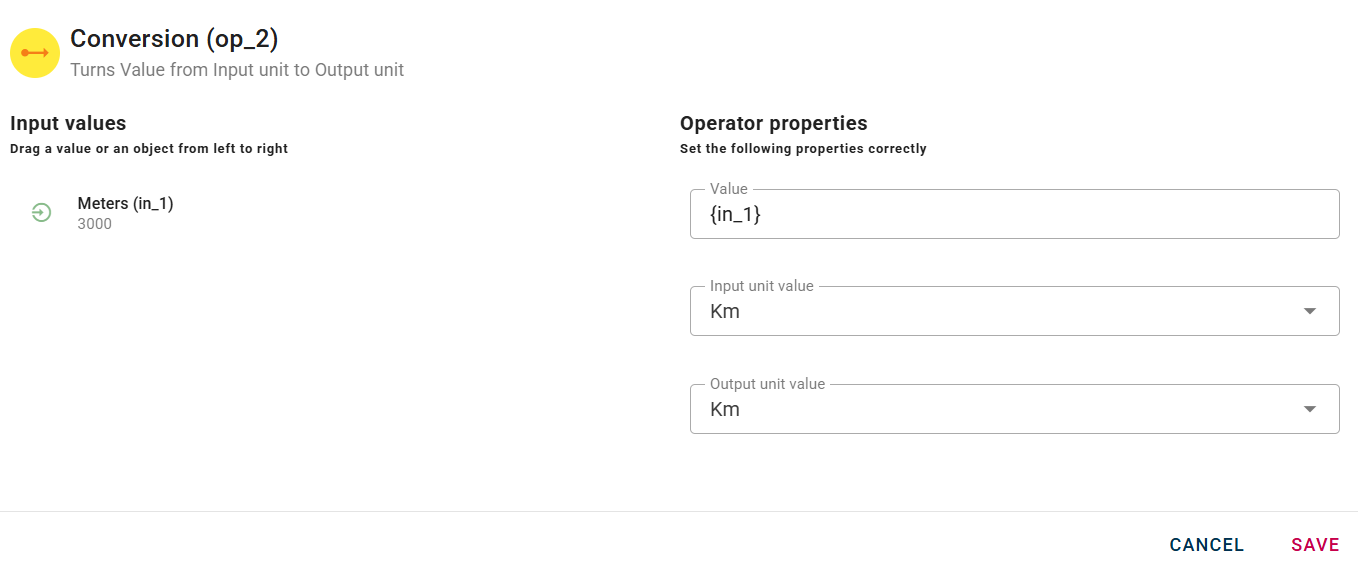
Now drag-and-drop your input into the value field, your modal will change again showing all the differents options for the conversion from one unit of measure to another.
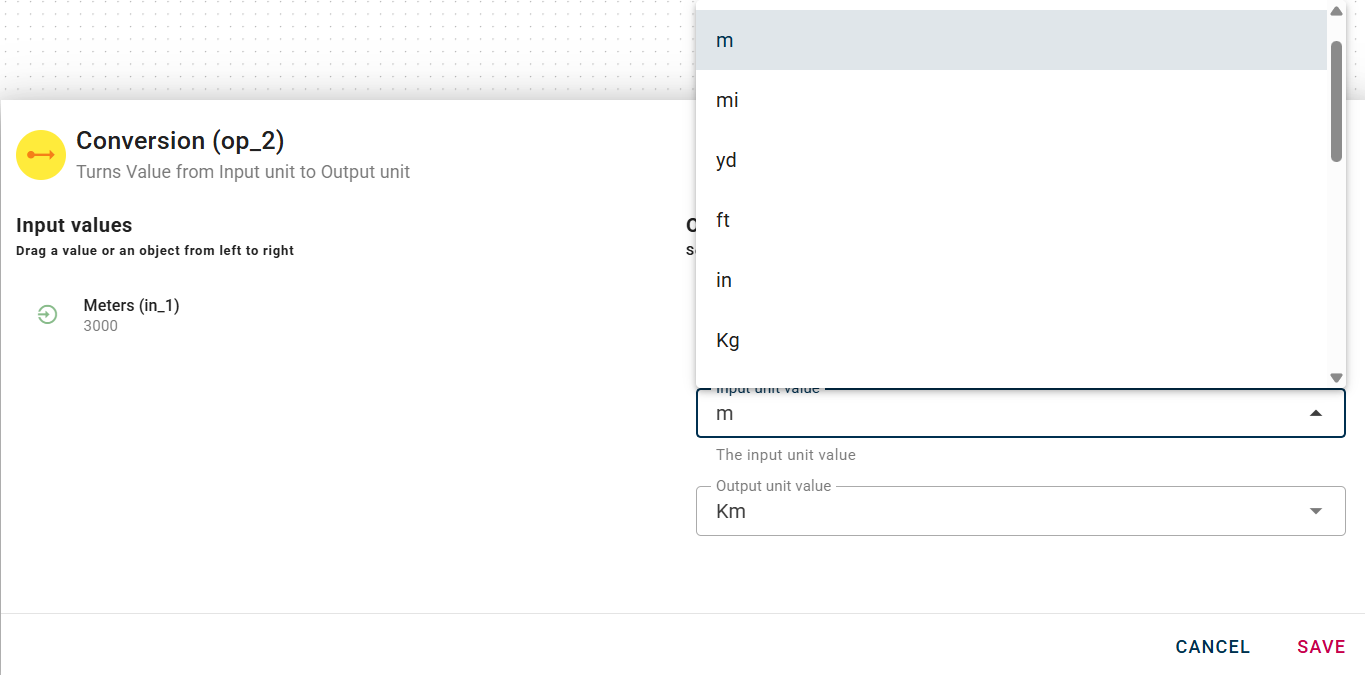
Now you can select the input unit and the output unit.
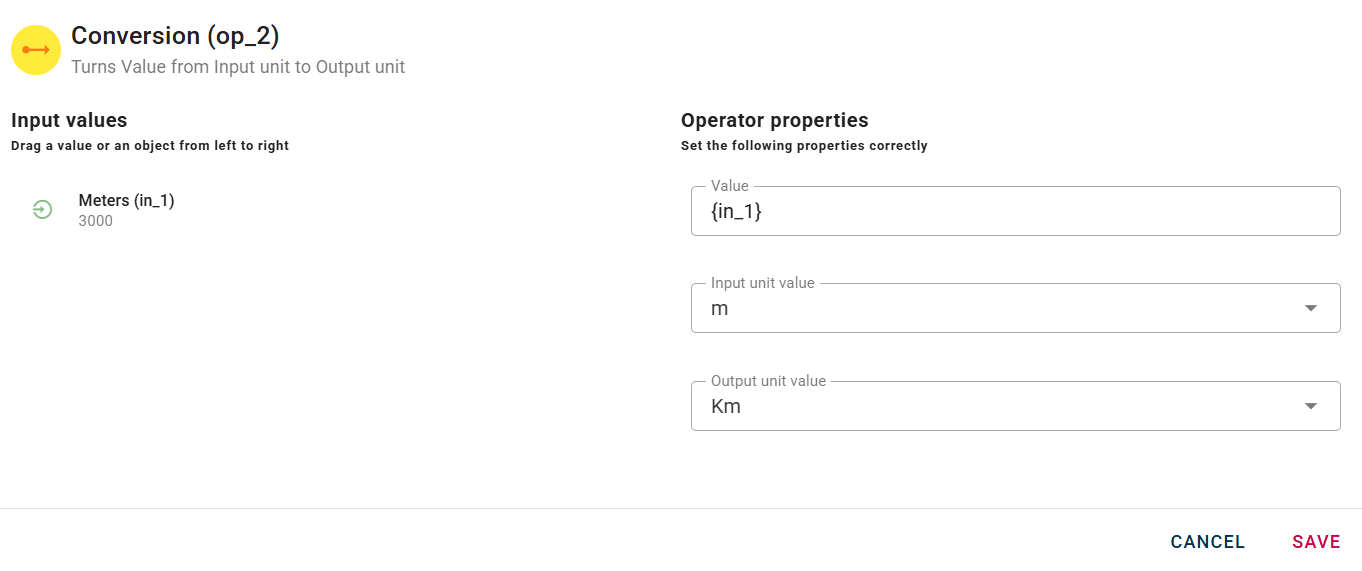
Then you can finally click SAVE button to save the configuration and then generate your output.
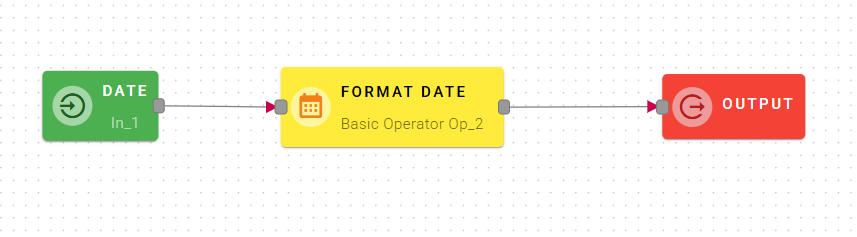
Format Date
Format date in input to a specific format (ISO-8601, European, USA or custom).
Input/Output examples

How to use it
Drag-and-drop your input into the Datetime Expression,it can be a Unix timestamp or a string compliant with ISO-8601.
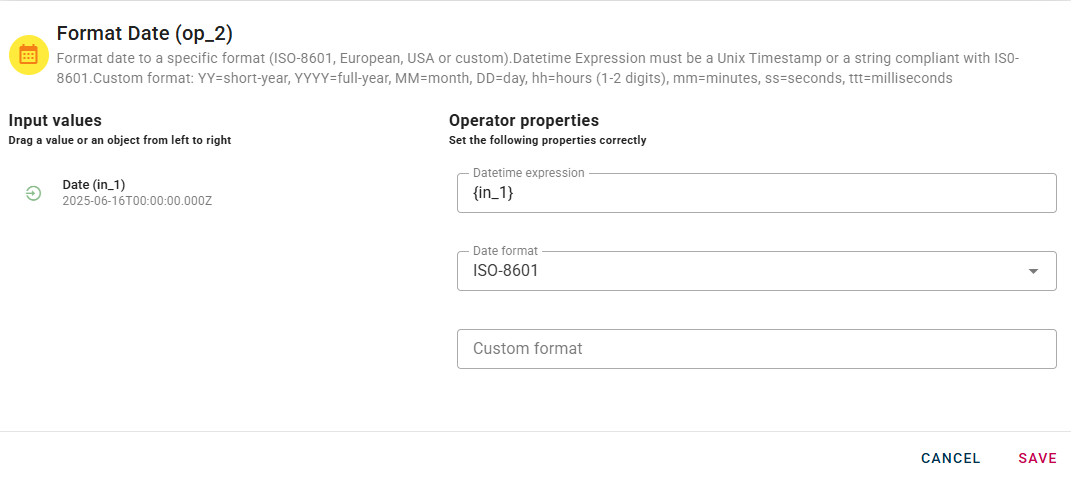
Now it's the turn to select a date format, this is a drop-down list and have the most popular date format, you can even create a custom one.

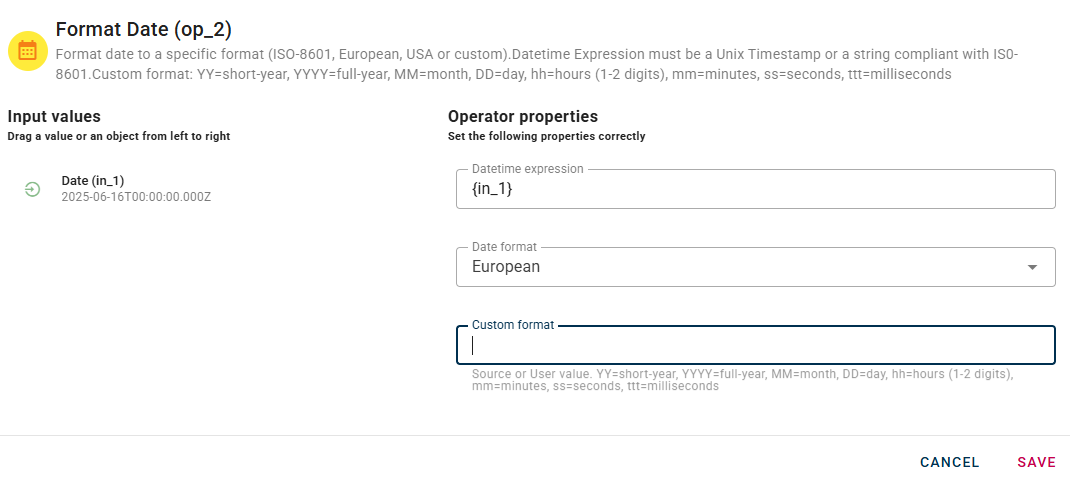
If you choose the "Custom" option, you will notice an additional field in the modal called "Custom Format." This field allows you to enter a specific pattern for your desired date format.
When using a custom format, you can modify it by utilizing various options. For example:
- YY represents the short-year
- YYYY represents the full-year
- MM represents the month
- DD represents the day
- hh represents the hours (1-2 digits)
- mm represents the minutes
- ss represents the seconds
- ttt represents the milliseconds
By combining these options, you can create a custom format that suits your specific date formatting requirements.
So you can choose in which format convert your date(In this case European format).
Click SAVE button to save the configuration and then generate your output.
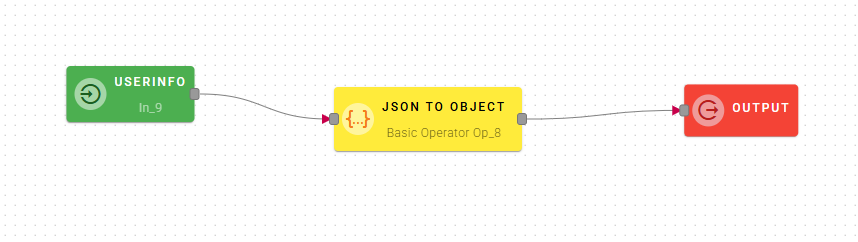
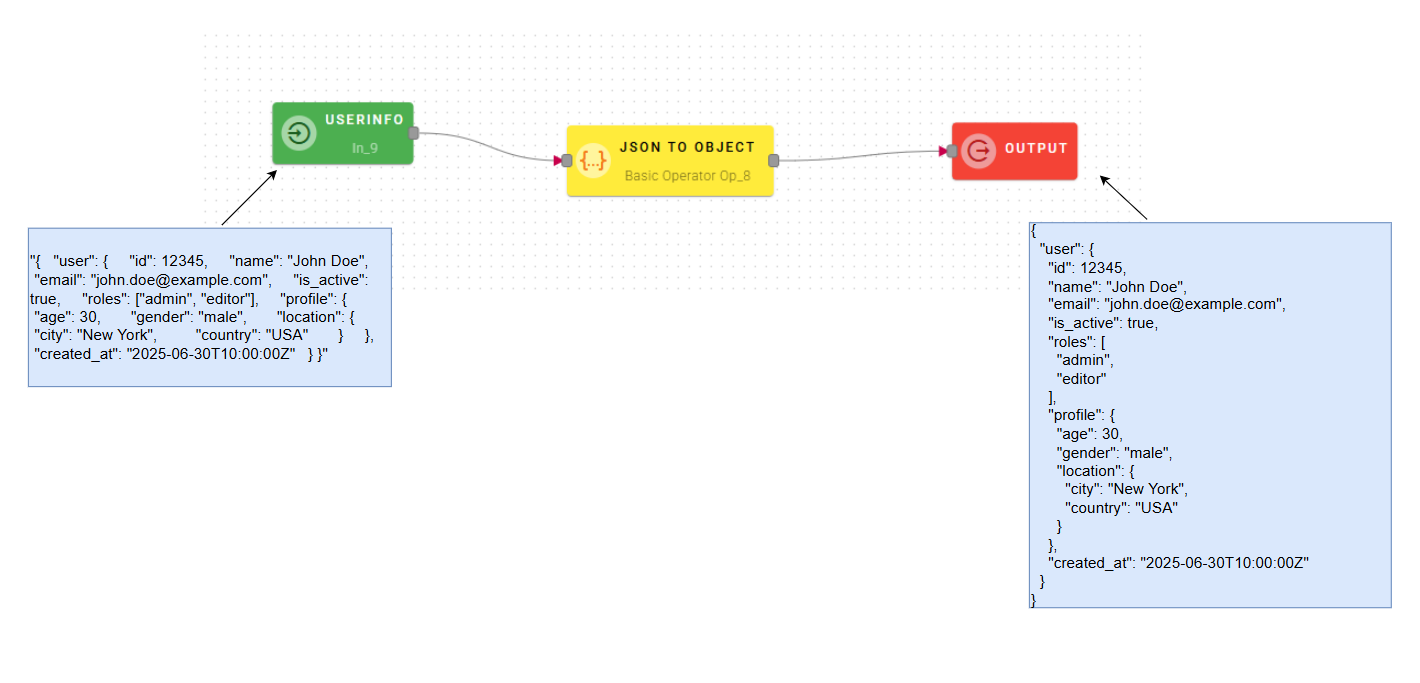
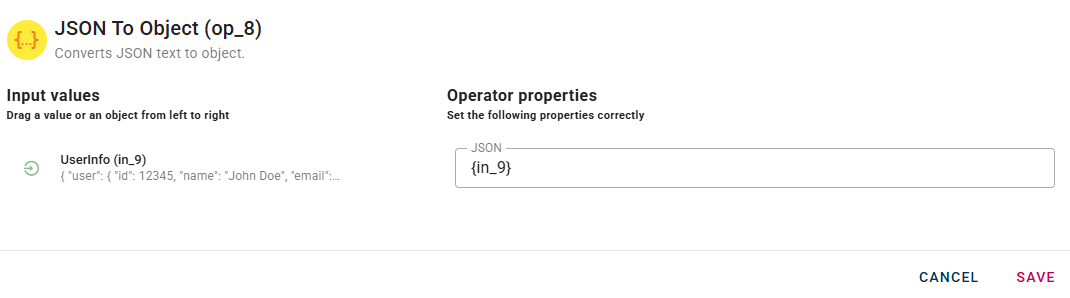
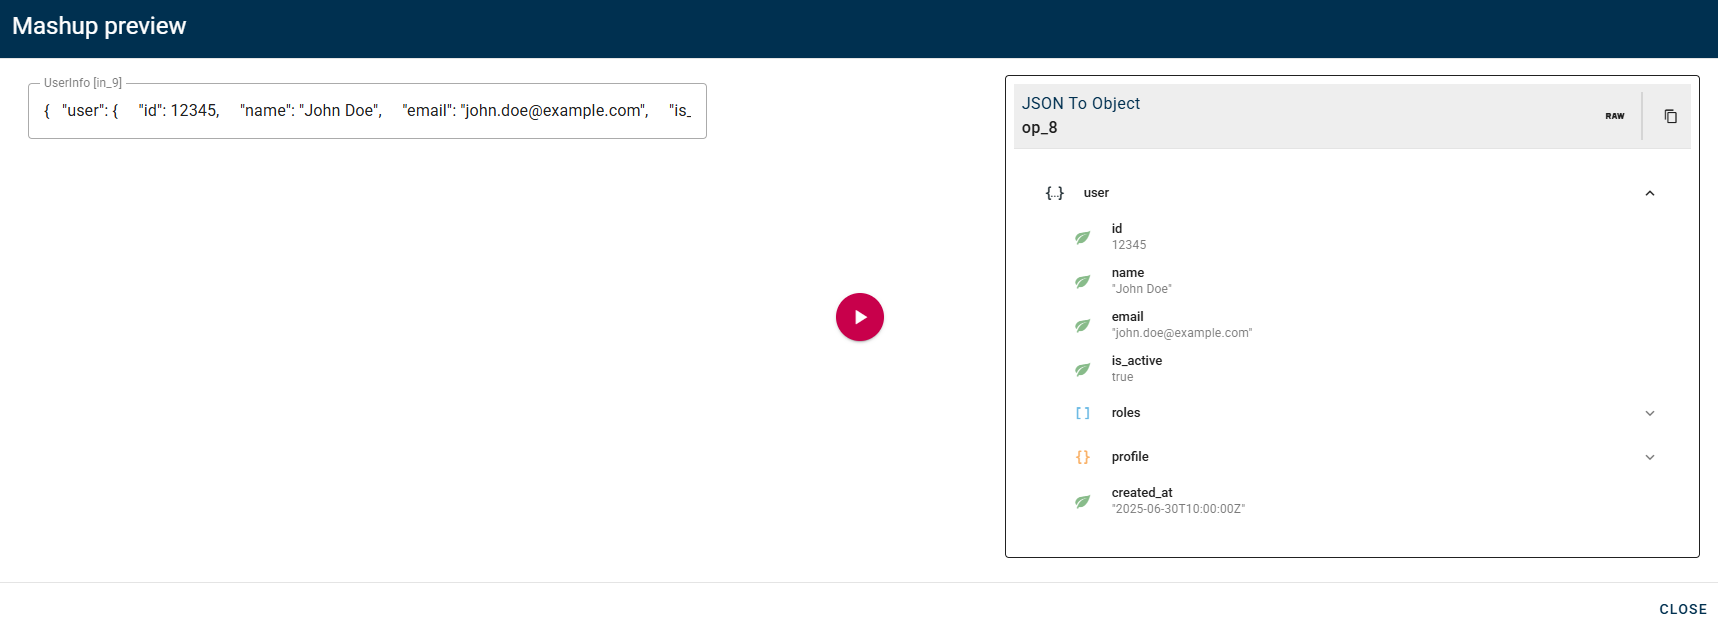
JSON to object
Converts JSON text to object.
Input/Output examples
How to use
Connect your input to the operator, within the source tree, locate and select from the input the JSON text that you want to convert to object. You can do this by clicking on the appropriate node within the source tree and drag-and-drop it into the JSON field.
Click SAVE button to save the configuration and then generate your output.
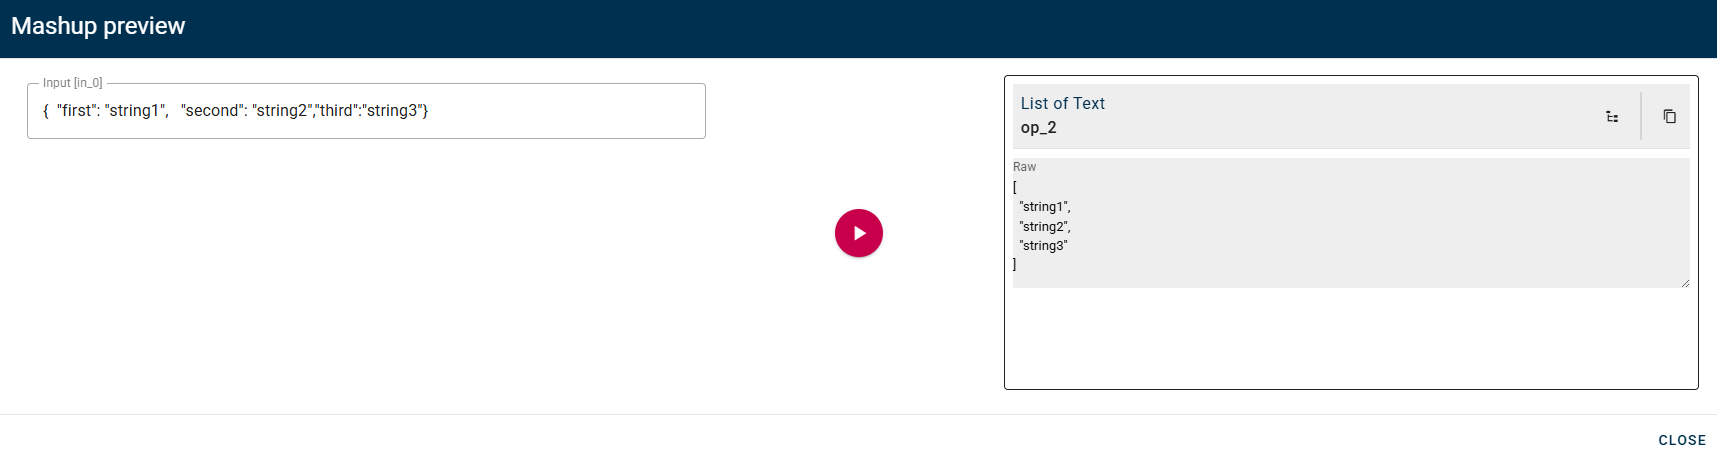
List of text
This operator creates an array of strings.
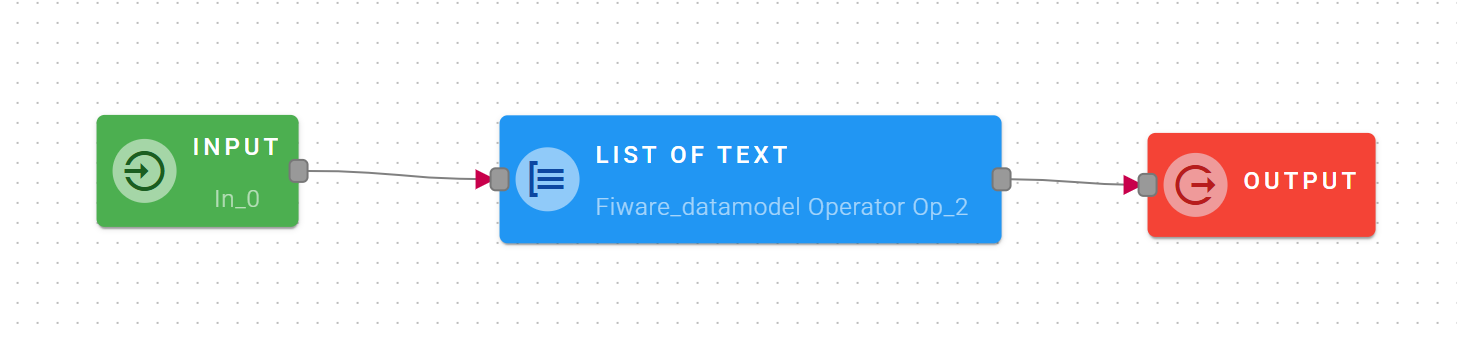
Input/Output examples
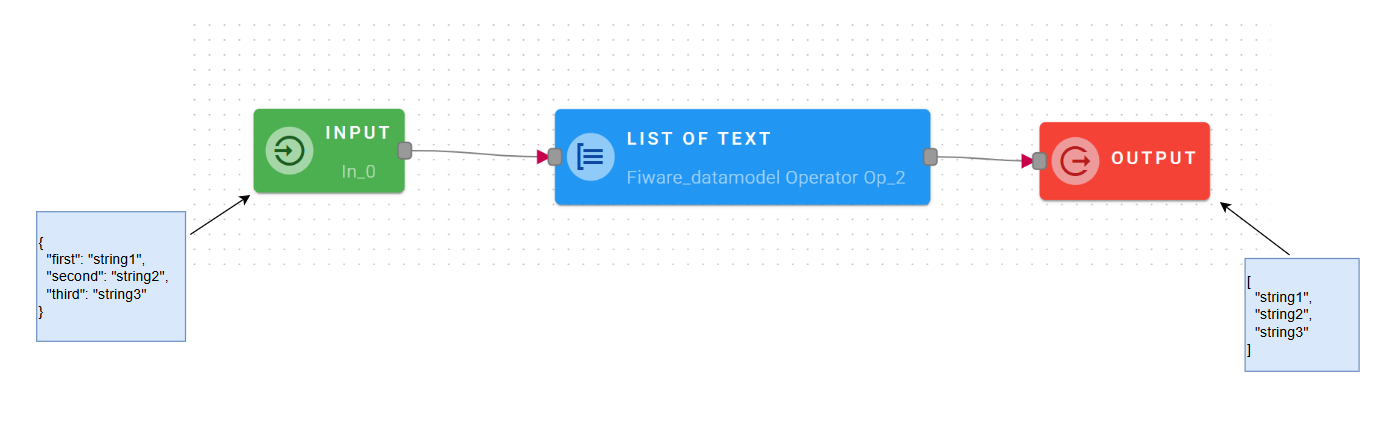
How to use
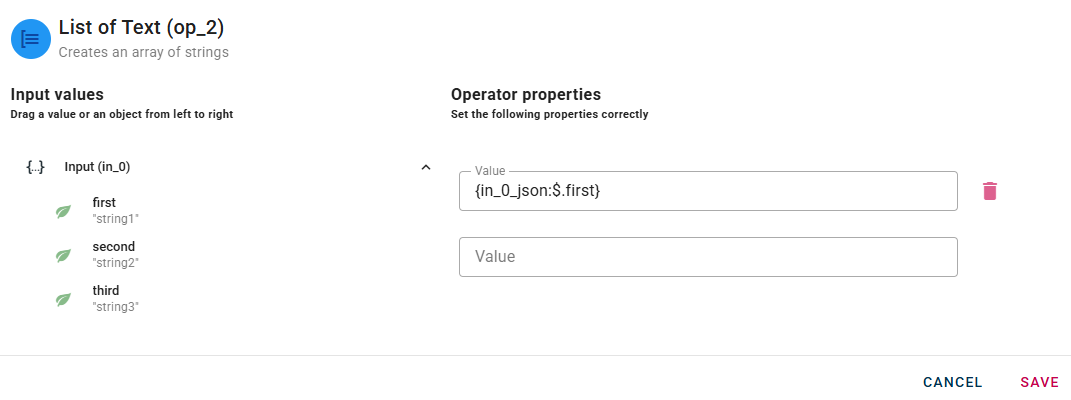
Connect your input to the operator, within the source tree, locate and select from the input a string that you want to add in the new array. You can do this by clicking on the appropriate node within the source tree and drag-and-drop it into the value field.
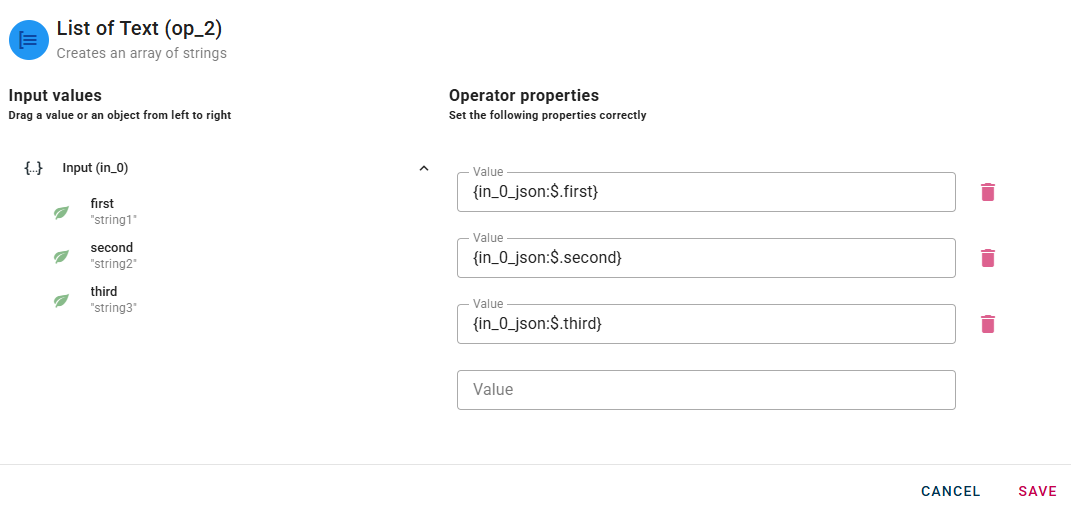 When you enter a string, a new drop-down list will automatically appear to add another one. This process allow you to enter as many string as you need.
Like others operator even after you add a string it's possible to edit and delete them with the trash bin icon.
When you enter a string, a new drop-down list will automatically appear to add another one. This process allow you to enter as many string as you need.
Like others operator even after you add a string it's possible to edit and delete them with the trash bin icon.
Click SAVE button to save the configuration and then generate your output.
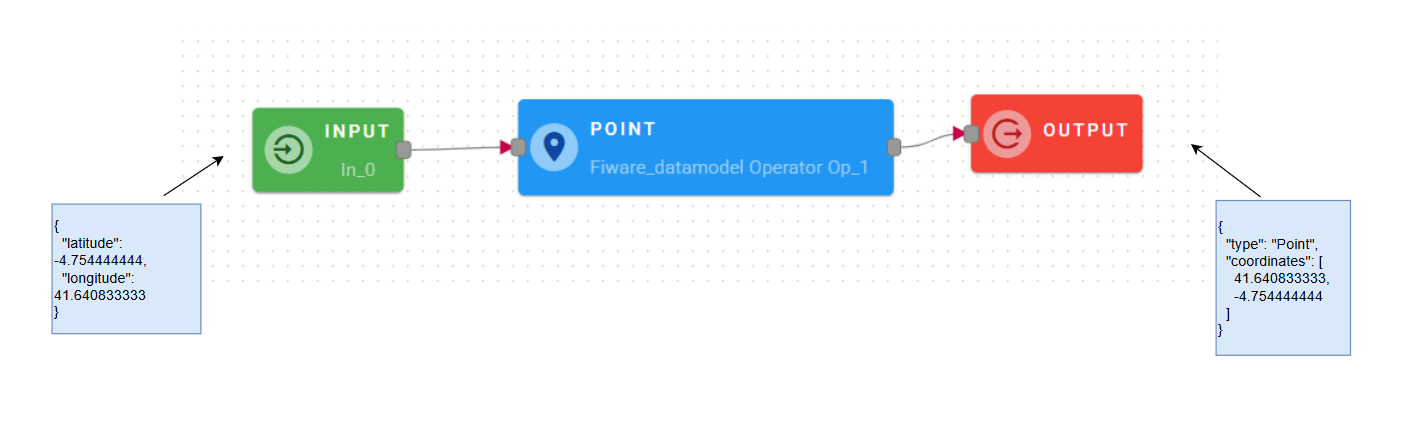
Point
This operator creates a GeoJSON Point with the NGSI standard format.
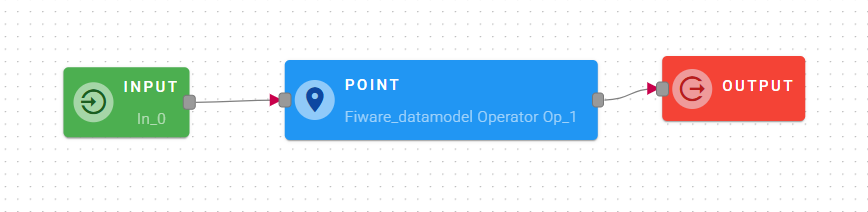
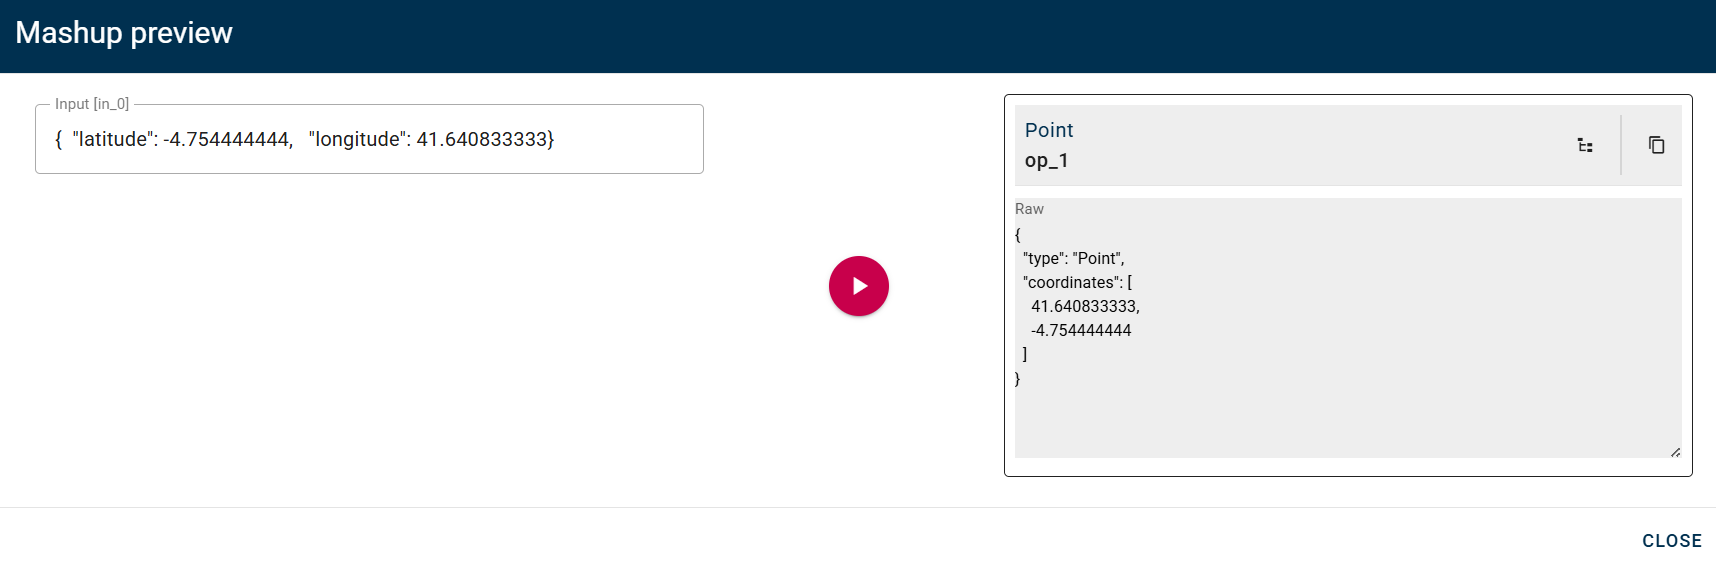
Input/output example
How to use
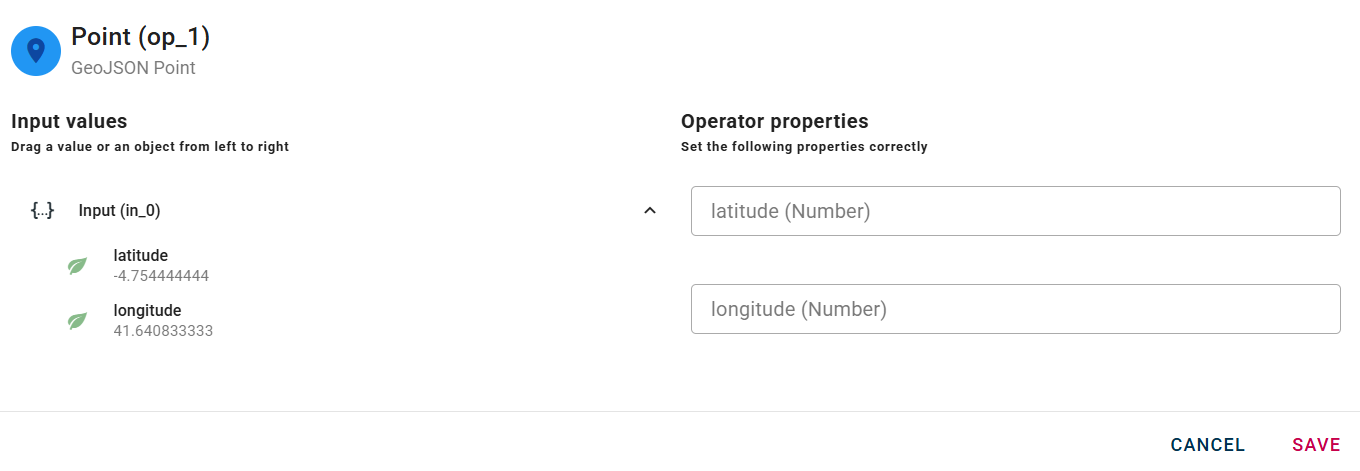
Connect your input to the operator, within the source tree, locate and select from the input an object that contains coordinates and you want to convert in a new GeoJSON point. You can do this by clicking on the appropriate nodes within the source tree and drag-and-drop it into the Latitude and Longitude in the appropriate fields.
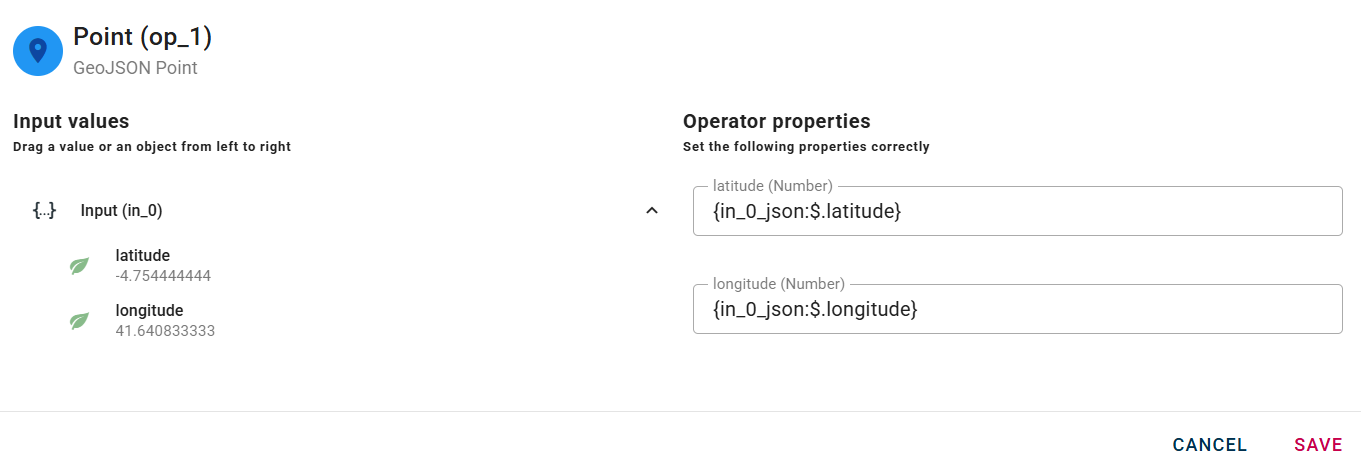
Click SAVE to save the modal configuration and then preview the output.
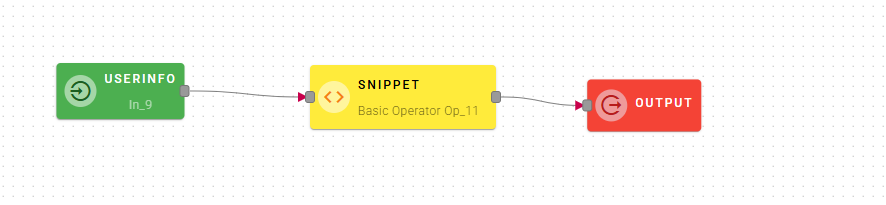
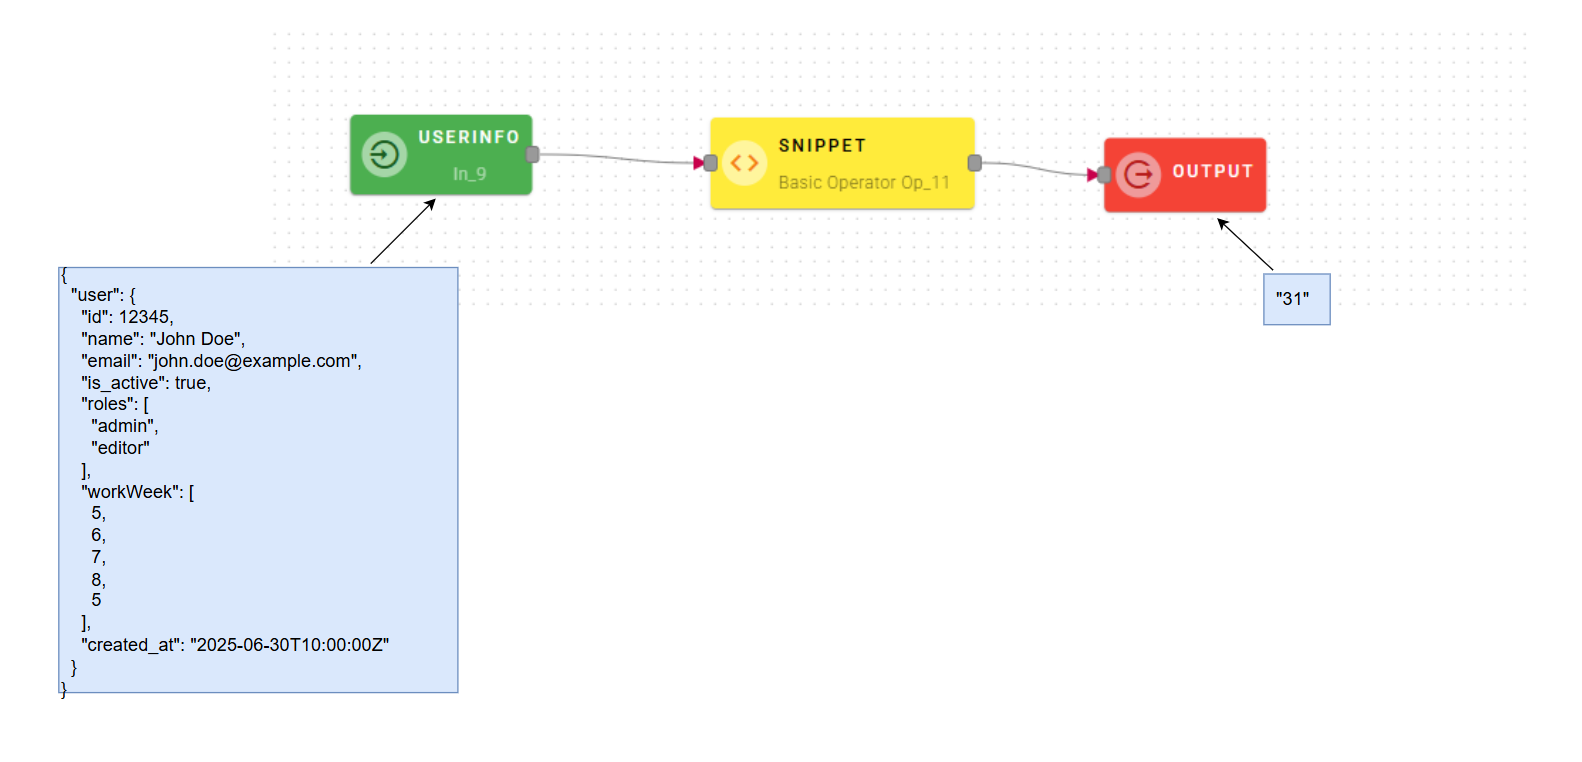
Snippet
This operator allows you to write code in JS to manipulate the data in the mashup editor.
Input/Output examples
How to use
Connect your input to the operator
 At the top you will see how the linked inputs are mapped so you can call them in your code. The snippet is like a main function but you can also split the code into subfunctions to call.
s1 will be the name of the input which let us manipulate via code:
Once you complete your script you can click ok and generate your output.
Snippet can be helpful to manipulate data in a custom way and give its output as input for other operators.
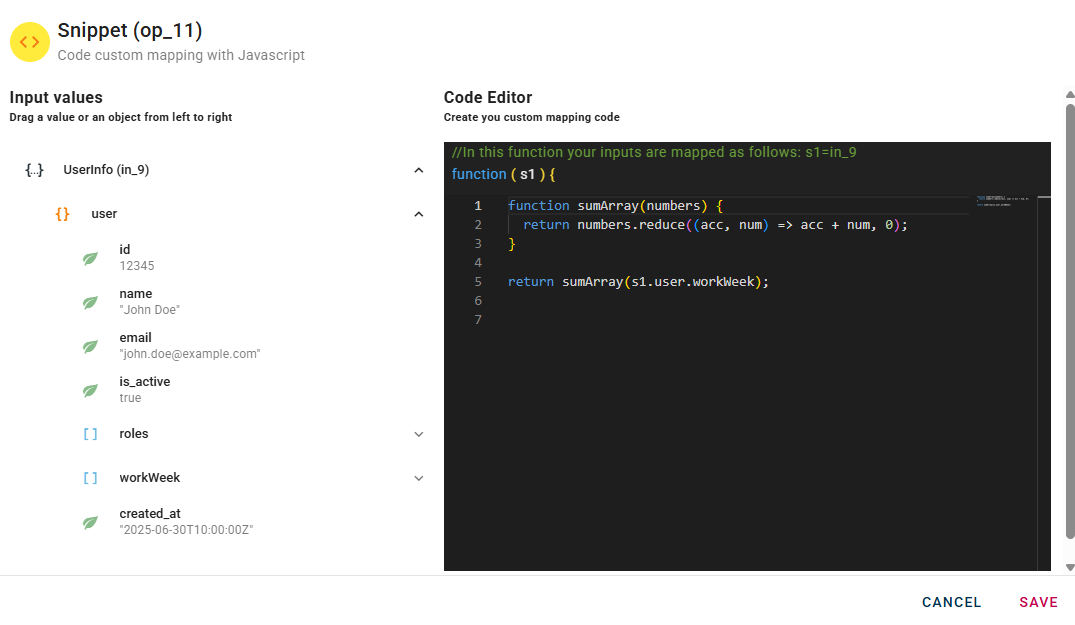
In this example there is a function that takes an array of numbers as input and returns the sum of the numbers in the array as output. You can see that the function is called by passing s1.user.workWeek as a parameter, which is an array nested in UserInfo. Remember to always include a return to get an output from the operator.
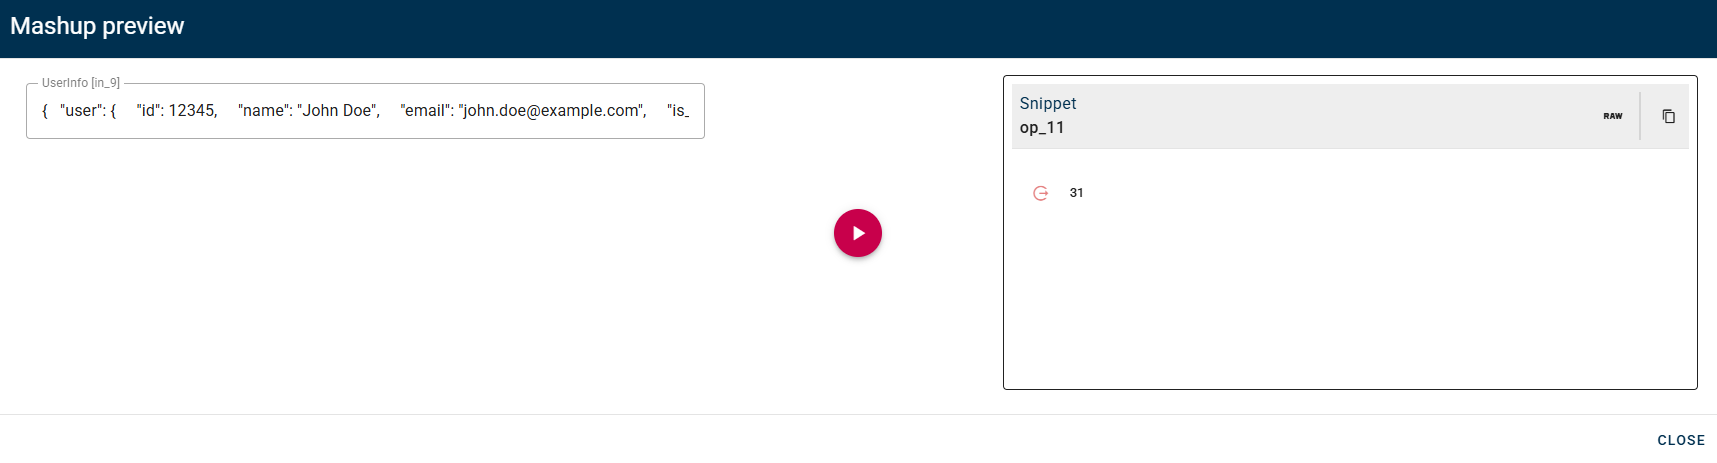
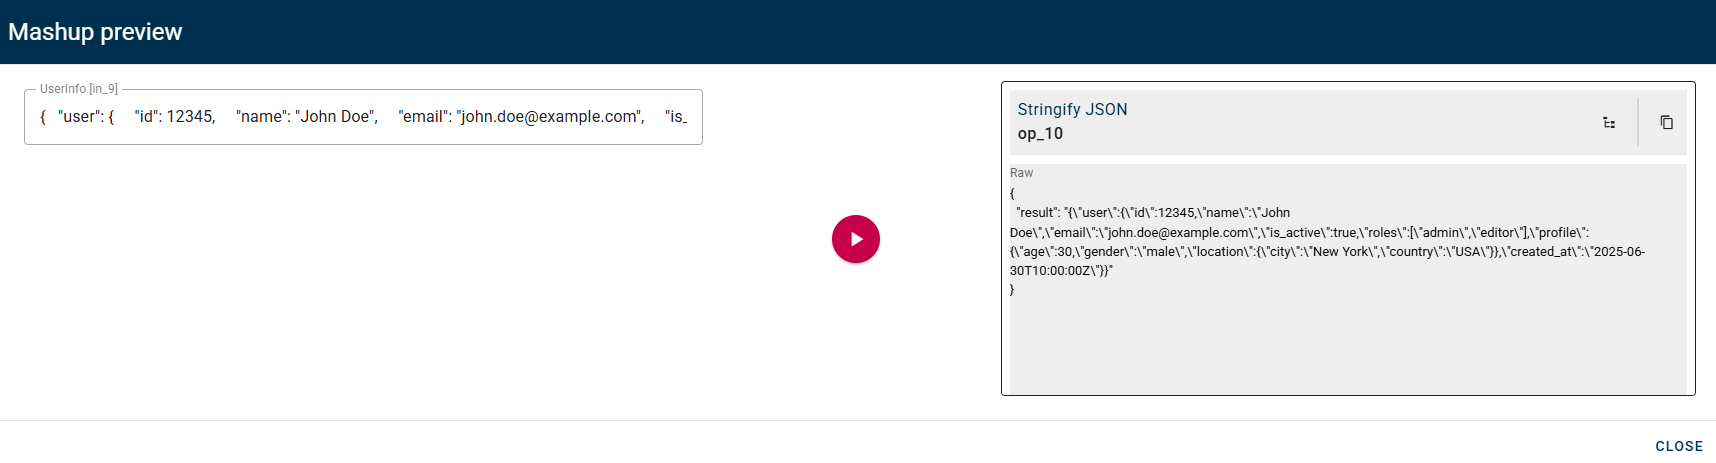
The preview will be like this:
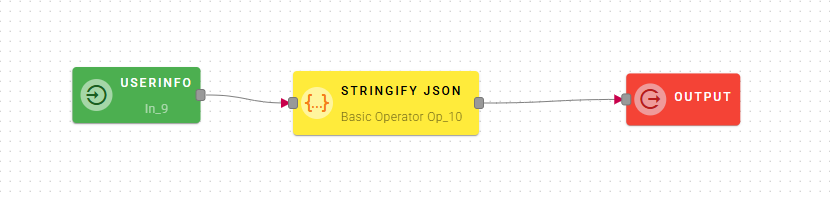
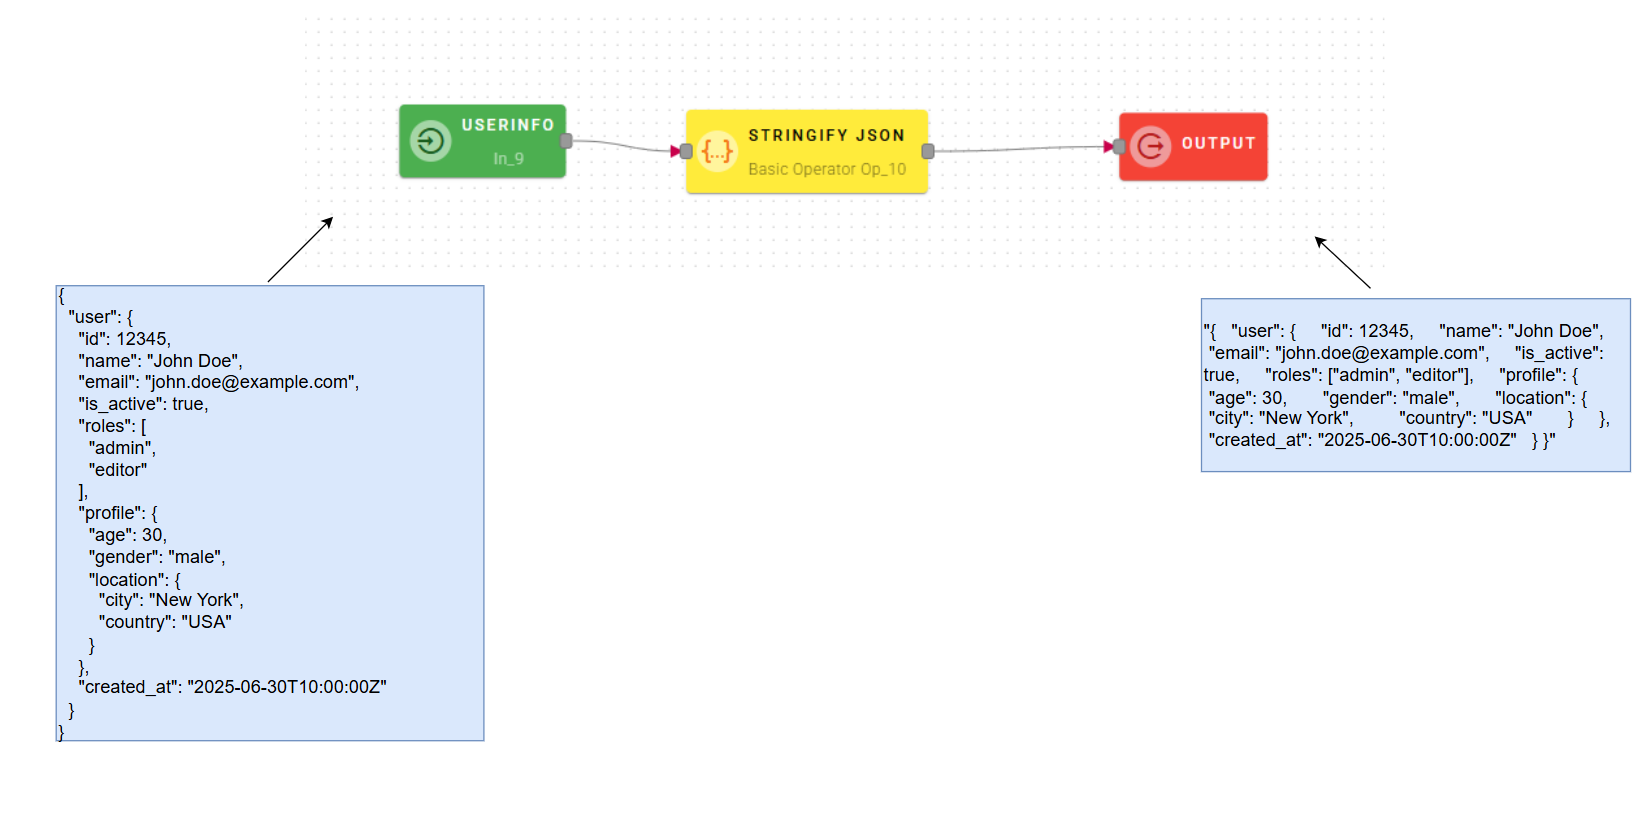
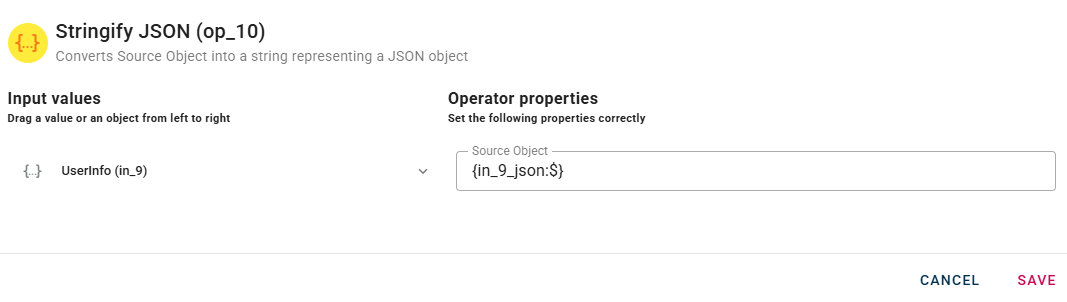
Stringify JSON
Converts Source Object into a string representing a JSON object
Input/Output examples
How to use
Connect your input to the operator, within the source tree, locate and select from the input a JSON that you want to stringify. You can do this by clicking on the appropriate node within the source tree and drag-and-drop it into the Source Object field.
Click SAVE button to save the configuration and then generate your output.
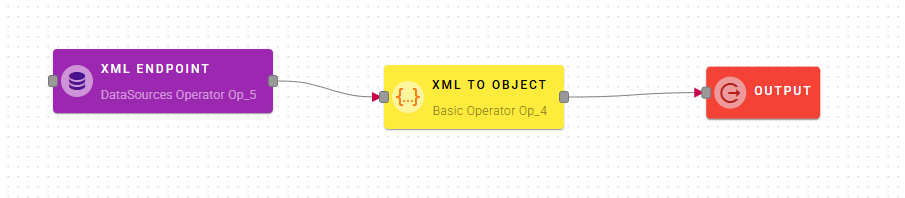
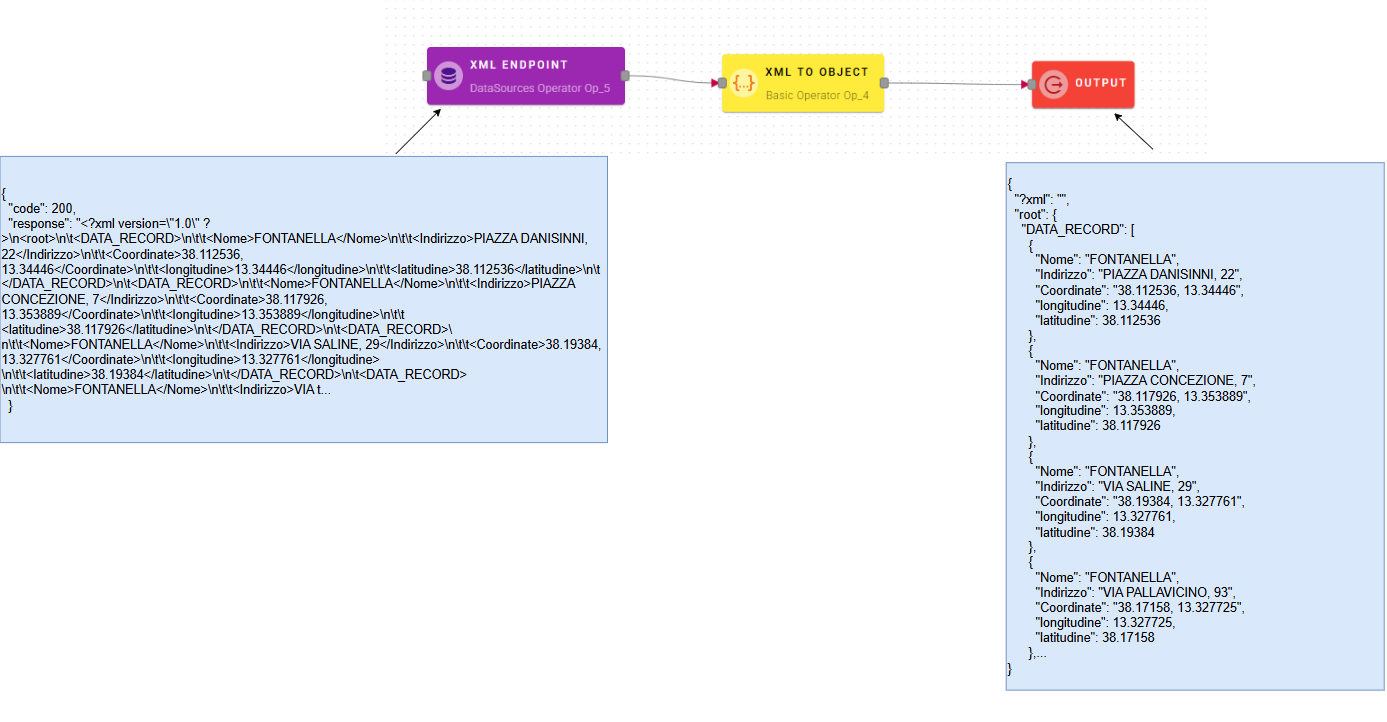
XML to object
This operator allows you to convert a file XML into an object.
Input/Output examples
How to use
Connect your input to the operator, within the source tree, locate and select from the input a string that contains a XML and you want to convert into an object. You can do this by clicking on the appropriate node within the source tree and drag-and-drop it into the XML field.
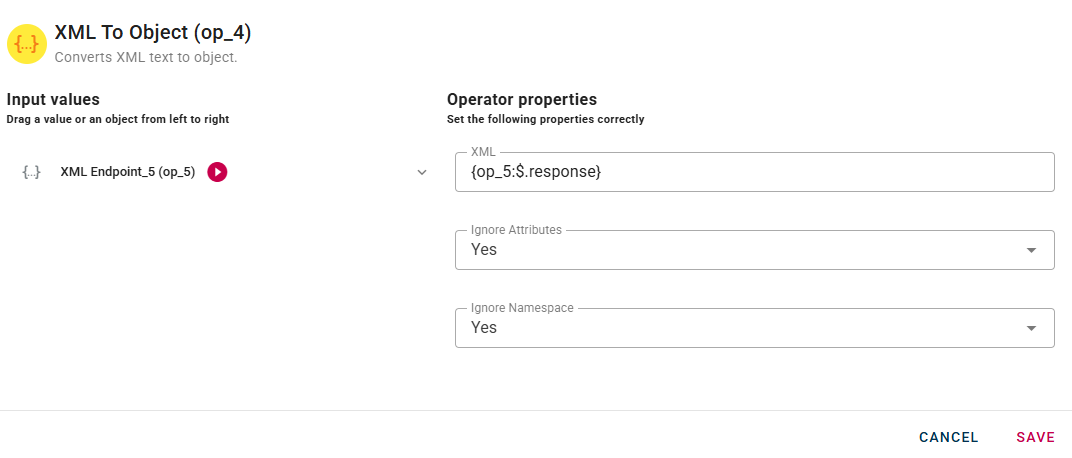
After you drag-and-drop the input as you can see there is the possibility to customize the conversion output with the options below the XML field.
Click SAVE button to save the configuration and then generate your output.
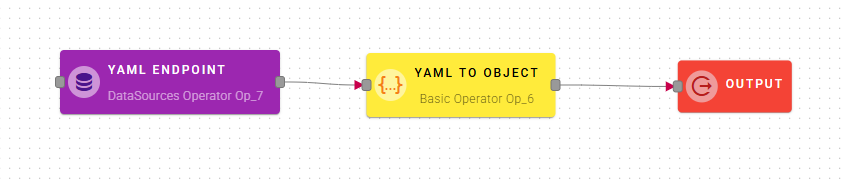
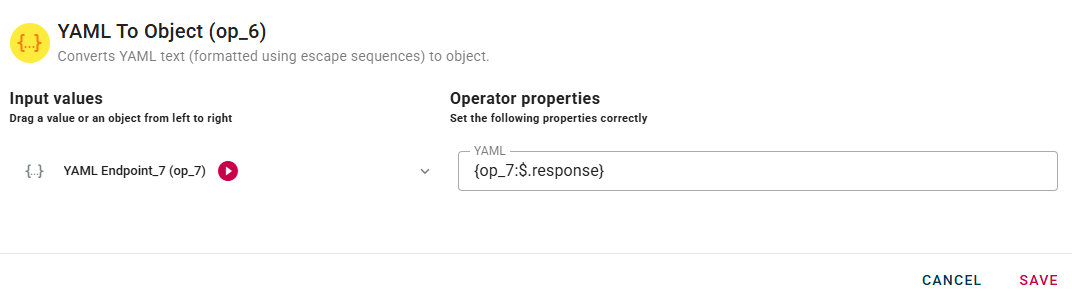
YAML to object
This operator converts YAML text to object.
How to use
Connect your input to the operator, within the source tree, locate and select the input that contains a YAML and you want to convert into an object. You can do this by clicking on the appropriate node within the source tree and drag-and-drop it into the YAML field.
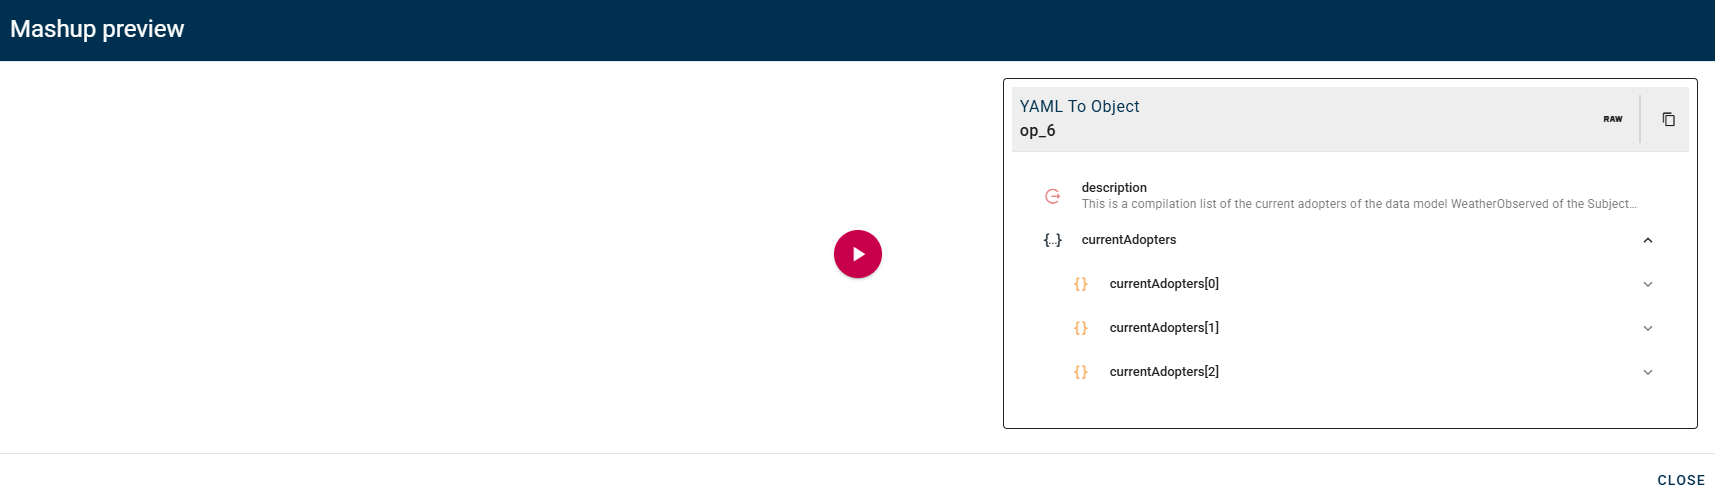
A real example can be done using a data source to pick a YAML from remote.
Once you have setted your preference click SAVE button to save the configuration and then generate your output.
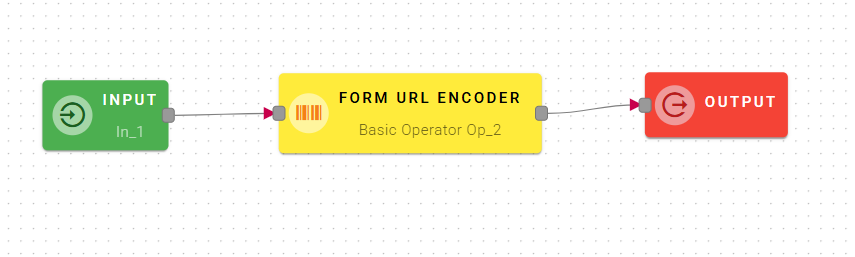
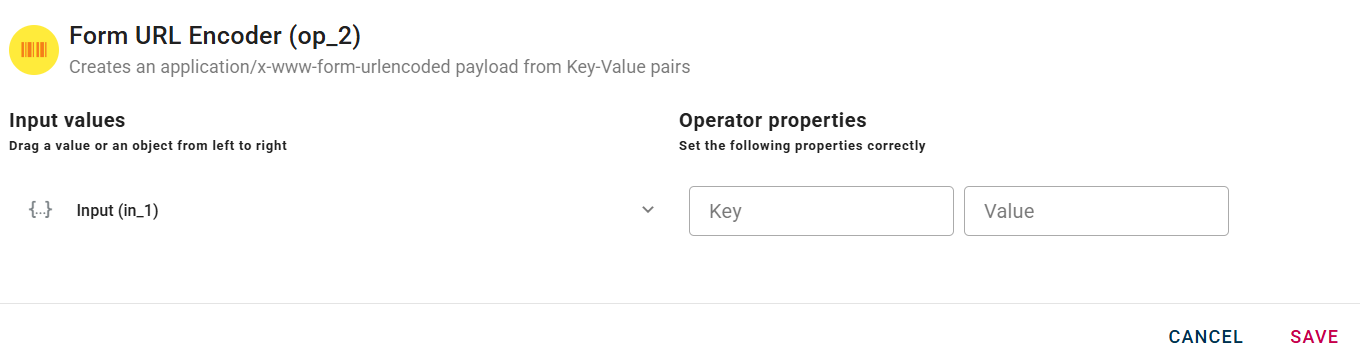
Form URL Encoder
This operator creates an application/x-www-form-urlencoded payload from Key-Value pairs
Input/Output examples
How to use :
Connect your input to the operator, within the source tree, locate and select the input that contains a Key-Value pairs that you want to use as payload. You can do this by clicking on the appropriate nodes within the source tree and drag-and-drop them into the Key-Value fields.
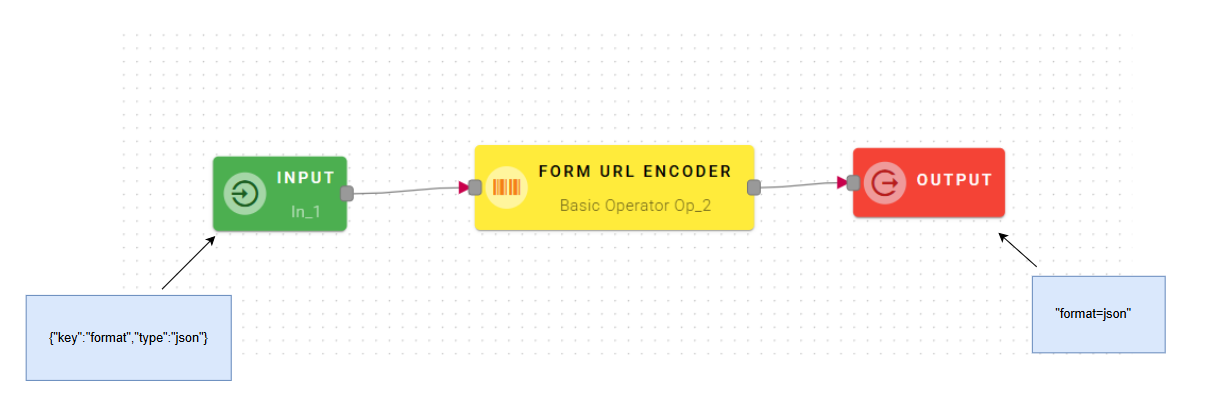
As example we are using an array of Key-Value pairs.
Drag-and-drop them in the right fields click to add the pair.
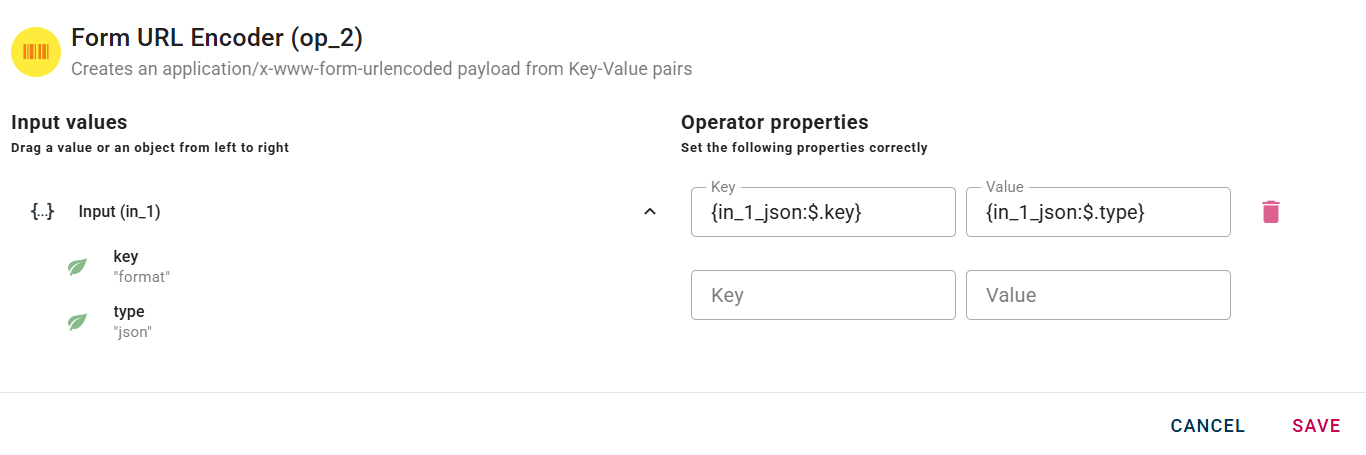
And so on for each Key-Value pairs you want to use as payload.
Like others operator even after you add a Key-Value pair it's possible to edit and delete them with the trash bin icon.
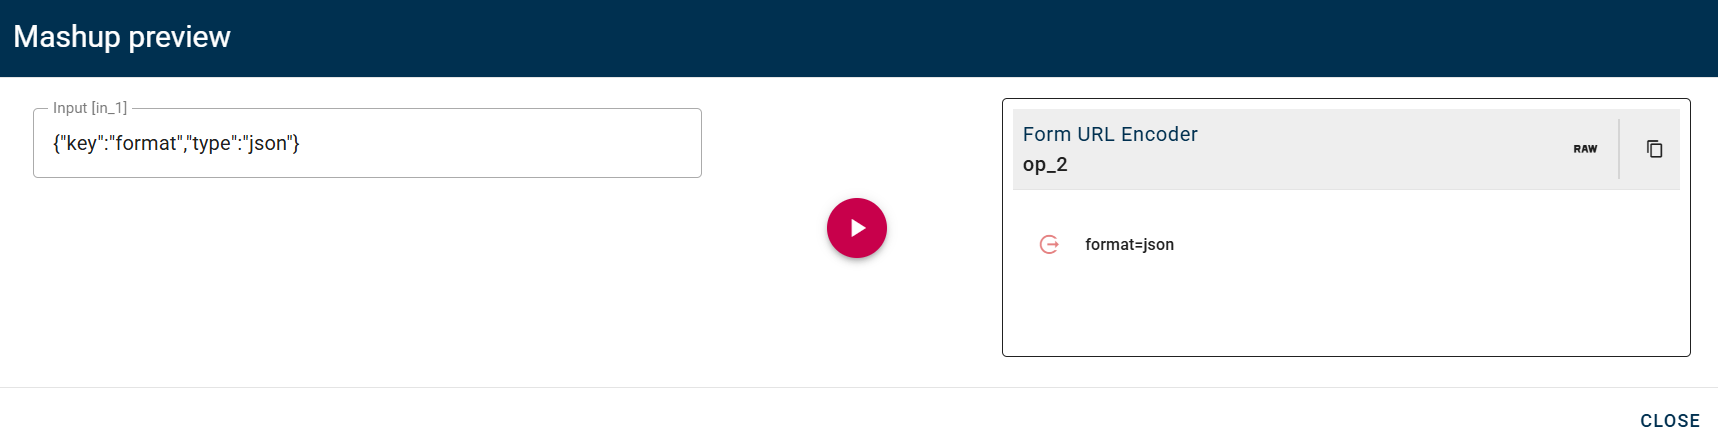
Click SAVE button to save the configuration and then generate your output.
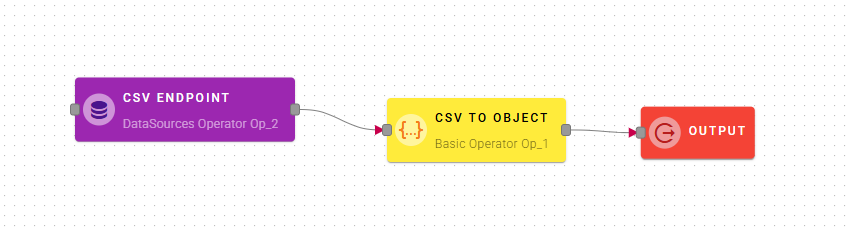
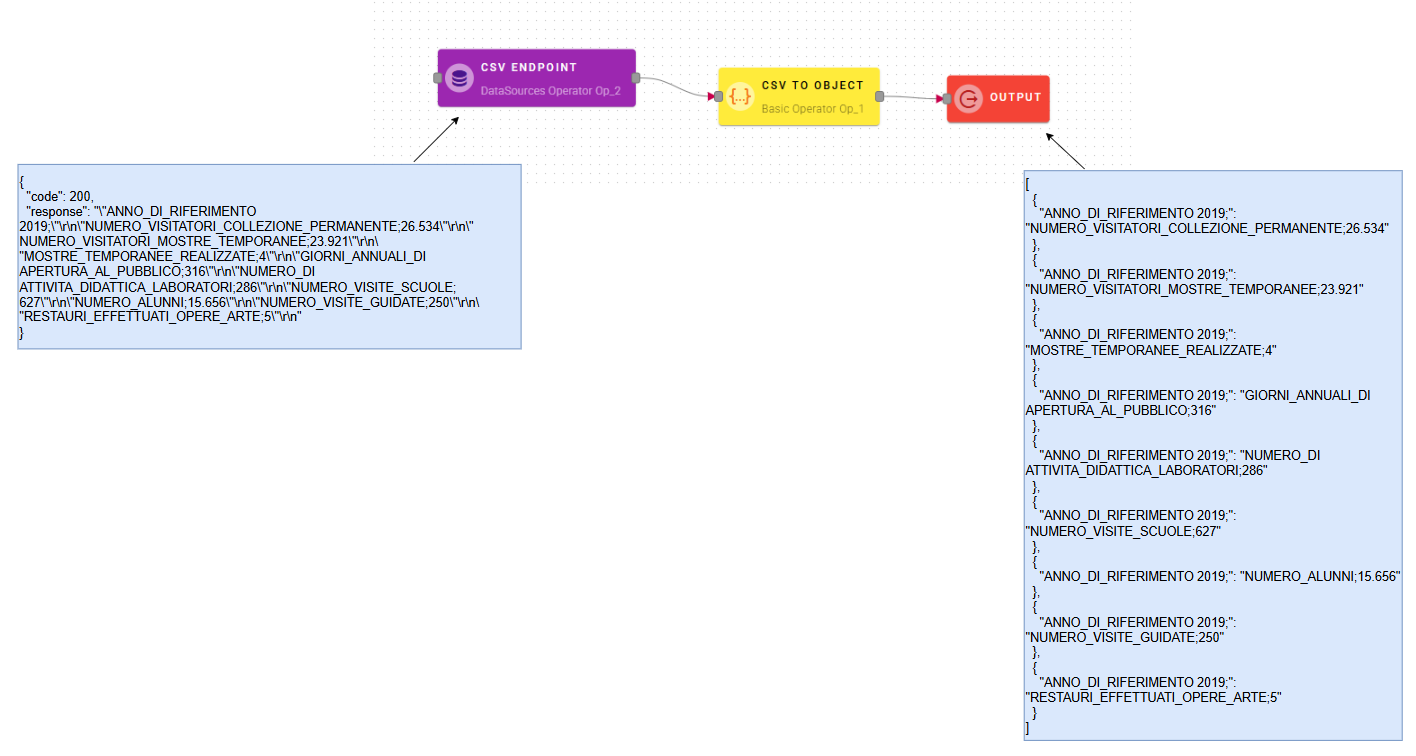
CSV to object
This operator converts CSV text to array. CSV fields must be separated by Separator.
Input/Output examples.
How to use
Connect your input to the operator, within the source tree, locate and select the input that contains a CSV text that you want to convert in object. You can do this by clicking on the appropriate nodes within the source tree and drag-and-drop them into the CSV field.
A real example can be done using a datasource to pick a CSV from remote, so we have to create a datasource and drag-and-drop the response into the CSV field.
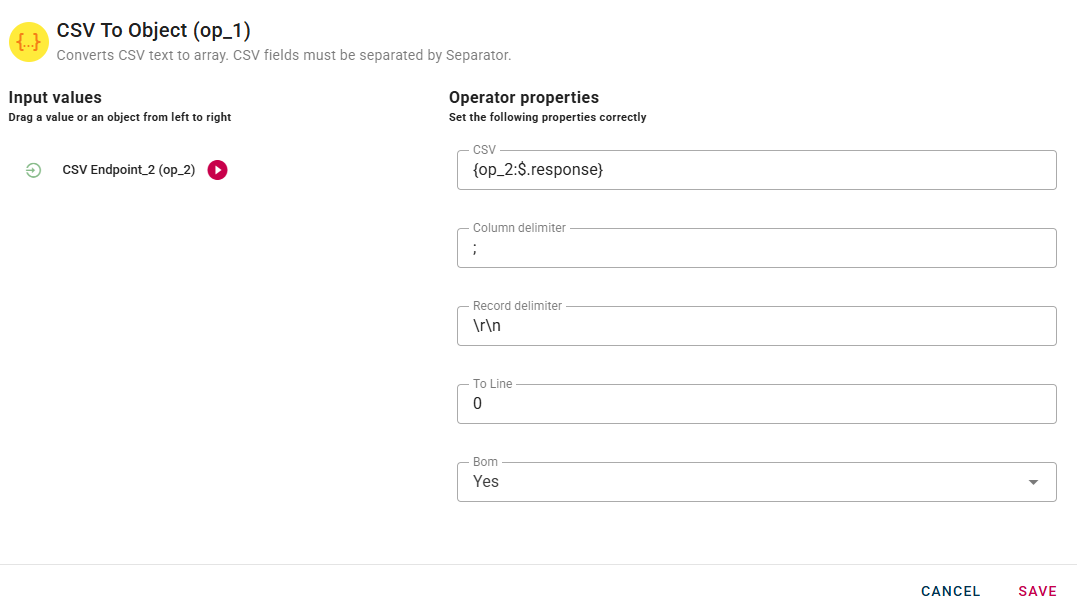
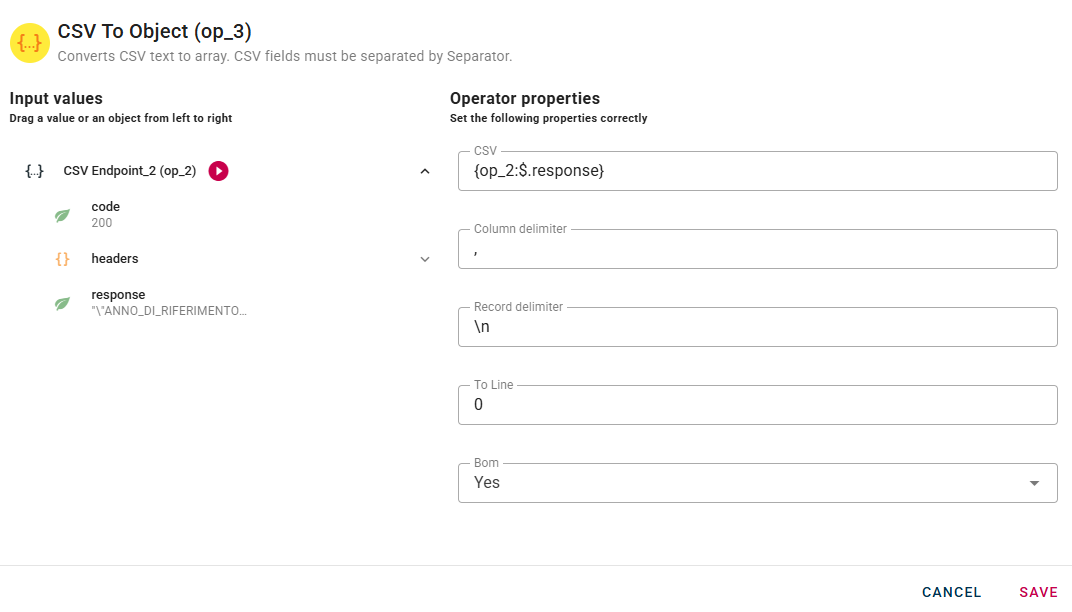
All the parameters in the modal can be changed at your own preferences, if you are not sure about them just try with the default parameters. In the CSV parameter enter the CSV string, then define the character that is the column limiter and the one that is the record delimiter. There is also the ToLine parameter that specifies the desired format for each row and the BOM parameter that if enabled includes the Byte Order Mark in the conversion.
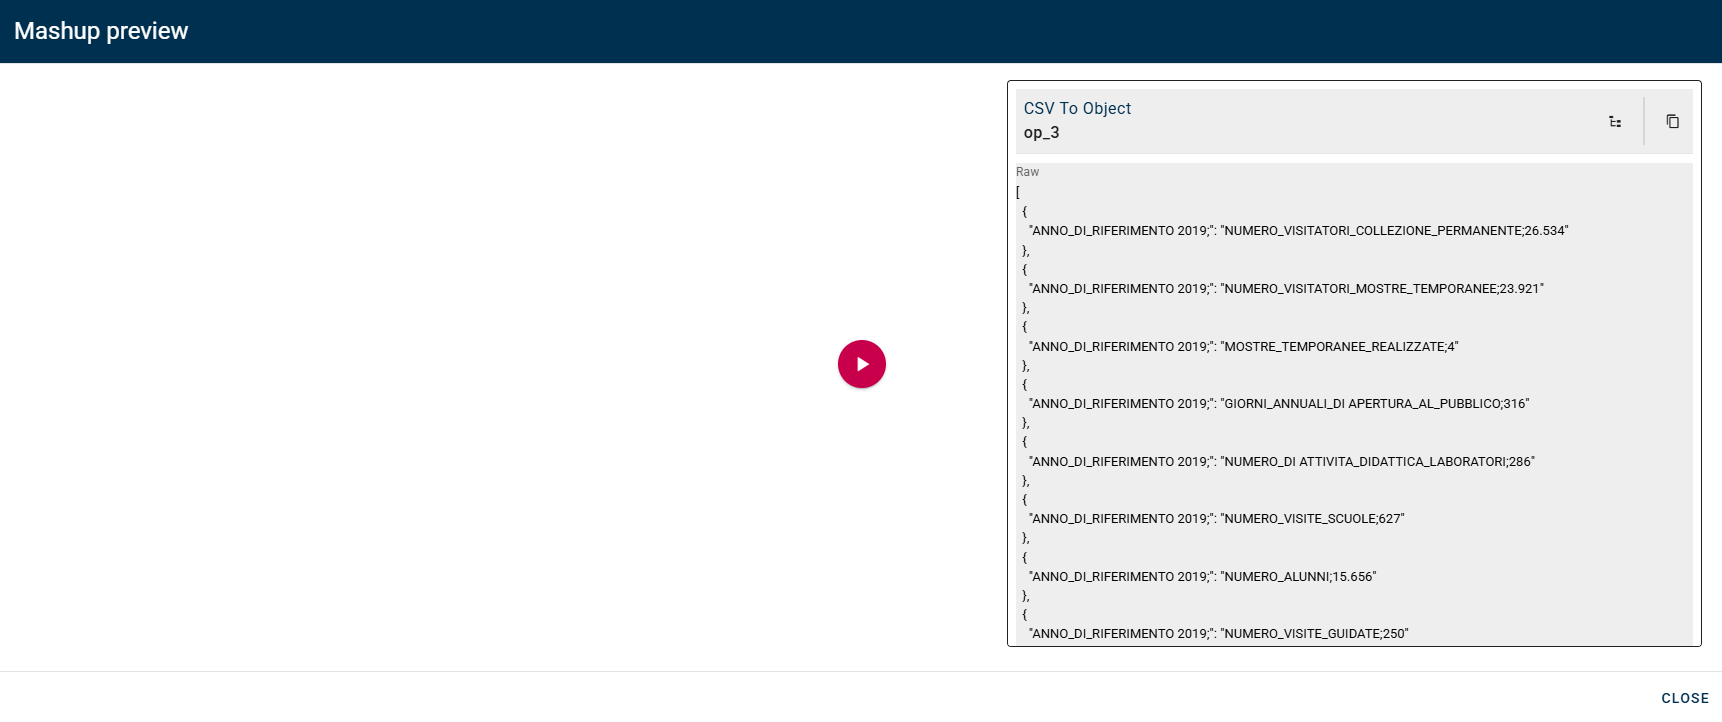
Click the SAVE button to see the preview of the conversion:
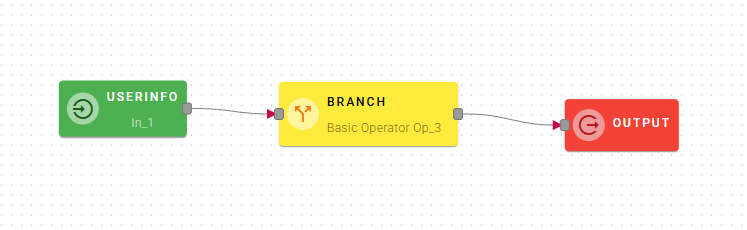
Branch
This operator checks a boolean Condition and returns True Result if Condition is true, False Result otherwise.
Input/Output examples.
How to use
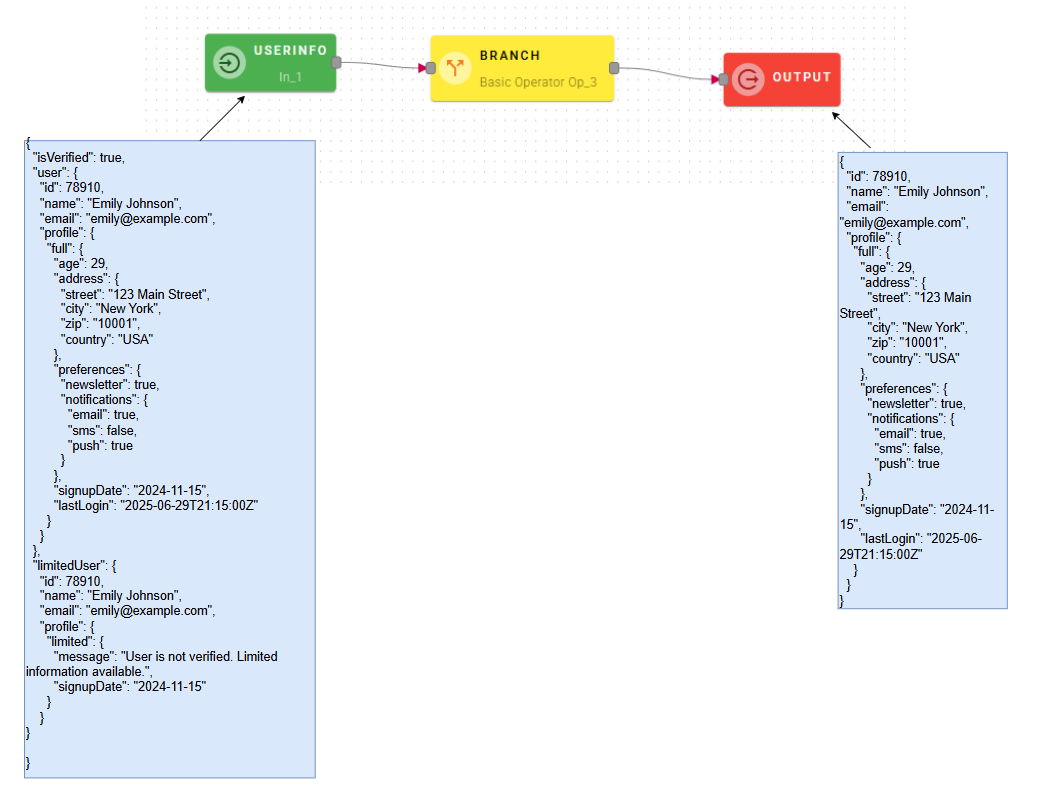
Connect your input to the operator, within the source tree, locate and select the input that contains the condition that you want to check. You can do this by clicking on the appropriate nodes within the source tree and drag-and-drop them into the Condition field.
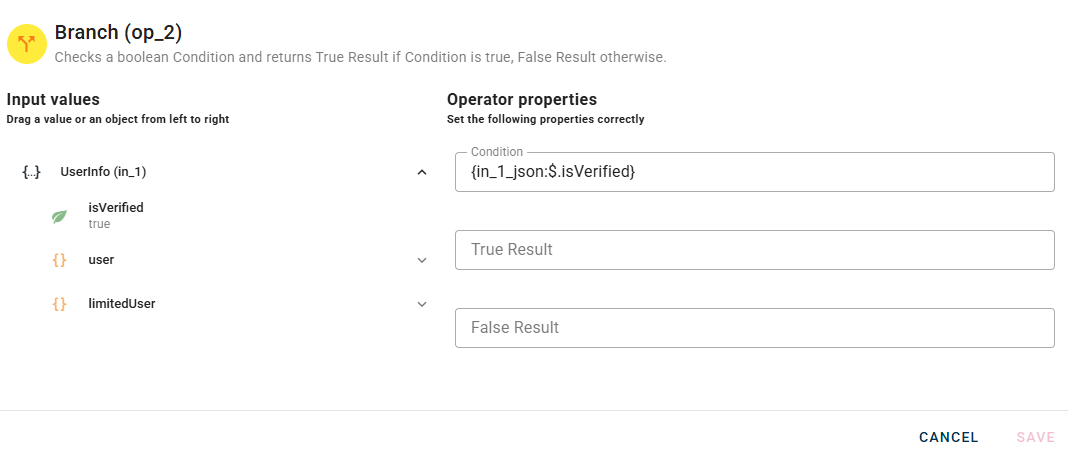
Once you drag-and-drop you condition there will be two new options for the operator:
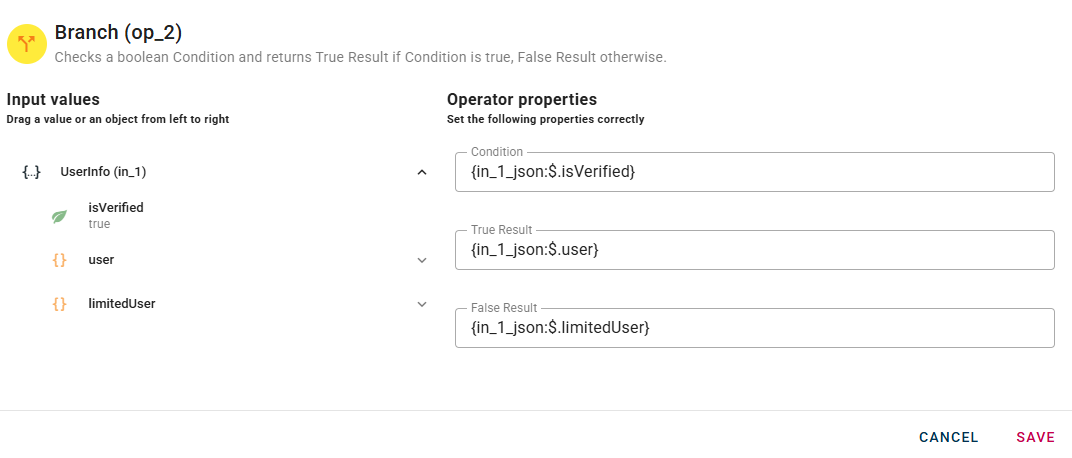
"True Result" and "False Result" are the output that you want to show when the operator returns one of them after checking the condition.
In this case you can see that I already gave them an alternative output, meanwhile in your modal when you drag-and-drop your condition they will be empty and will return a simple true or false as response for the operations. So feel free to write in this fields if you want to customize your mashup.
